Monday, November 29, 2021

Down Where It's Wetter

Contrary to what you might have heard in a song long ago, life is not much better down where it's wetter, as my bathroom vanity was not built to live under the sea.

But we don't always get to choose how we live, and so the moist life was thrust upon this poor, unsuspecting cabinetry.

Remember in a previous post where I said that whenever you see one of these accordion pipes under a sink, you know an idiot was the last person who touched it? Well, I now get to reap the mess they sewed.

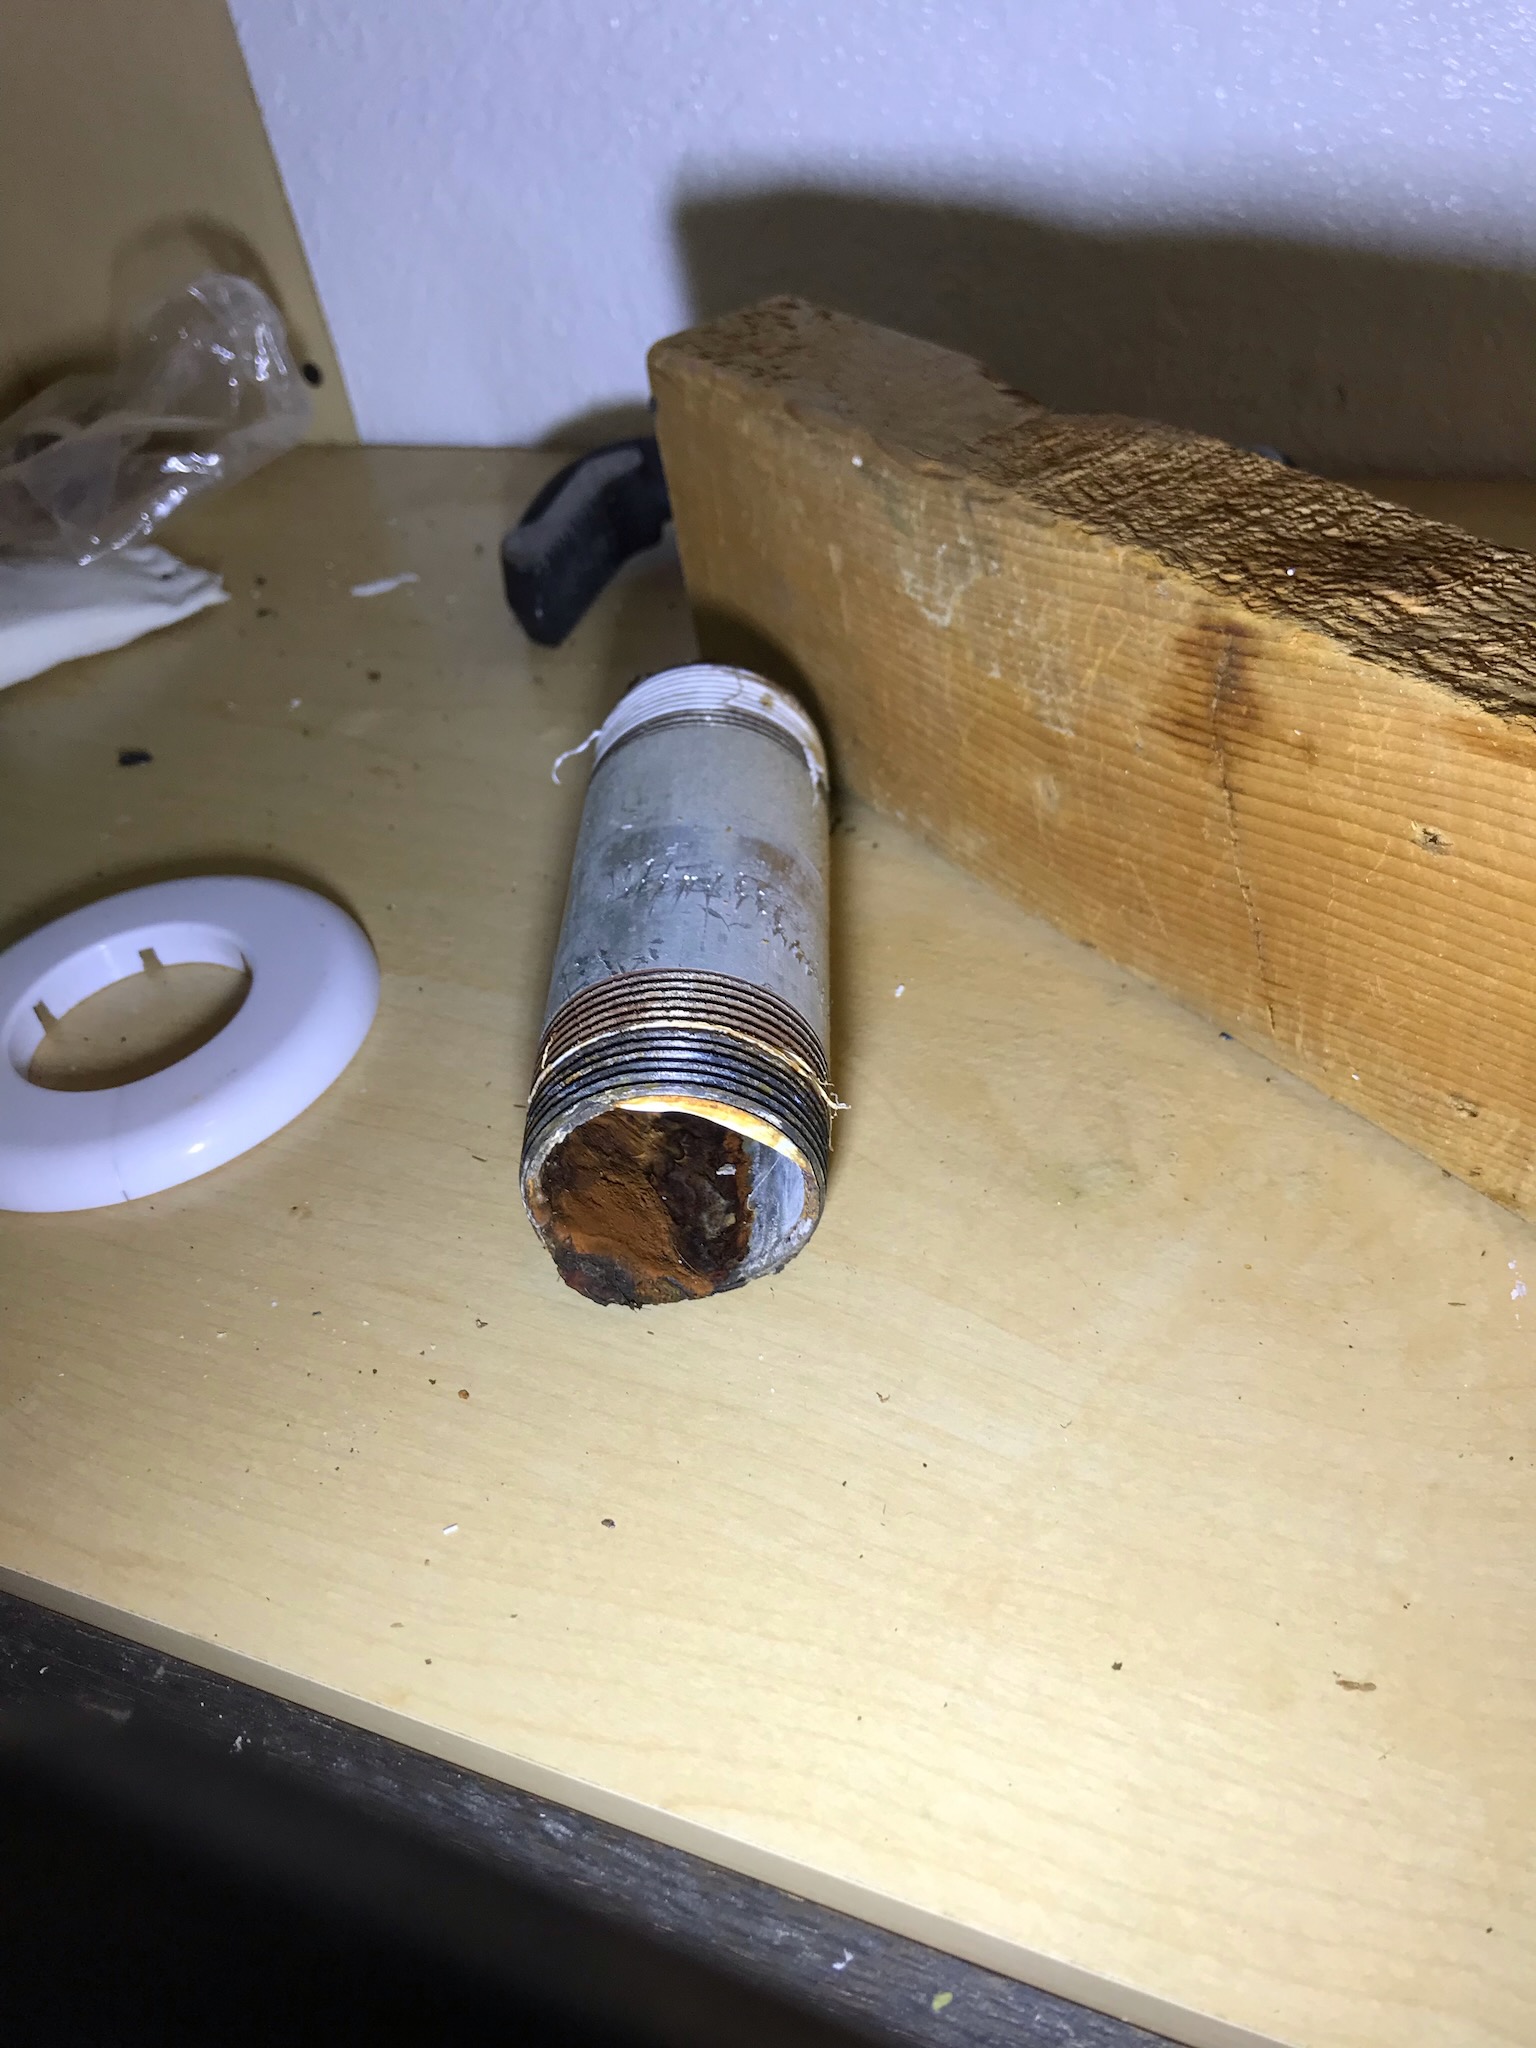
Basically, this problem all started because of the first little section of pipe sticking out of the wall. It's a 6 inch galvanized steel nipple. Setting aside the fact that galvanized steel is basically the worst barely-passable material to construct a drain out of, particularly a horizontal run where water will tend to sit (and thus rust it out), this particular pipe section is way too long.

So after this also-awkwardly-long ABS 1-1/2 male NPT to 1-1/2 female NPT adapter was added, the trap ended up sticking out a good inch or two past the tailpiece of the drain.

Which lead to this.

Yeah, water is not going to stay on the inside of that.

The threads on the cast iron fitting in the wall were gunked up and rusted to high heaven, so I needed to deal with that. A regular HSS 1-1/2 NPT tap is not a cheap thing to obtain, given how much high quality steel it takes to make one, but luckily you can get much cheaper carbon steel taps which, while not appropriate for cutting new threads in metal, are perfectly fine for chewing the rust out of old threads.

It is also highly effective when wielded as a weapon in hand-to-hand combat.

Luckily I didn't need to test out that half of it's capabilities, and instead just put its thread-cleaning functions to work.

Right, in you go. Thankfully a tap like this is stout enough that you can just crank on it with an adjustable wrench, which is nice because you don't usually have room to swing a standard tap handle under a sink, and certainly not one large enough to fit onto a tap like this.

You don't want to go too far with a tap like this, since it's tapered and you don't want to make the hole too big. You just want to go far enough to get back to clean metal and not rusted crap.

That'll do, tap, that'll do.

So, it's out with the steel and in with the plastic. Much, much shorter plastic. I also took the opportunity to size down to 1-1/4 since that's the usual standard for bathroom sinks.

Unfortunately the stubby length meant the fitting was too close to the wall for the escutcheon plate to fit on, so into the bin that goes.

Which is fine, considering that it wasn't properly covering the sloppily cut hole in the first place. Also it's inside the vanity, so who's even looking in there?

The important thing is all the new parts are in place and work perfectly, and none of them are made out of that stupid accordion-flex-pipe crap.

Of course, there's still a hole in the wall, so...

On with the hot mud. This stuff is a miracle of modern science: you just mix it up with water, slap it on as thick as you like, and 20 minutes later it's hardened up. Not like the pre-mix where you have to put on a super thin coat, wait days for it to dry, then apply another super thin coat, etc etc until the patch is complete.

With the first coat on, we apply the tape and second coat.

And quite frankly that's good enough for me. There's a tiny little area where it's a bit thin over the tape, but the hole is filled, the wall is basically smooth, and I'm not even going to bother painting it, never mind trying to match the wall texture.

It's done, it's dry, and as a bonus I even get a little more space under there to fill up with the usual under-sink crap.

Wednesday, November 24, 2021

Laurels To Rest On

I feel like I'm well past due for resting on my laurels, but as it turned out I was rather shamefully short on laurels to rest on. Luckily there's ways to fix that.

Once again, it's good to have a van.

The Laurus Nobilis is in fact one and the same laurel as the tree from antiquity. Though, to be fair, the Saratoga variety is a more modern hybrid of it, which has improved disease and insect resistance.

Of course, before I get to the resting stage I need to actually get this into the ground, and luckily I've got an empty spot just waiting for me to plant something in it.

I think there was originally another baby sage here, which died either shortly after I moved in or sometime before that. Baby sage is kind of a pain in the ass, though, so I'm not sad about it not being there anymore.

Before I stick the tree here, though, I need to get the dirt out of its hole.

Twice as wide as the pot, and just a little shallower than the root ball so that I can mound it up a little above the level of the surrounding dirt. There's two reasons for this: firstly, it's always good to plant a little high so as to not suffocate or drown the roots, and secondly, I'm planning to top-dress this area soon to bring the soil up to the level of the sidewalk and curb, as it's currently settled about 2.5 inches low.

That was a lot of dirt. And a lot of rocks. Luckily the rain a few weeks ago had moistened the soil enough that it wasn't like trying to chip away at solid concrete, so I didn't need to break out the rotary hammer for this one.

There was a bit of reasonably good soil here from when the baby sage was planted, but mostly it was just the heavy, sticky clay. So, I added some organic material to help amend things, and also to make up for the volume of the rocks I removed.

This soil was left over from the previous owner, and had been growing mushrooms for a while, which is just fine by me.

Anyway, time to get the tree into the ground. Let's see if it's root bound or not.

Hmm, that would be a yes. Not the worst I've seen, but I'll need to tease out those roots a bit. Luckily not a hard thing to do.

So, into the ground it goes, and with a little back-filling it's looking pretty good.

And rake the mulch back over to keep the moisture in.

You can hardly even tell I just filled in a huge hole in the ground.

And the 'after' shots.

Tuesday, November 23, 2021

Punch Tree, Get Wood

So in Minecraft, you are placed in a world equipped with nothing but your own two hands. The first task for most players is to gather some resources to build tools, and this is accomplished by punching a tree with your fist until you break off a log.

So, apparently that actually works.

This is where I usually park Scooty-Puff Sr and Rabbit Season. It's probably a good thing I moved them out of the way.

The other branch I slapped silly had less interesting things to fall on.

Just a fence. And, well, my gas meter maybe.

Nothing important, certainly.

As we can see, these limbs on the tree were more termite than wood.

Which is kind of fortunate, as it made them much lighter to carry to the curb.

I don't really like this tree at all, and now there's less of it, so I guess that's an improvement. I should probably get the rest of it taken down before it falls on the neighbour's car hole.

Sunday, November 21, 2021

This Is America

America: Why is everyone so fat?

Also America: This seems like an appropriate amount of brownie to eat in one sitting.

Unpaid Rent

I woke up this morning to discover an odd pile of debris on my front step.

When I saw it on the security camera I wasn't sure if it was a pile of nuts, the remains of a dead bird, or something else. As it would turn out, it was something else: dead leaves and little bits of chewed up spray foam.

Now I wonder where that could have come from? Hmm.

Hmmmmmmm...

Ah yes, that would be it. Time to knock on the door.

Sir, we need to have a word about your unpaid rent, it's really starting to become a problem.

Perhaps two words would suffice:

Get.

Out.

Friday, November 19, 2021

ReCaking

Second batch of cakes. Preparing them took a bit less effort than the first, now that I'm all practiced up.

I'm thinking of slicing these up into 5 pieces each and eating them on weekdays over the course of two weeks, rather than 4 pieces each and consuming them in one week total. I generally only have hot coffee on weekday afternoons which this cake pairs nicely with, and stretching it out will mean half the calories per week, plus I only have to bake every second week rather than every week.

I find it interesting how different the two cakes turned out. The closer one puffed up with a very rounded dome in the center, whereas the one in the back rose to the same height, but with a bit of a dip between the center dome and the edges, making almost a W shape. There was no difference in the two batters (it was just one batch split in two), or in the baking (they were both side-by-side in the oven), or really any other variable I can think of. I suppose they just decided to be different.

Ah well, they should both taste great.

Sunday, November 14, 2021

Getting Toasty In Here

So on Friday I ate the cake fresh, on Saturday I ate the cake leftover, and for Sunday's cake, I experimented with toasting.

Into the sauna you go!

And apparently my iPhone gets very confused about white balance, the cake is not actually glowing red hot in this shot.

It's also not burnt around the edges, just a bit dark.

All in all it's not too bad this way. Nice crispy shell, warm and soft inside. It does take quite a long time to toast though, due to the density and moisture content, so I think it might just be an occasional thing for me. Who knows, we'll see.

Friday, November 12, 2021

It's a piece of cake to bake a pretty cake

I recently decided that I want to have cake. Part of this was due to picking up a package of chocolate croissants to toast nibble on with my afternoon coffee, and part of this was due to learning about the fascinating world of toasting poundcake. Part of it is that cake is just fucking delicious. Whatever the reason, I wanted it.

Now while I could have made an actual poundcake, I have strong moral objections to modern recipes which call for ingredients other than one pound each of eggs, butter, flour and sugar, while at the same time recognizing that those bastardized abominations do, in fact, produce a far superior cake. Instead, I opted for an olive oil cake, which results in a cake in the same general genre without the baggage of historical inaccuracy.

Of course, I say I made an olive oil cake, but the truth is I had a bottle of walnut oil left over so I actually used that instead. We'll just keep that as a little secret between us, nobody else needs to know.

It all starts with preheating the oven (which I obviously didn't take a picture of) and greasing the cake tin.

Which, as you'll notice, is already a deviation from the recipe, which calls for a 9 inch round. As such, I actually waited until I was about half way through the prep before I greased these, just so I could be certain that I'd be using two and not just one. I wanted to use these 1lb loaf tins in order to steer things back towards the poundcake aesthetic, which means making a cake-loaf.

Anyway, with that time skip out of the way, we get to the real first step: zesting and juicing one lemon.

This isn't the perfect type of rasp for zesting a lemon, as the zest tends to get stuck in between the punched rasp teeth, but it does nicely pulverize the zest which is actually quite good for this type of recipe. A toothbrush is a vital tool when it comes time to get the zest off of the rasp. As for juicing, a fork does the job nicely, a reamer is not required.

Next up, the dry ingredients get mixed together. Not much to say about that.

Now to the eggs. One of the other requirements I had going into this is that the recipe had to use three eggs. Not four, not two. The reason being that eggs are only sold in certain multiples of 6, and I don't want to end up keeping a bunch of excess eggs in my fridge for months at a time. With a three-egg recipe, I can use up a half dozen eggs with two batches.

Remember to crack your eggs into a bowl one at a time, just in case an unwelcome surprise is hiding inside one.

With the wet ingredients together (sugar is almost always considered a wet ingredient), it's time to beat the mixture until it forms light, creamy ribbons.

This handheld mixer was perhaps the best $20 I've spent recently. I think this photo was taken after the step where you emulsify the oil into the mixture, but I can't quite remember. Either way, make sure to do that.

Next up we do the dry-wet-dry-wet-dry additions.

And with a little gentle folding to avoid taunting the gluten (I was using AP flour in order to give the cake a bit more structure so it would be less likely to fall apart when toasting), it'll look a little something like this.

Into the loaf pans it goes.

And then we let the magic happen.

Until the internal temp measures around 190°-200° freedom degrees. And looks a little something something like this.

Then it's on to a rack until it's cooled enough to not burn your fingers.

At which point it's time to pop them out of the tins. To do this, simply make a cake-sandwich and invert it.

Then remove the tins.

And use the same technique to revert.

Once it's cooled completely, enjoy delicious cake.

I know I will.