Thursday, November 30, 2023

A Tense Situation

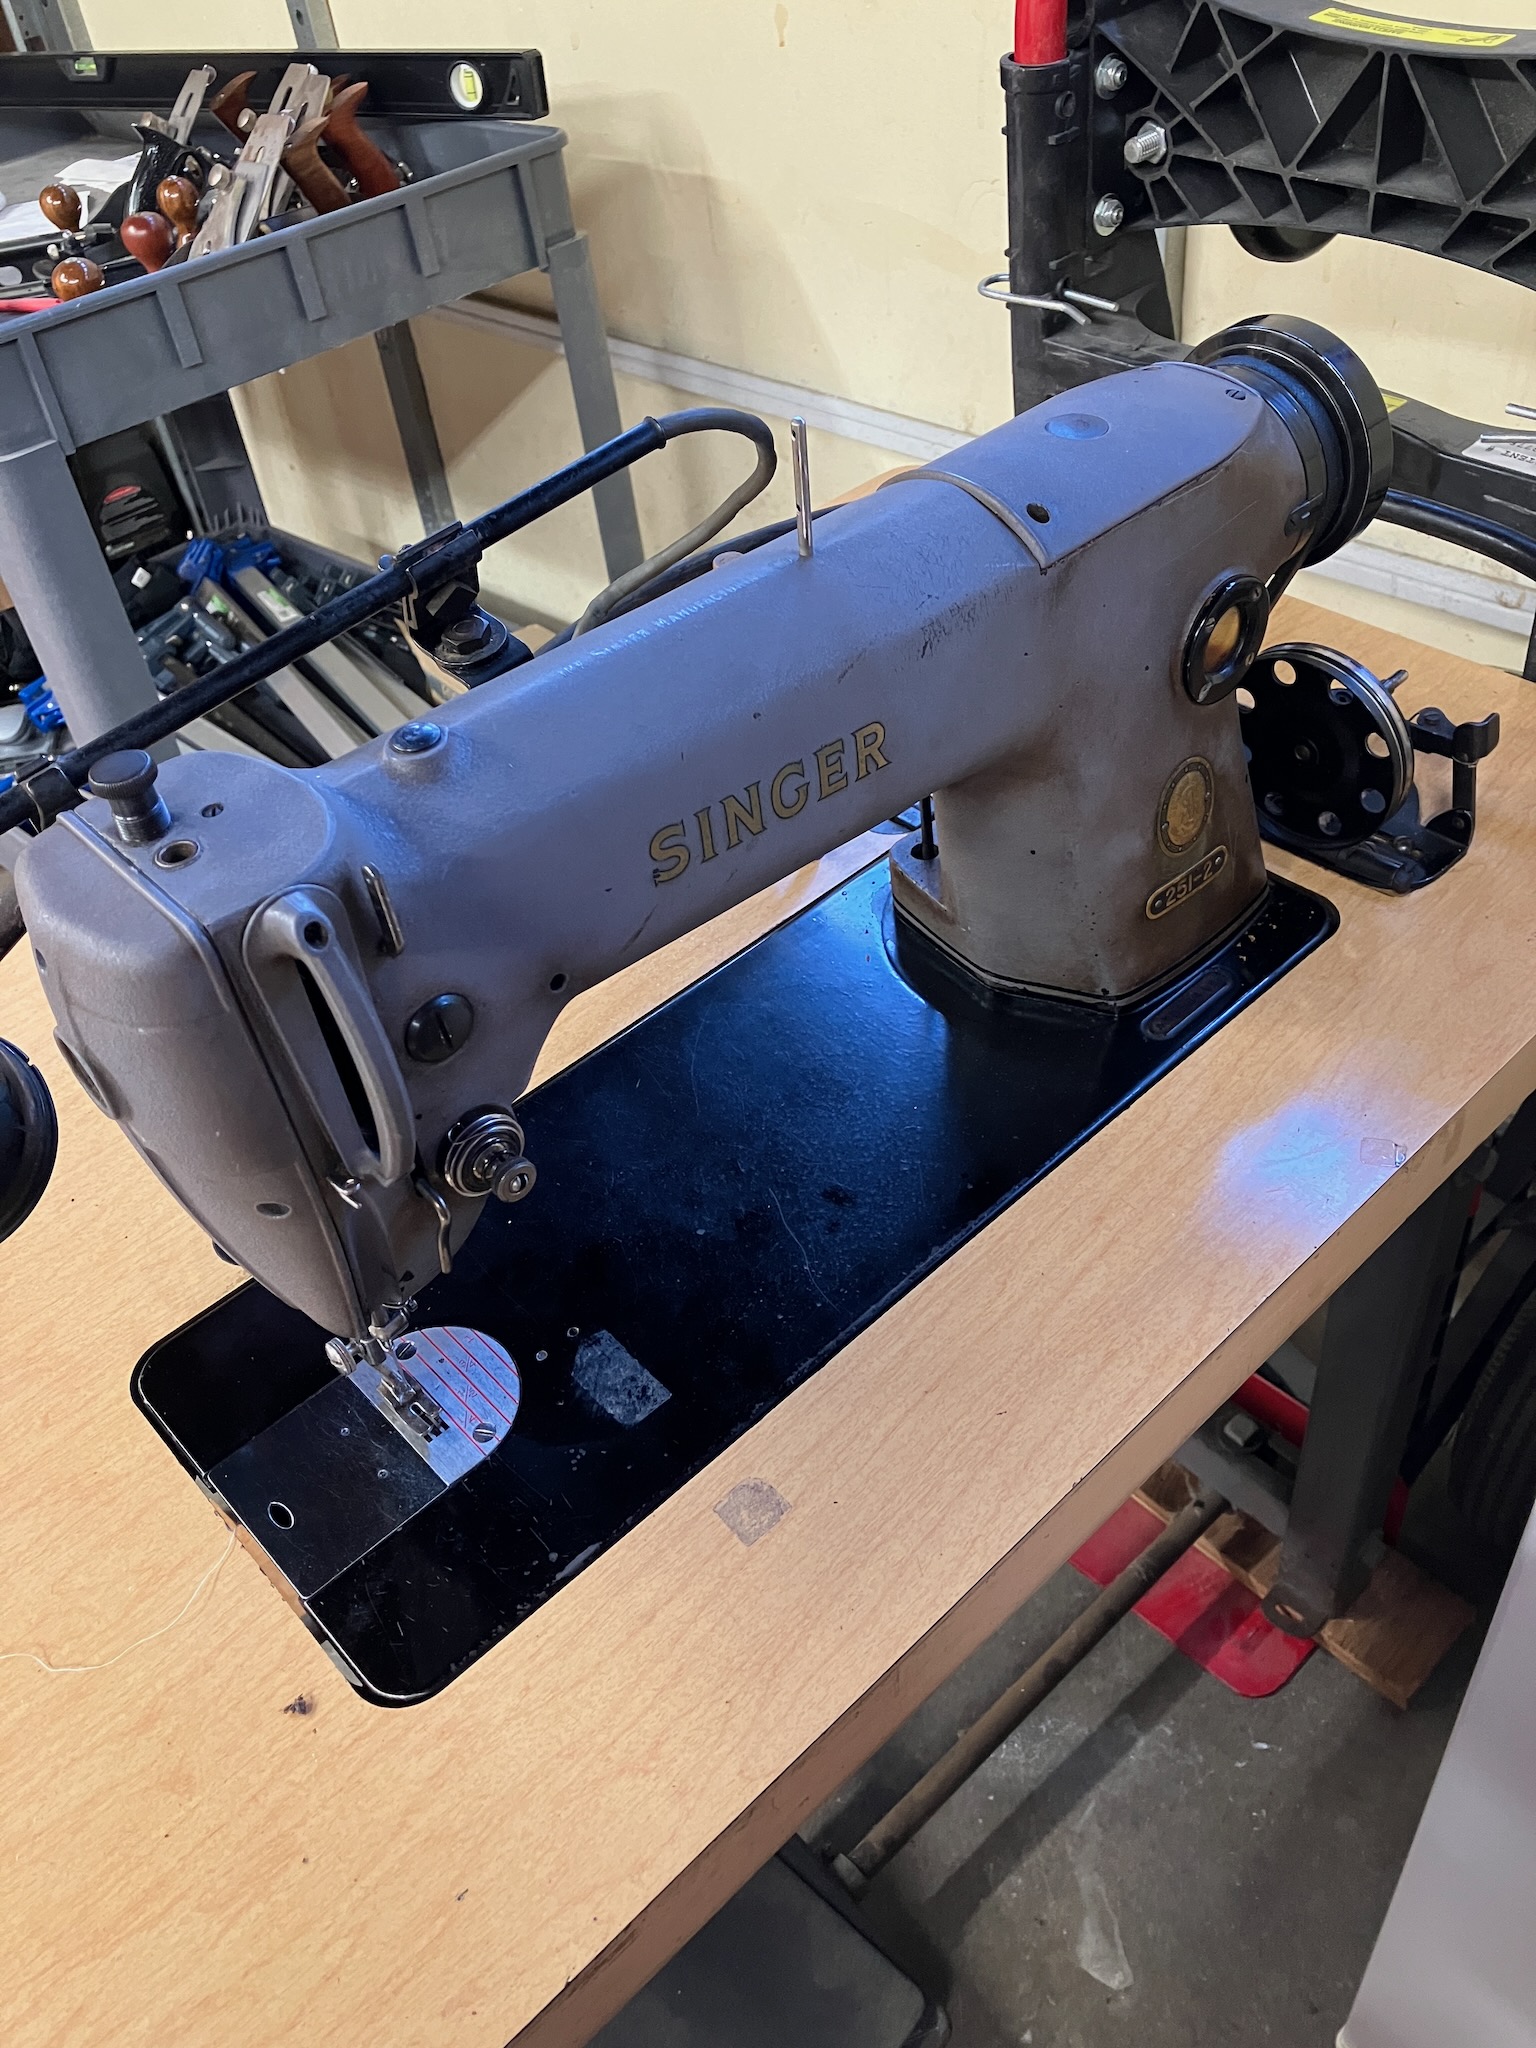
So I had mentioned in a previous post that I picked up this machine for the low, low price of free. The reason it was so dramatically discounted was because the people who owned it, having inherited it from an elderly neighbour (likely the original owner?), could not figure out how to make it sew. "It just makes loops of thread under the fabric" the Craigslist post said.

For those with a keen eye, you'll recognize immediately that there was no problem with the machine at all.

In fact, what had happened was that the machine had not been properly threaded. The needle thread was sitting on the outside of the tension discs on the face of the machine, rather than between them as they should have been. The timing was also a little bit out of adjustment, but was close enough that it should have been serviceable.

So, the first thing I did when I got the machine at least reasonably cleaned up was to rethread it properly and adjust the tensions. The bobbin tension was way too high to start with (people have a tendency to, for whatever reason, try to tighten down the tension screw on the bobbin case all the way, resulting in way too much tension on the bobbin thread), and the tension on the needle thread was equally too high to match.

I loosened off the bobbin and the needle thread, stuck in a reasonable substitute for a piece of fabric, and sewed a perfectly respectable line of stitches.

Or two lines, I guess. And technically this is after I fixed the timing.

However, something was still amiss, and it was in fact the reason that the machine had been misthreaded in the first place.

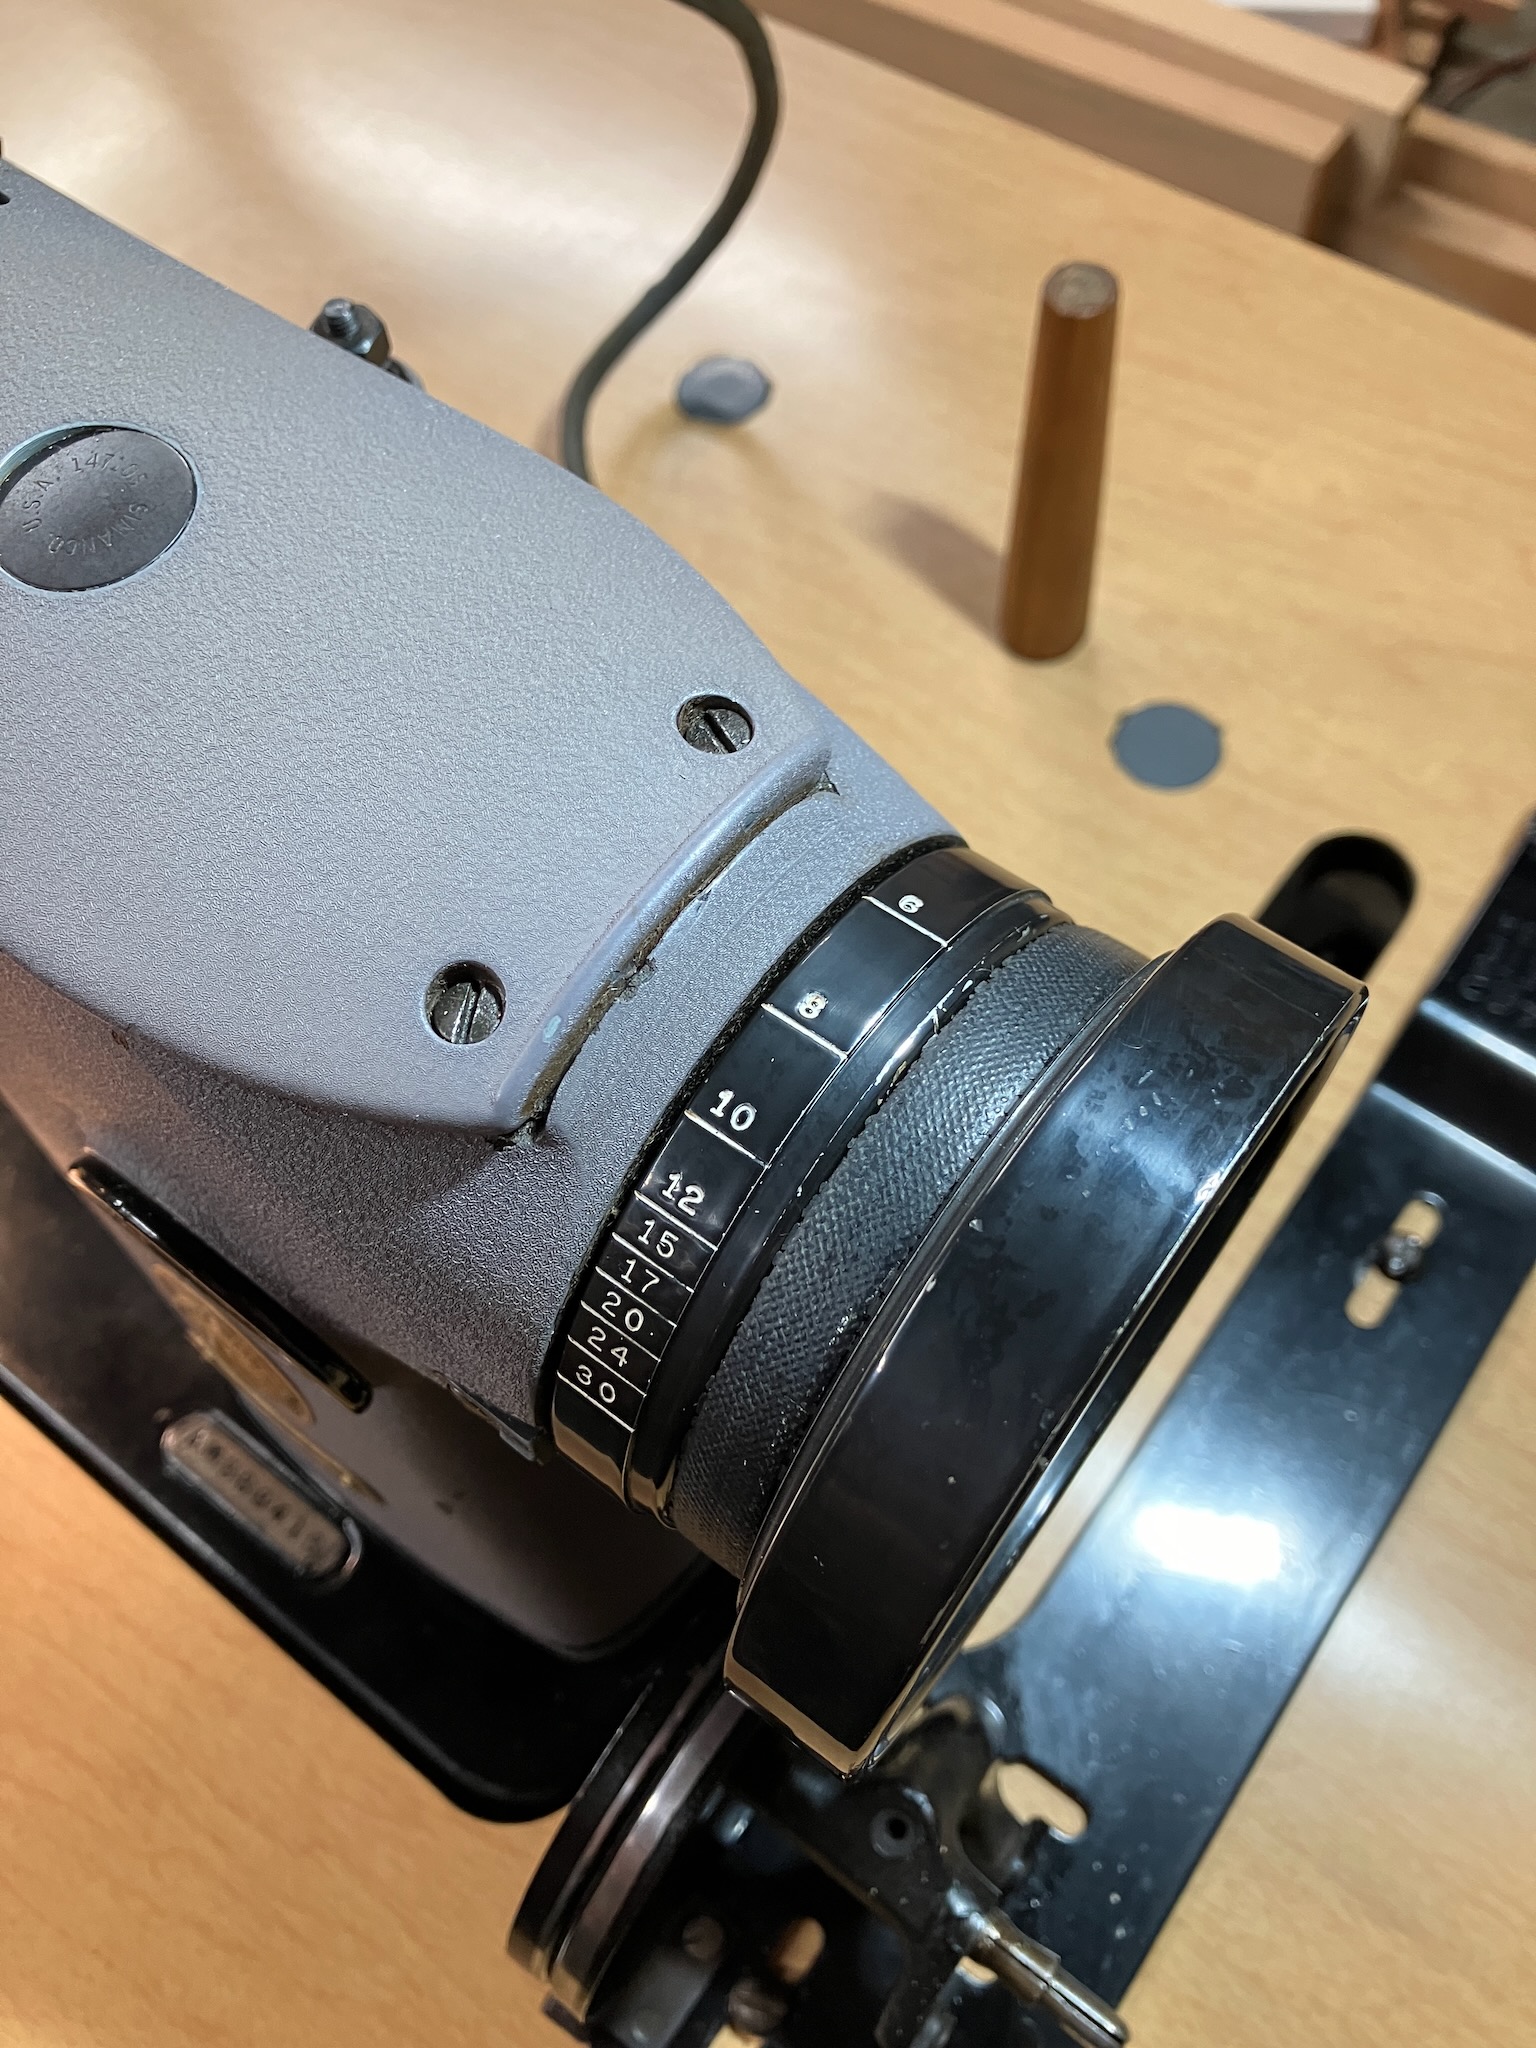
You see, on the back of the tension unit, there's a small pin that sticks out. This pin actually goes right up through the center of the unit all the way to the front side where it rests against the spring plate.

When you raise the presser foot, a small lever pushes on this pin, and that forces the spring plate away from the tension discs.

It's not super easy to demonstrate in a photo, but the tension discs are loose here because I'm pressing the unit down against the bed of the machine and the pin is being pushed up against the spring plate.

Anyway, this lets you do two things: it lets you pull the fabric out of the machine without fighting the needle thread tension, and it also lets you thread the machine more easily, as the needle thread can just slip in between the slack tension plates without having to be forced between them.

But, over time, say over the course of 67 years, this pin, lever, and spring plate can wear to the point where raising the presser foot no longer takes the spring pressure off the tension discs.

This is a very common issue, and luckily has an easy fix: spend $12 to buy a whole new tension unit.

Of course this means I'll now need to readjust the take-up spring tension and position, since it's integrated with this tension unit, but it's a small price to pay for getting the presser foot tension release functionality back.

The Secrets of the Old Ones

The ancient texts wrote of a mysterious concoction, one which could rend lipids asunder, stripping them from the carcasses they cling so tenaciously to. This elixir was thought to be lost to the ages, but as it turned out, it did not intend to remain lost forever.

A hopeful sign, a glimmer of light in the darkness.

The revelation of that which has been obscured for longer than any living soul can remember.

A glimmer of light, of hope, reaches things which had been condemned to the shadows, until finally a lost beauty is revealed.

Shining as bright as the full silver moon on a cloudless night.

Yes, a screw is missing, we'll get to that later.

So the secret here turns out to be remarkably simple: household ammonia. For the longest time I had dismissed ammonia-based cleaners because I assumed that it was primarily a foul-smelling disinfectant. What I didn't realize that its method of action was in fact saponification, the process in which esters, the main components in oils, are basically cleaved up into soap.

Since the gunk stuck to this machine was essentially dried on oil, this chemical reaction was fantastically effective in melting away the grime without harming the paint at all. It didn't even touch the pad printed Singer logos (though I did experience a bit of fading on the top logo, which had started to wear thin already, though I think that was mostly due to mechanical action of wiping the grease away) which had been a major concern when I was using the isopropyl alcohol as a solvent to try to loosen up the grime.

It even cleaned up the stitch length indicators, changing them from a dingy beige to a nice bright white.

Truly magical.

A Foot In The Door

A sewing machine can't really sew without presser feet, and though the machine came with a straight stitch foot in relatively good shape, I decided to roll the dice and try buying a variety pack of feet from Amazon.

The first thing I wanted from the kit was the pair of thumb screws it came with. These are usually used for screwing the foot onto the presser foot bar, but they're also used for securing the t-guides to the sewing machine's table.

And they do that job perfectly!

However, this is where things took a bit of a downhill turn. As I soon learned, the discount presser feet were not really worth even the low price I paid for them.

In case it's not obvious, this is not how presser feet are supposed to work. This was admittedly the worst of the bunch, but even the ones that were close to being good were not great.

Like honestly, how hard is it to just manufacture these correctly?

I sorted the feet into three piles, based on whether they immediately caused a needle strike, almost caused a strike, or were actually suited for purpose.

And of the 25 feet in the kit, 12 were completely unusable, 10 were marginal, and 3 whole presser feet were basically within tolerance.

Pure garbage. It's a good thing that Amazon has an easy return policy. Lesson learned: never trust CKPSMS.

Keep It Secret, Keep It Safe

I don't actually mind if my neighbours find out that I have a new industrial sewing machine, but I'd rather not announce it by way of having a house fire. So to that end, we've got a bit of overlooked maintenance to take care of.

First up is the clutch motor. It needs a little bit of TLC.

To say that it has a little lint in it is maybe a wee bit of an understatement.

This is the clutch disc, if you're curious. The friction material visible on this face presses up against the motor's flywheel, which allows it to transmit power into the belt. On the opposite side is a stationary braking disc which the friction material on the other side grips against to allow you to stop sewing instantly. The lint is not part of the original design.

But boy howdy there was a lot of it, and this isn't even counting the remaining bits of lint that I blew out of the clutch assembly, nor the lint I blew out of the motor, using my compressor. Needless to say, it's much cleaner now.

Next, we have that cord to deal with.

Knocking off the ground lug is bad enough, but also bending the prongs to fit a 240v plug into a 120v socket? Come on.

Really, how hard was that to do?

Now this next item wasn't really a safety issue, unless you count bits of rubber flying off into your eye, or the belt possibly snapping, but it definitely was some overdue maintenance. The main drive belt needed replacing.

I went with a slightly shorter belt since I had plenty of slack in the motor adjuster, and I figured that this way if I wanted to put a smaller pulley on the motor to slow things down a little, I might be able to get away with it without buying another new, shorter belt.

I probably could have gone a little shorter still, but being in the middle of the adjustment range is a good place to be.

And for those of you wondering, I ended up installing a 3L-440 size belt.

And it wasn't a moment too soon.

But on the other hand, perhaps I'm being too harsh on this poor old belt. I probably could have gotten a few more miles out of it, right?

What's It Got In Its Pocketses?

Every sewing machine table comes equipped with a drawer, and it's always a surprise to see what lurks inside. The table for my Singer 251 is no different, so let's have a look at what goodies await!

At first glance, this looks like the usual treasure trove. I'm not sure I'll be able to make use of that lipstick, but it does look like the original set of Singer screwdrivers is included. Let's empty things out and have a closer look.

A little history of the machine, it was clearly owned by a professional seamstress in its past life.

And it's not hard to guess what part of the world she likely had ties to.

A lucky find in this drawer was two spare needle plates. Both had obviously been used, but one of the spares was in much better shape than the one which was installed on the machine.

The black one was a little worn under the presser foot area, and didn't have any stitching guides, so I passed on that one. The one with the red markings was the one that came installed on the machine, and the needle hole...

Well, I suspect there was more than a few broken needles in its past. I didn't really trust it to not snag and tear the thread, so I swapped it out for the other spare one with the white markings.

Moving right along, the drawer also contained... a tire gauge, for some reason.

I suppose that's handy to have, in some situations. Not sure what you'd use that for in a sewing context.

The rest of the drawer's contents are much more sewing related.

There's the aforementioned screwdrivers, some T-guides, oddly a quilting guide with no way to actually attach it to the machine, a tape measure, some chopsticks for turning out corners, some hooks and eyes, a scattering of safety pins, some tailor's chalk, some lead coat weights, some random mystery hardware, and of course a pile of buttons.

But we have ways of dealing with buttons.

Oh, and naturally, an obligatory googly eye.

I also got quite a number of bobbins with no spools of matching thread. I'll likely use these for basting and sewing toiles, as most of it is probably fairly old.

The original manual is of course a treat to find, along with the original oil can. How do I know it's the original oil can?

Let's just say that it's a solid hunch.

But of course, no oil can is complete without oil, and we've got that too.

I'm expecting that it's probably not good anymore, but it is kinda cool that it made it all this way.

Nico's Home for Wayward Sewing Machines

So this followed me home.

What can I say, it was free.

Anyway, what we have here is a Singer 251-2 industrial sewing machine.

The 251 is a straight stitch single needle drop feed machine, and the -2 indicates it was equipped from the factory with the needle plate and feed dogs for medium weight fabrics, though those are pretty easy to swap out and, as we'll see later, probably were.

It's also a touch dirty, but this is to be expected for a machine that's been in service since 1956.

It's also had a few... interesting modifications, let's say, during its lifetime.

Yes, that is a 240v10a plug, with the ground lug snapped off and the blades twisted to fit into a 120v15a outlet. Oddly, even though the switch box is specced for 240v, the motor is a 120v unit. I expect it was probably swapped out at one point; the original was likely a high speed 3450 RPM 240v unit, whereas the motor that's on there now is a 1750 RPM 120v one.

We'll come back to this plug later. For now, we need to do some cleaning.

Some Simple Green to start with took off a lot of grime, but didn't really touch the old, caked on, dried out oil.

We can at least see the serial number tag a little more clearly, though.

And experimenting with dissolving the old oil with isopropyl alcohol showed some signs of success, but I got worried about it possibly dissolving the paint as well so I didn't push my luck.

Not all hope is lost, though. We'll revisit this grime situation later. For now, though, we have more things to deal with, which will continue in the next blog post.

Tuesday, November 21, 2023

ConcreteImpl

One of the concrete slabs on the west side of my house has been a thorn in my side for a while.

It's pretty ugly looking, which isn't a big deal since I never go on the west side of my house in the first place, but what's more concerning to me is that the combination of the sunken middle, the giant crack running through it, and the failed previous patch jobs, have turned it into a giant funnel that captures rainwater and soaks it into the ground right next to my house.

As you might imagine, that's not super.

So, step one is to clean off the moss.

Along with sizeable chunks of failed concrete.

Step two, go get some supplies while things dry out a bit (but not too much).

Now you might notice something missing here, namely gravel. Usually concrete is made with a mix of portland cement, sand and gravel, in varying ratios but commonly a 1:2:3 mix (since it's easy to remember). However, I'm trying to skim an existing slab, and regular concrete mix is nearly impossible to spread out in a layer less than 2 inches thick, due to the chunks of gravel in it.

So instead what I'm making here is known as "sand mix". As you might imagine, it's a concrete mix with, well, sand. No gravel. This actually makes a very strong product, though it tends to be a bit more expensive than standard concrete since you miss out on about half the volume that would normally be provided by the gravel. But as a tradeoff, you can actually spread it right down to basically a feather edge. I'll need to do that in places.

Anyway, we've got our supplies staged.

So it's time to mix.

I'm aiming for a very stiff mix here since I'm not using any formwork, so I want the concrete to be self-supporting around the edges.

This first batch is actually ever so slightly on the loose side, but I'll be feathering it into the slab on the far end so it'll work out to my advantage.

One other important task here is to apply a bonding agent, so that the new concrete actually adheres to the old stuff, unlike the previous patch attempts that just flaked right off.

I've heard that this stuff is just watered down PVA glue, and some people actually just use watered down PVA glue, but the actual bonding agent is pretty cheap so I just bought it pre-mixed. I only maybe used 1/3 of the gallon jug here.

I didn't take any in-progress pictures of spreading the concrete, because I was busy spreading the concrete, but here's what it looks like after the initial troweling.

I mixed up three batches of concrete (1 bag or 47lbs of cement to 1.5 bags or 90lbs of sand) and had about half a batch left over when I was done.

I'll let these rocks-in-progress harden up and then dump them in my regular trash one at a time over the next 6 weeks.

Of course just pouring and troweling the concrete is hardly sufficient, you need to float it after it's started to set up a little. Usually you can tell when the right time is when the bleed water on the surface has dried up, though this can vary depending on weather conditions, mix ratios, the phase of the moon, and so on.

The goal is basically to scrub the surface of the concrete with the float (not the trowel) to both even out the surface, as well as to make sure that the aggregate is brought to the top so that you don't end up with a thin layer of powdery cement on top with no sand for it to bond with.

Then it's just a matter of waiting for it to cure.

This is the next day, and the little white streak in the foreground is from a spot that I overworked a little bit while floating. The beige patches towards the house are a little bit of a mystery to me, but I think they might be spots that got a little dried out the previous day, as the sun was mostly hitting that side of the slab once I was done.

And speaking of drying out, the most important task is to keep the slab hydrated as it cures, so I'll be watering this regularly over the next few weeks.

Luckily the weather has gone cold now, so I don't have to be obsessive about spraying it down every hour or anything. Just once or twice a day should be sufficient.

This was quite a lot of work to do, but well worth it I think.