Saturday, August 26, 2023

The Changing of the Seasons

Apparently it's winter already.

I guess this is what a tropical storm looks like in the Bay Area.

What's also tropical is the number of bugs I've been running into this summer. There's been the occasional actual biting fly, like a horse fly or deer fly, which is annoying enough but not so common as to be troubling me. What has been troubling me is the hundreds and hundreds of smaller flies that swarm me every time I go cycling up in the hills.

They don't bite, which is nice (although confusing), but for whatever reason they insist on swarming directly in front of my face, occasionally bouncing off my eyeballs and getting sucked up my nose or down my mouth. No amount of swatting them away seems to drive them off, and the only way to escape them is to outrun them, which is not an easy task when climbing a 15% grade.

So desperate times call for desperate measures.

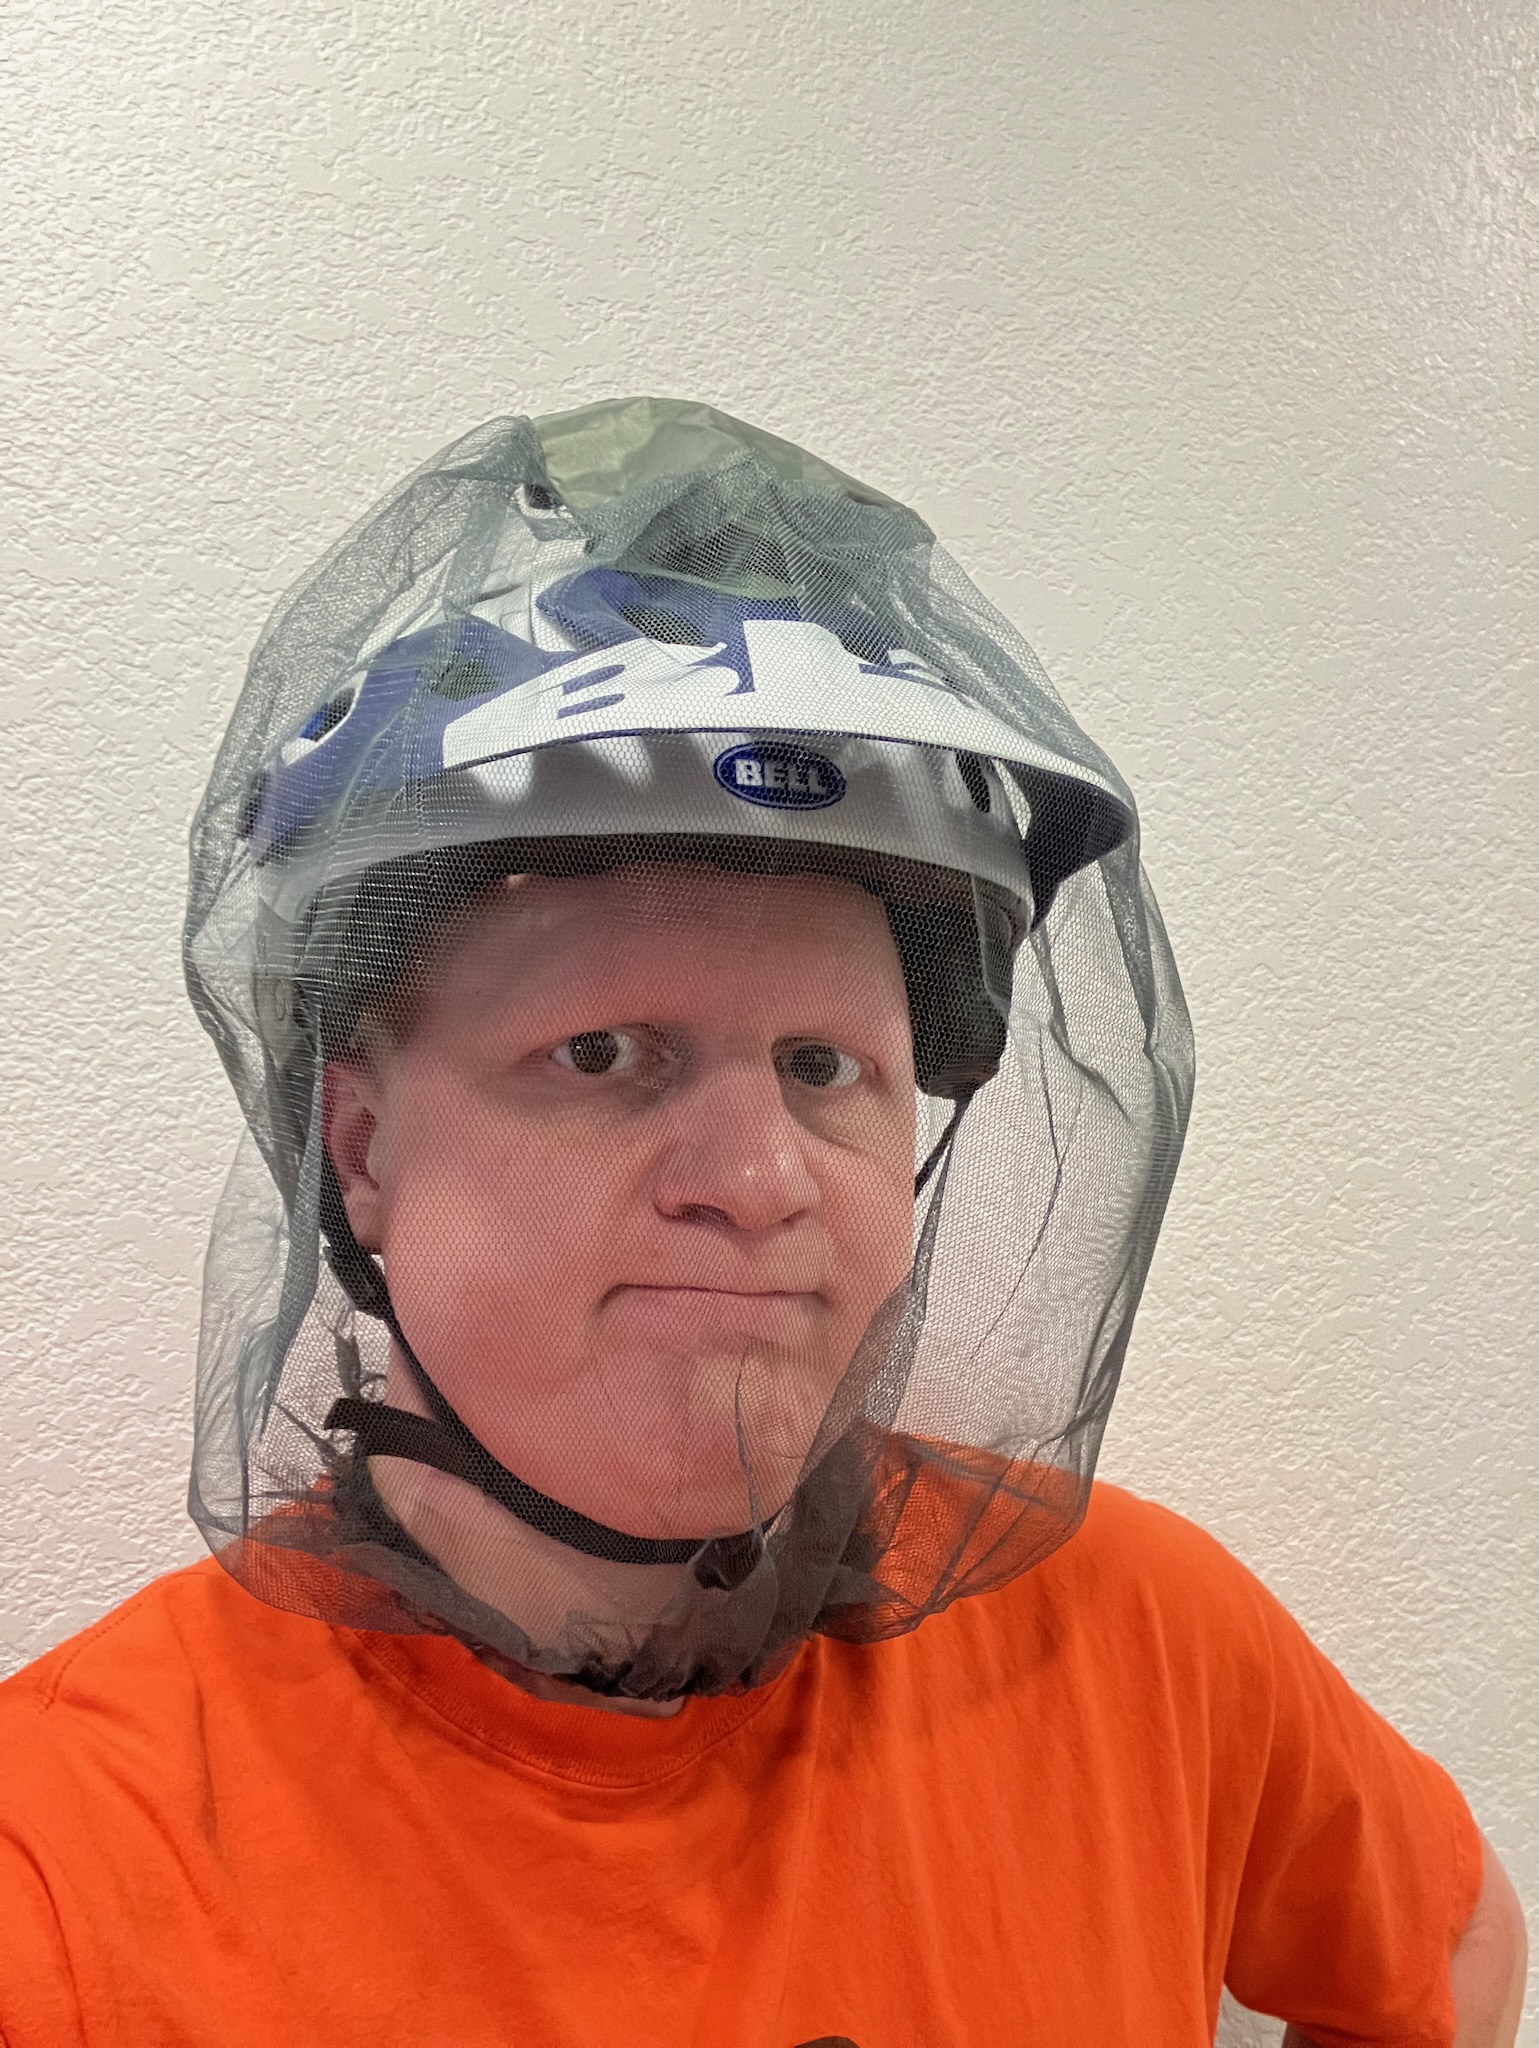
And it should perhaps come as no surprise that this bug net comes from a company in the mosquito capital of the world.

Curiously, I had always thought this company was named Colghan's. I also always thought that those bears were named Berenstein. I guess I really did cross over from the parallel universe, because this very clearly says Coghlan's.

Now I could just wear this bug net as is, which I have done for one ride, where I found it performed quite well. But, I figured it could use a little modification.

Specifically here, at the top, where there's a little circle(-ish) of nylon fabric.

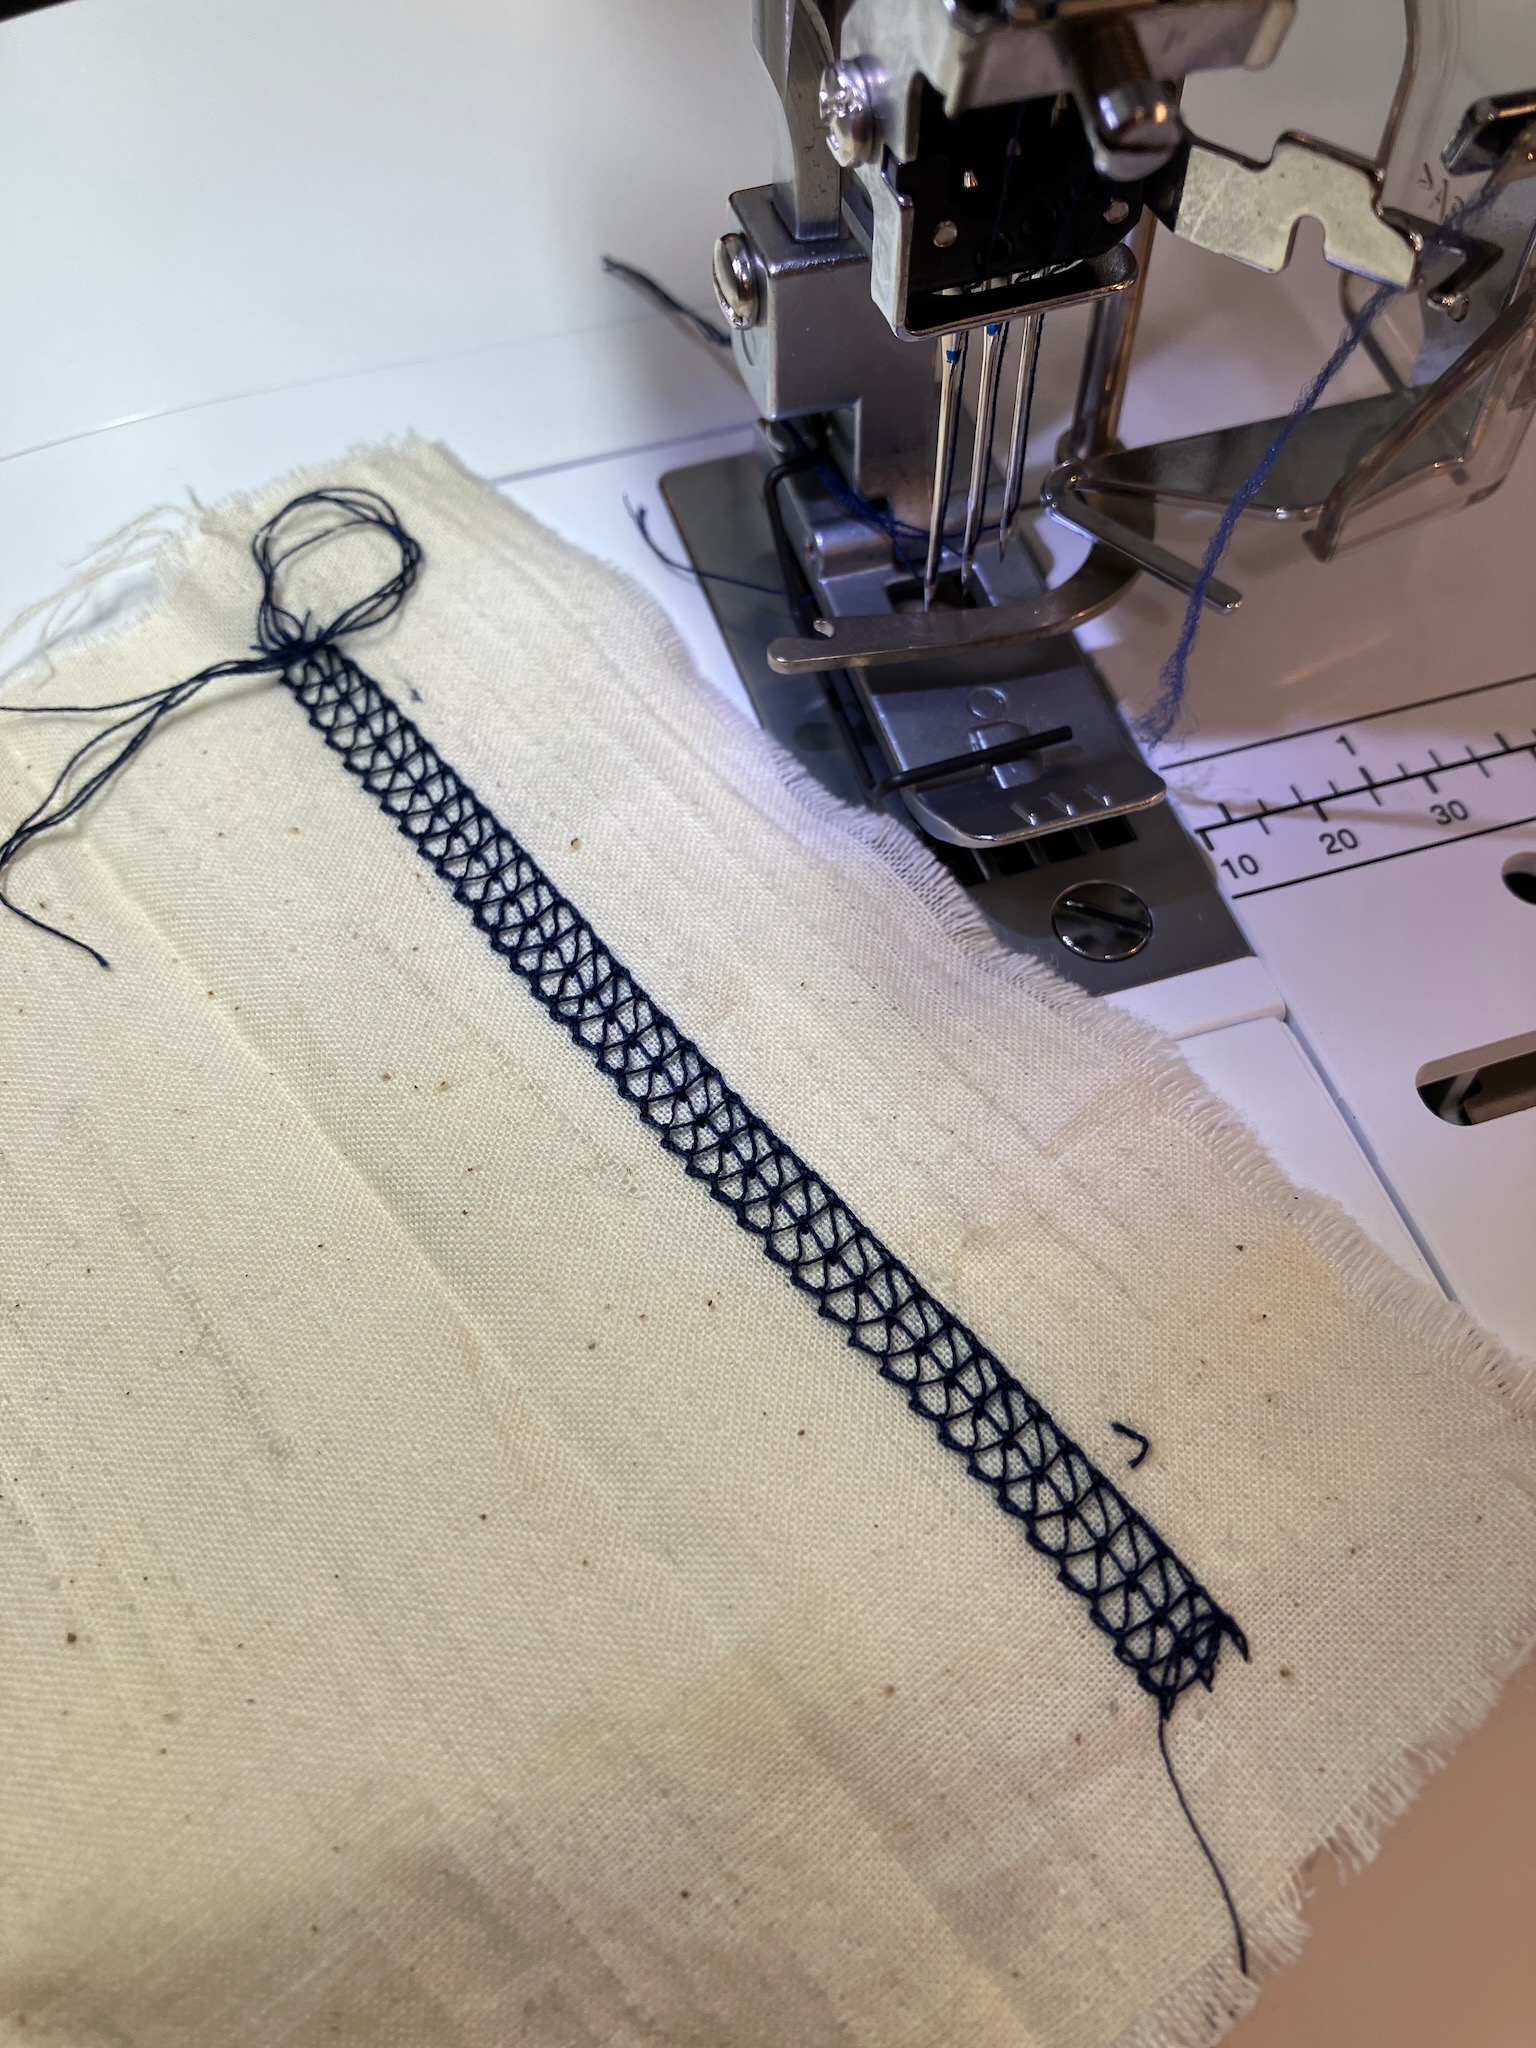
The first step of the process is to inscribe a set of chalk runes.

After which we must cut a strip of sacrificial cloth, marking it as well.

Next we bind the sacrificial cloth by piercing it with a life-thread, to close it into a loop.

The sacrificial cloth is then cleaved in two, then made as one with the original garment, binding their fates with a shared life thread, while ensuring that the runes are aligned.

The garment is then vivisected, and the sacrificial cloth is inverted, following the ways of the ancient ones.

Finally the wound is encircled, so that it will not grow to consume the entire garment, and yet the scar will always remain.

And now I can stick my 360 camera through it.

Why would I do that? Well, you know, reasons.

This is known as a double-welt pocket, by the way, though I didn't actually put a pocket on the backside. I suppose you could consider the entire inside of the bug net to be a pocket, if you wanted to?

Meanwhile, since I had the sewing machine out, I decided it was about time to refresh the elastic strap on my heart rate dongle again.

I kept things simple by not bothering to do a double-fold here, and I used a lot less elastic than last time as that strap ended up almost completely doubled-up once I had adjusted it to fit. This length is a much more reasonable use of material.

Did I use my fancy new coverstitch machine to do this sewing? No, definitely not. This is all regular lockstitch sewing.

Sunday, August 20, 2023

The Holy Grail, Almost

For a while now I've been on the lookout for a top-and-bottom coverstitch machine. Like any other coverstitch machine, the foundation of it is a three-needle chain stitch machine with a single lower looper. What separates it from these more common machines is that it also has an upper looper, which adds a thread that goes back and forth across the top of the seam.

Recently, just such a machine popped up on the 'ol fleabay, a Brother CV3550. One "buy it now" later, and this box showed up on my doorstep.

Mmm, internet shopping.

As you might expect, the machine showed up with almost no signs of use at all. I expect that the original owner bought it, got confused and frustrated with it, and then shoved it back in its original box until they needed to clean house. Given that the list price for this machine is $1700 and the price I paid was, let's just say, significantly less than that, I do have to thank them for taking the depreciation hit for me. Of course, like most list prices it's a complete lie, and the real price is more like $800, though that's still a fair bit more than I paid.

But enough about the financials, let's see the machine!

And a little close-up of the upper looper, where the magic happens.

The threading path for the lower looper is very simple, especially compared to my Singer Professional 5, which is a combination coverstitch and overlock machine.

Conveniently, there's also little snap-in spots for the spare needles, a set of tweezers, and the little hex key that you use to loosen the set screws holding the needles in place.

Also a convenient feature: the free arm. Granted, anyone who's used to the free arm on a more pedestrian lockstitch machine will find his hilariously small, but it's what you get with this type of machine.

Given that my Singer has basically no free arm at all, this is a nice step up.

So let's give this thing a test-drive to make sure everything is in order. A regular 3-needle coverstitch seems like a good place to start.

As expected, we get the usual three rows of stitching on the top side, and the looper thread on the bottom. This, along with its 2-needle variants (which this machine can also do), is very commonly used to stitch hems on garments. Generally the right needle (and center needle, for a 3-needle stitch) will pierce both layers of fabric, while the left needle will stitch just to the left of the lower layer of fabric, ensuring that the raw edge is trapped underneath the looper thread on the back.

Now let's spice things up by adding the top looper thread.

I used a wooly nylon in the upper looper here, just for the added dramatic effect.

Now this is very dramatic and all, but what functionality does it bring to the party?

Generally a coverstitch machine is not used for joining multiple pieces of fabric together to construct a garment, but rather only used for finishing hems and seams after they've been sewn together with a lockstitch sewing machine or an overlock machine. With the latter machines, this is done by placing the two pieces of fabric right-sides together, and stitching along the seam allowance. The overlocker will trim the seam allowance and encapsulate the raw edge with its looper threads, while the lockstitch machine will leave finishing the seam allowance up to the user. A coverstitch machine can't do that, as all the needles need to go through the fabric.

Now you might say that one could just overlap two pieces of fabric both right-sides up (or both wrong-sides up), and coverstitch through the overlap. With a regular coverstitch machine, however, this would leave one raw edge loose and unfinished, as the top side of the stitch only has the three lines of needle thread and no looper.

Ah, but my machine has an upper looper, and so it can encapsulate the raw edge on both the top and the bottom, making what amounts to the closest thing to a proper flatlock seam that can be achieved without resorting to industrial-level equipment.

Now a proper flatlock seam uses 4 needles, and looks a little something like this.

Two needles go through the fabric on the left, two needles go through the fabric on the right, and the upper and lower looper threads hold the two sides together. This type of seam is done on a machine that looks like this:

And that's not remarkably practical for home use, especially considering the price that those machines generally command.

So, with that style machine ruled out, I think I'll still be able to do quite well with what I've got. I've got a few projects planned for this, but I've also got a backlog of other projects that I've already started, so it may be some time before I get to them.

Saturday, August 19, 2023

A Gateway to Another World

Or perhaps just a gateway to my back yard. Which I suppose could be another world, depending on your definitions. But wherever it leads, every gate needs hinges to hold it up, and the hinges on my gate are... hingey, I guess.

The wood that they're screwed into, however, has dried out considerably though, and the screws are no longer doing a good job of gripping those parched wood fibers, leading to them becoming quite loose.

This does not bode well for the gate remaining a gate, and not a pile of planks scattered across the sidewalk. I did try to shore things up a few months ago with some construction adhesive, but the results were somewhat mixed, as evidenced by the screw I was trying to remove just spinning in place rather than backing itself out. It did end up requiring a little creativity to complete that screw extraction.

Why would I remove a screw, you ask? Well naturally to give me somewhere to drill a hole.

And that hole then becomes the new home for a carriage bolt.

Is it a bit long? Yes, but we'll get to that shortly. This length did pose a bit of a challenge in the meantime, though, as I do not own a deep 9/16 inch socket. Thankfully, like any civilized person, I do own a deep 14mm socket, which did the job just fine.

This carriage bolt would be a bit lonely just hanging out here on its own, so I gave it a friend to keep it company.

They're like two peas in a pod.

And at this point it should also be fairly obvious why one of them was looking quite a bit longer than necessary. I just picked up one size, ensuring that it would have sufficient length for what I'd be needing, with the plan to trim them down to size once in place.

Which was a fairly simple task.

These carriage bolts should do a much better job of keeping the hinge in place, given that they're going all the way through the wood and clamping it from either side, rather than just trying to grip against the wood fibers.

Yup, that's not going anywhere. To make doubly-sure, I also gave the nuts a little dab of Loctite 290 to keep the vibrations of the gate opening and closing from shaking them loose.

With the carriage bolts taking the majority of the forces, the remaining screws shouldn't have much trouble staying in place now. $6 well spent, I'd say.

Friday, August 18, 2023

The Gripping Conclusion

After the lacklustre results from my earlier science experiment with running grips through the dishwasher, I decided to fall back to the old, reliable methods of refreshing grips.

Which is to say: buying new ones.

Despite my attempts at cleaning, the old ones were just not going to return to their former glory.

Though I suppose I shouldn't have expected a trip through the dishwasher to replace the missing chunks.

Anyway, finding replacements for these was a little bit tricky. Santa Cruz still sells these ones, which are colour matched to the accent colour on this bike.

But unfortunately they're out of stock.

Thankfully PNW sells a similar colour, though the shade is a bit more seafoam blue rather than seafoam green.

It's just a little bit off. I think they were trying to go for Yeti Teal rather than Santa Cruz Seafoam.

That said, it's close enough that from any reasonable distance you can't really tell that it's not quite the right shade.

And certainly out in the wild the difference doesn't stand out.

It was on this ride, interestingly enough, that I was reminded that my rear hub is making some creaking noises. I decided that it was about time to dig into it, and things took a bit of a turn. But that's a story for another day.

Teaching Rocks to Think

When we last left off, my server was looking a little something like this.

It had just endured a brain transplant, and the Coral AI accelerator was sitting on top of it just waiting to do some thinking.

How well did those rocks think? Not well at all, sadly. Due to what I can only surmise is a bad case of bit-rot, I wasn't able to get the USB Coral to actually do much of anything. It just refused to bootstrap itself into being a Coral. Very disappointing.

But I wasn't going to just leave things at that. If USB wouldn't work, perhaps M.2 would?

Luckily I happened to find one in stock, and after a few day's sailing across the pacific, it made its way from China to the land of freedom and opportunity.

What didn't arrive, however, was the correct screw I needed in order to mount it to my motherboard. Luckily Amazon exists, and so that problem was solved relatively easily.

Well, sort of. It turned out that I needed not just a screw, but in fact a standoff as well. I ended up installing it with just the screw for the time being, and ordered a different pack of fasteners so I could swap in the proper hardware afterwards.

It's fine, don't worry about it.

So how well did these new rocks think? Also not particularly well. But, after a bit of poking and prodding and patching the driver to actually compile and fixing up some weird permissions issues I did finally manage to get it to do its thing.

But it's still not very smart.

(The thumbnails are rotated 90 degrees because I have that camera mounted sideways).

Sunday, August 6, 2023

It Waited A Lifetime For You

Bob, I hate to bring you bad news like this, but the can of Diet Pepsi that you left in my care back in 2012 has unfortunately met its bitter end. It seems as though its tough aluminum skin eventually fell victim to the cruel gnawing of the carbonic acid running through its veins, and I discovered it slowly bleeding out today.

I know there were few things in the world that meant more to you than one day being reunited with your beloved brown elixir, but once it was clear what was happening, there was no time left to summon you to its bedside to bid it farewell.

You may take solace in the fact that its life was not lost in vain, and in the end it managed to find a refreshing purpose in this cold, uncaring universe.

I suppose we shouldn't mourn its passing, though. It lived to a ripe old age and survived many challenges that were the undoing of its lesser kin.

I promise, dear 1838CA121723, that you will not be soon forgotten. You'll live on forever in our hearts.