Monday, February 19, 2024

The Can-Do Spirit

So the time has come again to can up a fresh new batch of giardiniera. I only have a few jars of the old batch left, and the long weekend provided the perfect opportunity to spend a little time in the kitchen. The result is 15 jars of tasty pickled vegetables.

This is, somewhat curiously, more than the usual 12 jars that this recipe produces. I'm not entirely sure what accounts for the difference in volume this time around. Usually I buy some random amount of veggies that mysteriously always exactly fills my 8 quart food tote, and then by some mysterious folding of physics it all packs down into 12 pint jars. Apparently the imperial system is confusing enough to flummox even the universe itself.

Well, whatever the reason, I'm not exactly sad about having three extra jars to go through, since that means I'll have three more jars to eat before I have to make another batch.

The canning process itself went quite smoothly, though you might notice that the lids look a little bit dusty. This is actually due to the temporarily hard water that's being piped in while San Jose Water cleans the fish bones out of our usual supply, which is delightfully soft compared to this liquid rock they're sending me. I didn't know I could precipitate mineral scale like this just from boiling one pot of water, but, well...

That is, indeed, a rather alarming amount of minerals built up after just boiling one pot of water.

Sunday, February 18, 2024

Default Route

I've had a router for a while now, and I've always been meaning to pick up a router table to go along with it. It just so happened that a cow-orker was selling one used for $100 and so I didn't buy it because I ended up being #3 in line. However, a different cow-orker was also selling one for $90 in slightly poorer shape, and so...

It followed me home.

This is the Bosch RA1181which is, as the title of this post suggests, pretty much the default router table, and matches well with my Bosch 1617EVSPK router, which is pretty much the default router.

The condition issues are a missing cord spool on one side, which I couldn't possibly care less about, and some missing nuts and washers that vibrated loose and got lost somewhere along the way. Vibration tends to be an issue with these things.

However, there is a solution to vibration, and that solution is called nylock nuts.

And also new washers. And just in case that's not enough, we also have the venerable Loctite 290.

For when it just refuses to stay stuck. Also for the few nuts that weren't 1/4-20 and for which I didn't purchase replacements.

Anyway, 8 new washers and nuts go in to hold the legs onto the table.

And some loctite goes on these 10-32 nuts.

Now you might notice that these nuts have springy toothed washers on them. This is an attempt by Bosch to keep them from rattling loose, but there's two issues with that.

The first issue is that, much like most forms of lock washers, they don't actually work.

The second issue is that these nuts sit inside hex-shaped insets that keep the nuts from turning, so not only will the nuts not turn anyway, but the springy toothed washers actually interfere with getting the nuts seated into the recesses in the first place.

Great job, Bosch.

Anyway, these are the nuts that are getting buttered up with Loctite 290, which conveniently can be applied after the fastener is torqued to spec, as it will wick into the mated threads and seal them together.

Meanwhile, here we can see the remains of the original hardware.

That's 3 original nuts with the useless springy washers, 2 replacement nuts without them, two original washers (black) and two replacement washers (stainless). This hodge-podge of hardware will find a new home in my random fasteners bin.

I suppose there was one other condition issue to mention, which is the sorry state of this featherboard.

Pro tip: if your featherboard does this, you're using it wrong. Luckily a replacement set was included, so I actually have three working featherboards, not just two.

With all the fasteners fastened and the table set up, I must say it's looking pretty good. And, as luck would have it, it fits perfectly on my shelving.

This will be quite a nice addition to my shop.

Saturday, February 17, 2024

Getting Ahead Of The Game

In order for a bicycle's fork to stay attached to the frame, while also being able to turn left and right, it needs a pair of bearings that sit in the head tube of the frame and hold the steerer tube of the fork.

These bearings require a certain amount of preload on them to keep from rattling around all loose and janky-like, and that preload is set by tightening down the top cap.

However, the top cap is not what retains the preload. Instead, the stem clamp pinches the steerer tube and keeps the spacers and bearings below it from working themselves loose.

In fact, you can even remove the top cap completely, and the whole system will still work just fine.

And it's only when you loosen the pinch bolt that the stem can be removed, allowing you to, if you so please, remove the fork from the bike, or set the preload again.

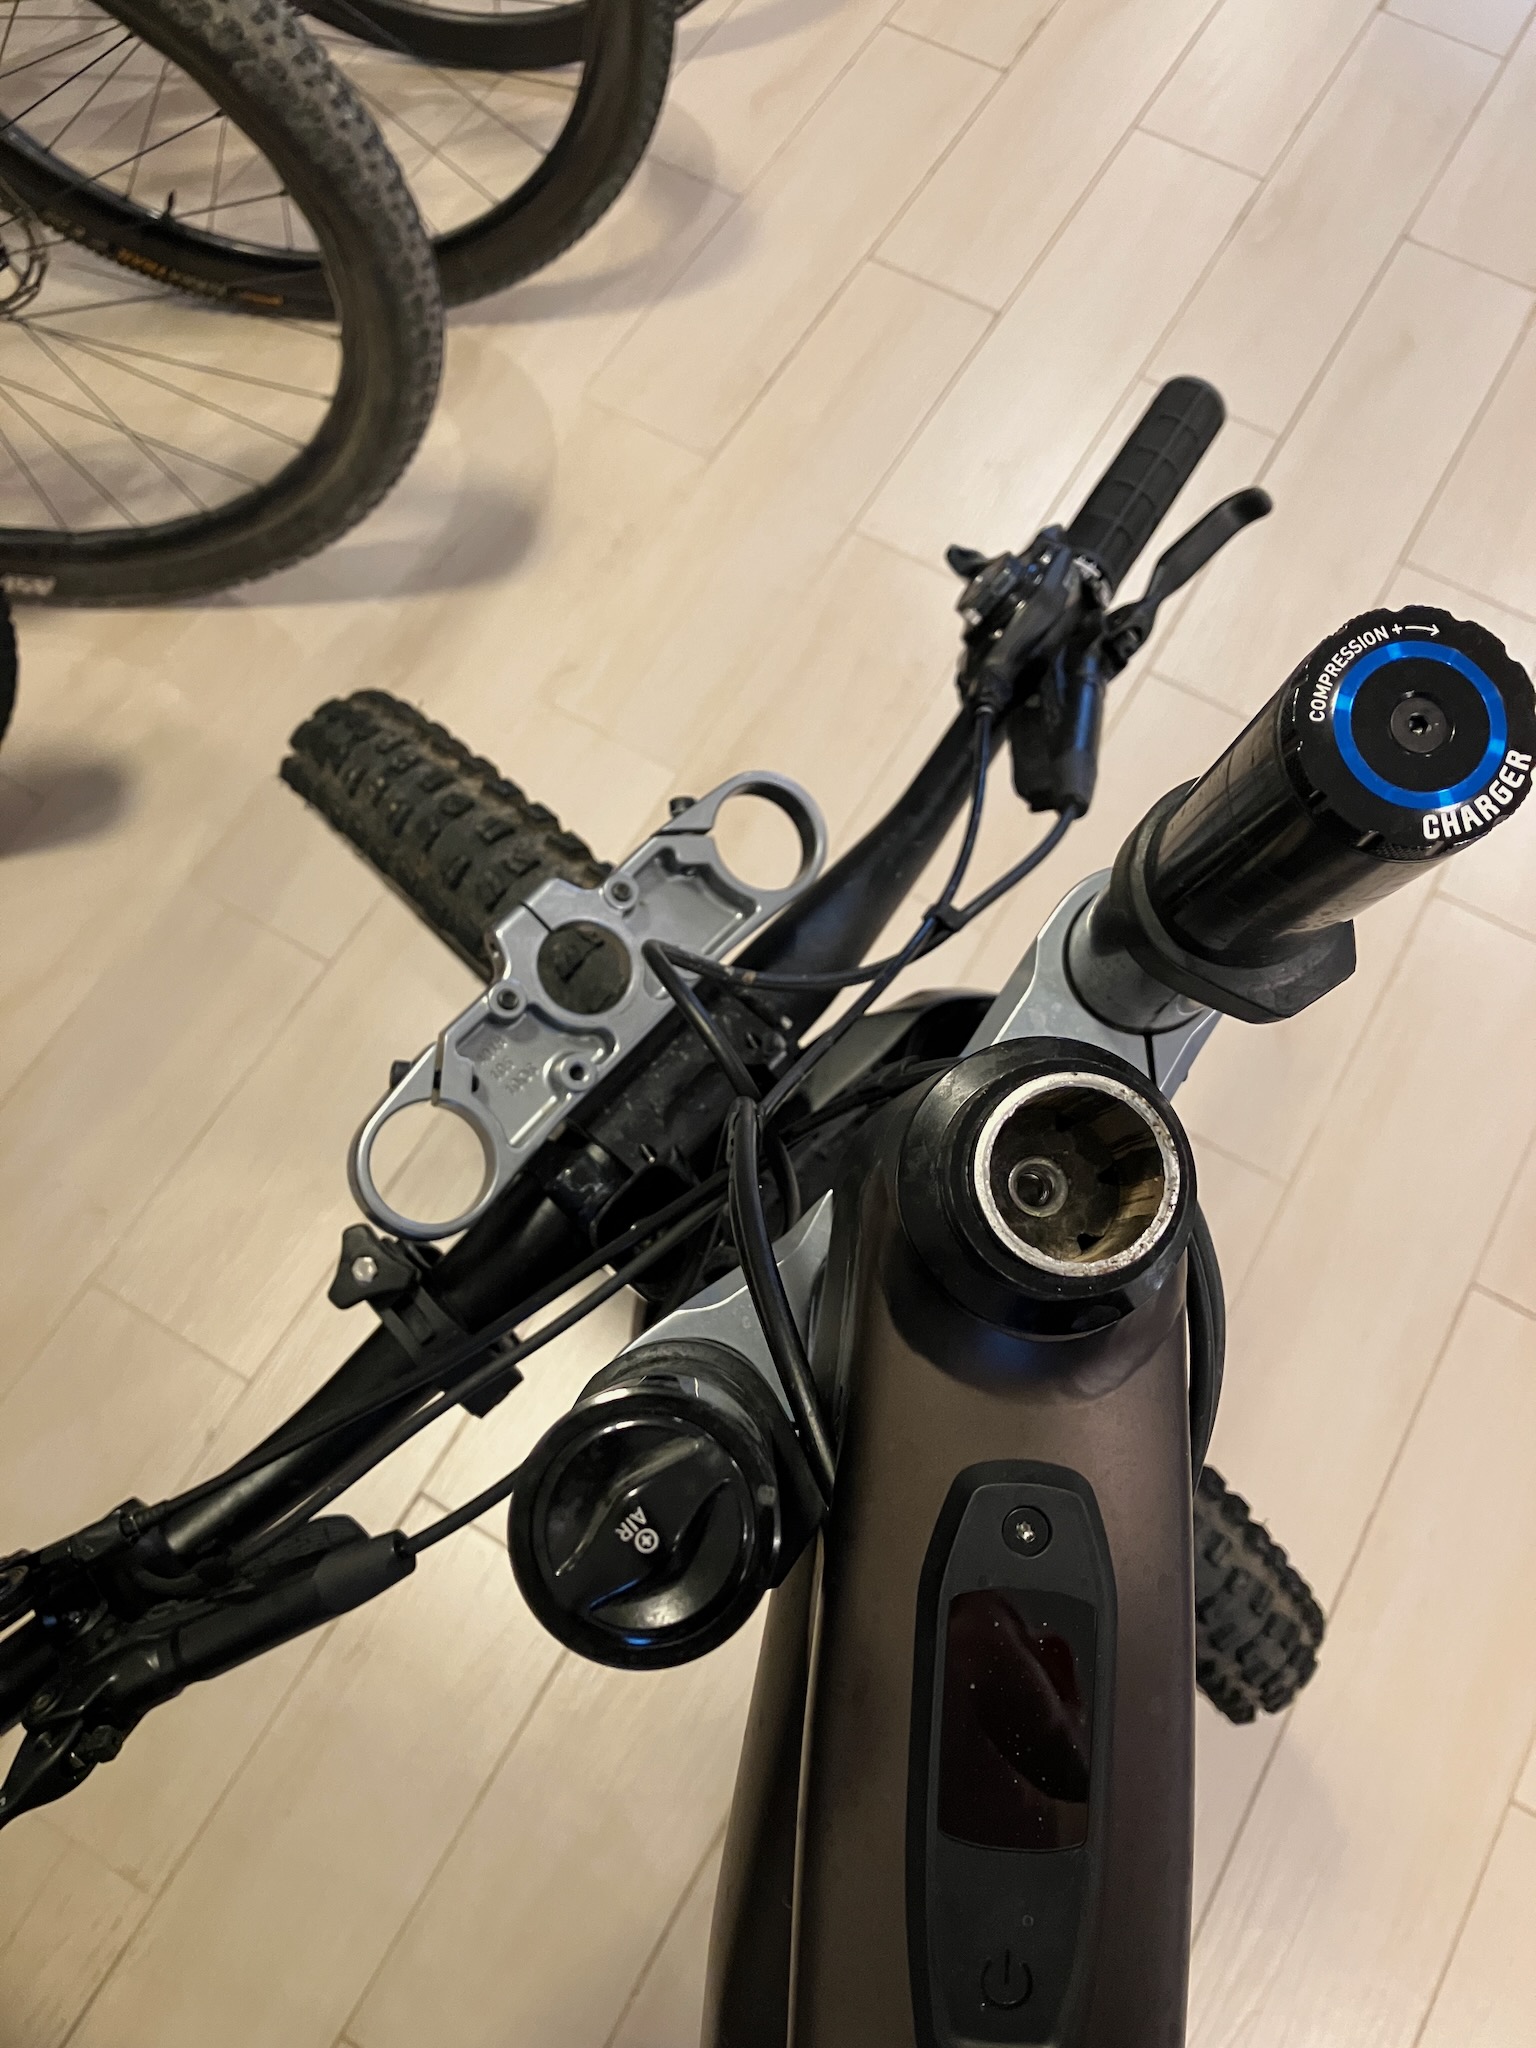
Now this is all fine and dandy, when it works. However, due to a peculiar design decision with this Rockshox Boxxer dual-crown fork, the "stem", whose role is in this case played by the upper triple clamp, uses only a single pinch bolt. This means that it is not able to grip the steerer nearly as securely as a more traditional fork where the stem is usually twice as tall (at least) and uses a pair of pinch bolts to clamp itself into place.

This design oversight has lead to a recurring issue where, after going for a spirited ride, I've returned home to find that the headset has just the slightest amount of play in it. Briefly loosening the pinch bolt on the upper triple clamp (again, acting as the stem) results in the play disappearing as the fork components settle back into place after having been slightly dislodged over the course of the ride.

This is not ideal. Thankfully, we can do something about it.

This here is a locking headset spacer. It's sort of like half of a stem, and is going to serve as the missing half of my steerer clamping mechanism, effectively doubling the clamping area and hopefully solving this problem for me. It's usually intended to just allow you to remove the stem without the fork falling out of your bike (which you might want to do when packing the bike for traveling, for example), but I see no reason why it can't also help retain the headset preload in regular riding usage as well.

Since it's installed in place of one or more of the existing spacers, let's measure it up and see if we can't get roughly the same stack height.

Well, it's supposed to be 8mm, but I guess they were feeling a little generous at the factory. Not a big deal though, let's see what the original stack looks like.

Ah, yes, three 5mm spacers. This is going to take a little bit of math.

Or, it will take a little bit of fishing into my stash of headset spacers.

Alright, 8mm plus 8.5mm gives us 16.5, which is just a smidge more than we started with. This could work, but actually if we scroll back up, we can see that the upper triple clamp is actually sitting pretty high on the steerer. Despite the fact that there's a 5mm spacer preinstalled above the clamp, the steerer is actually slightly below the top surface of the clamp, which means we're missing out on a tiny bit of clamping area.

So, instead of going with the 8mm spacer, we'll go with one of the original 5mm spacers, which will give us...

A healthy 13.5, which will drop the upper triple by 1.5mm, give or take.

So we'll go ahead and slide those on, just leaving the clamp loose for now.

Then the upper triple goes on.

And we can see here how the steerer now just peeks up above the top of the clamp, as we intended.

Next up comes the 5mm spacer.

This makes sure that the top cap doesn't bottom out against the end of the steerer when it's screwed down to set the preload.

And speaking of the top cap, let's get it in place too.

In case you're wondering, this fancy top cap includes storage for a quick link, plus an integrated chain breaker tool. Very convenient if you ever break a chain out on the trail.

Once the preload is set, we tighten down both pinch bolts this time (as well as the fork tube pinch bolts, of course)

And once it's all buttoned up, you can't even tell it's there.

As a bonus, while I've got my hands dirty, I should check on the brake pads on my gravel bike, since it's been a minute and I've been putting some miles on it this winter. For reference, you're meant to change them when the total thickness hits 3mm.

Hmm, yup, I think I got my money's worth out of these pads.

Wednesday, February 7, 2024

I'm In Hot Water

This is my hot water tank. There are many others like it, but this one is mine.

It's in year 11 of its 6 year warranty, and has finally decided to give up the ghost. However, it did not do this by springing a leak. No, instead it decided to start backfiring out the venturi tube.

So, let's pull out the burner and see what's up.

This is what's known as an ultra-low-NOx burner. Usually the venturi tube would mix a slightly rich mixture of natural gas and air, squirt that into a burner, and the mixture would exit through a series of small ports, which is where it would burn. The gas would mix with the ambient air in the burner chamber, leading to a fuel-lean mixture at the outside of the flame and a fuel-rich mixture on the inside. A little bit of NOx and a little bit of unburned HC would be created, respectively, and exit out the flue.

These emissions were considered not entirely ideal, so California enacted some regulations clamping down on the limits for NOx and HC, which required a redesign of the combustion system. Now, instead of injecting a fuel rich mixture, a stoichiometric mixture is created, and fed up through a screen where a sheet of flame burns in an otherwise sealed combustion chamber. This results in a much more even fuel-air mixture throughout the entire flame, with (in theory) no lean spots to produce NOx and no rich spots to produce unburned HC emissions.

And this is all fine and dandy until the screen cakes up with grime and holes get burned into it.

These holes, in particular, are what allow the flame front to pass back through the screen and up the venturi tube, causing the backfiring that I observed.

Now I didn't much fancy the idea of not having hot water, so my first attempt to remedy this situation was to get out the wire brush and clean the grime off the screen to see if that would fix things.

The screen cleaned up nicely, improving the gas flow, but the holes still present meant that the flame was not able to be confined to the combustion chamber.

A new burner assembly would have been roughly $300, but given the age of the tank, I'd like to introduce you to its replacement.

It's a like-for-like swap, a 40gal gas heater, which even comes straight from the factory pre-scuffed.

Well this is off to a great start but whatever, its job isn't to look pretty, it just needs to heat water and not set my car hole on fire.

Step one of the replacement is draining the old tank. I initially started off by hooking this garden hose to the drain spigot, but it was not flowing especially quickly.

40 gallons is only 8 buckets, so that's what I tried next.

That seemed to be working well enough, so I busied myself with disconnecting the tank from the gas, water, and oddly excessive earthquake strapping.

Then roughly 8 buckets of hot water later, we pop the new one into place, hooking things up in the reverse order that it was removed.

Now you might be wondering how, exactly, I managed to remove the old tank and put the new one in its place all by myself?

The answer is simple: Grab hold of it, tilt it back so it's well balanced on top of you, and then lift with your knees. It's only 130lbs empty, just man up and do it.

After I did the swap, my curiosity got the best of me: I wondered just what an 11 year old anode would look like. The answer?

Some anode material is technically still there.

Which is the best kind of still there.

I actually suspect there was a bit more material than this still clinging to the anode rod, but I had used my impact wrench to remove it and at one point the rod got spun at quite a high rate of speed, which is why it's rather bent looking. I'm sure some anode fragments were probably flung off during this process.

Anyway, the entire ordeal started at approximately 8:30pm and, including a 30 minute round trip to the Home Despot, I had everything buttoned up and running again at 11:00pm. So disaster was averted and I was able to have a hot shower at the usual time before tucking into bed.

Friday, February 2, 2024

Unleaded Gas Furnace

So the previous furnace adventure, where I replaced the return air intake with a much larger one, didn't fix the issue I had where the furnace kept going into over-temp fault. Since I bought some replacement molex pins, but didn't use them yet, I decided that today would be the day that I'd perform that experiment.

Here's the connector in question.

So, out comes the pin puller again.

I actually only replaced three of the pins, the two yellows for the over-temp circuit, and the orange for the inducer vacuum switch, as those were the only ones I'd observed malfunctioning.

And I'm happy to say that the job went smoothly.

So I buttoned it up, turned it on, and everything worked. Right?

Of course not, it went into overtemp again, almost immediately.

So why did it go into overtemp? Well, let's have a closer look at the other side of the furnace controller board, shall we?

I'm thinking those solder blobs look a little suspicious. Almost like these pins were soldered in with an insufficient quantity of solder; and lead-free solder at that, which is prone to fatigue cracking when exposed to mechanical stress, like heat cycling or vibrations. How delightful!

So, let's get out the soldering iron, melt our way through that conformal coating, and freshen things up with some eutectic leaded solder.

The burnt conformal coating makes these reflowed joints look a bit worse than they actually are, but trust me, they're very solid.

Here's a different view, shot directly with my iPhone instead of through the microscope.

The fatigue cracking of the original solder joints is very obvious to see here. In fact, the lighter green spot above the bottom-left pin is actually where the conformal coating has started peeling off of the board due to the pin wiggling around loose.

Now I have a little secret to tell: I'm not actually resoldering the board from my furnace, here. Instead, I'm resoldering the board that I pulled out of my furnace 4 years ago when I replaced it with a brand new one. Well, let's have a look at the new one, just to confirm that it has the same problem.

And that would be a yes, yes it does indeed.

Amusingly, this isn't the only spare furnace control board I have. Back in 2000 when I first replaced this board, about part way through the swap I glanced down beside the furnace and what did I see? A third furnace control board, no doubt left there by the previous owner after they swapped a new one in.

Thanks, ROHS.