Sunday, August 21, 2022

The First Quick Spin

I've finally gotten to the point where I was able to take the bike out for a quick test spin, but let's not get ahead of ourselves, there's still some work to recap.

First things first, we need to get the brakes in place. This involves mounting the calipers and the levers, and of those two it's much easier to mount the levers first, as it gives us a place to keep them safe while we're messing around with the calipers. So, on they go.

Alright, brakes are on, let's go for a ride!

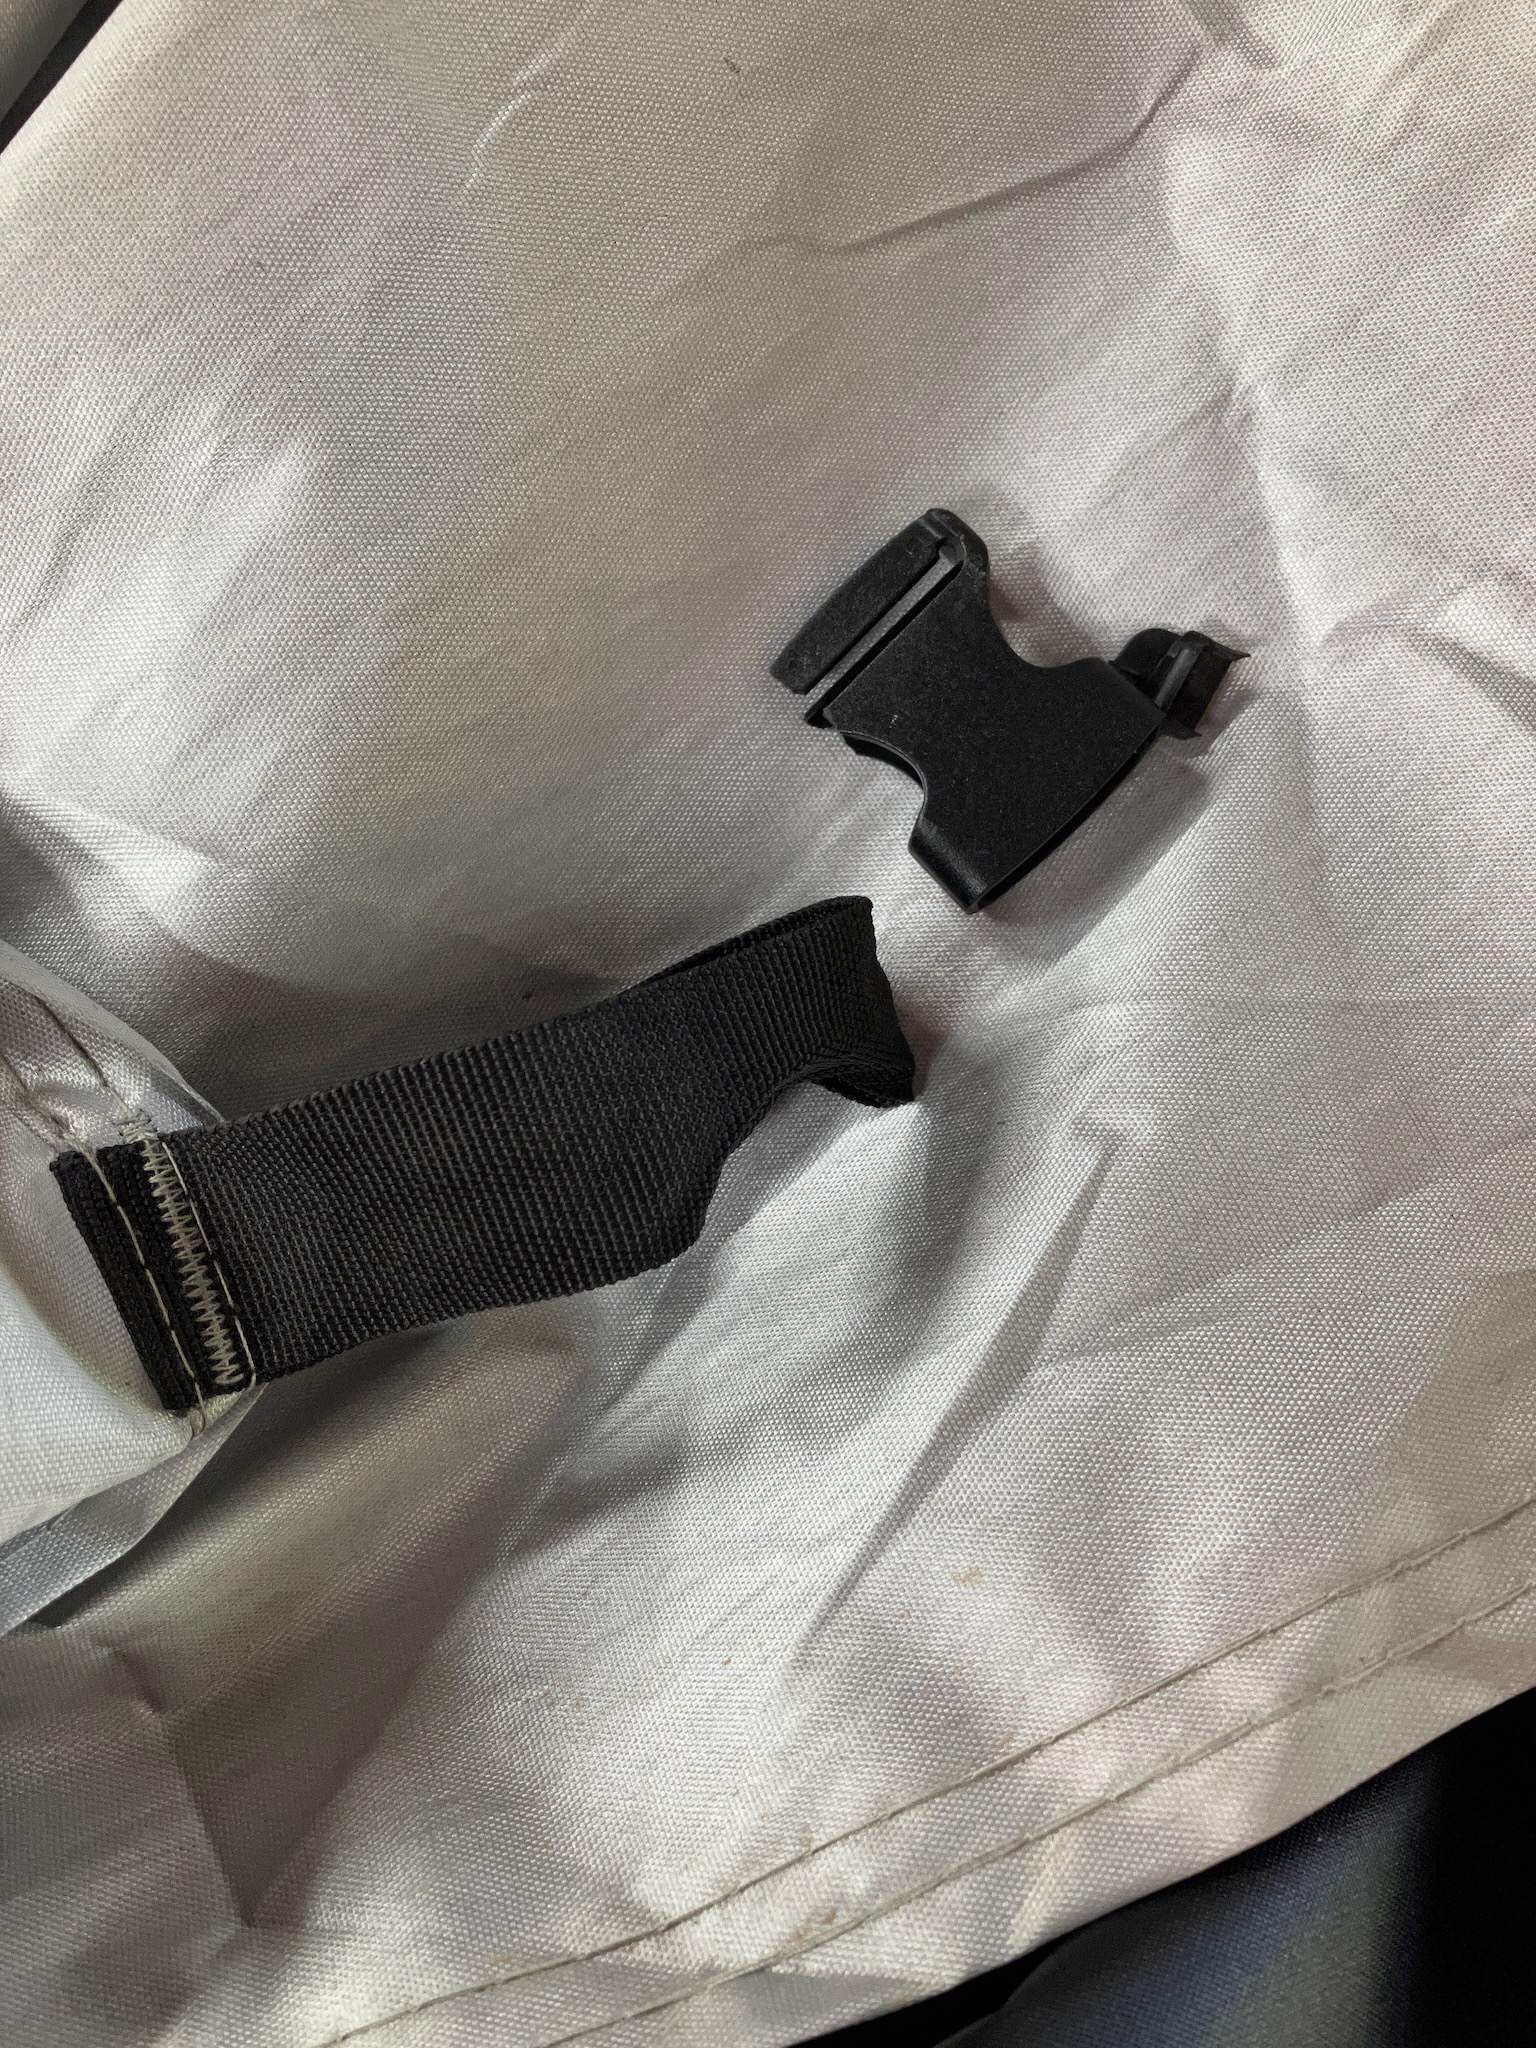
Ok, ok, I'll install them properly. First job is to disconnect the lines at the stealthamajig. SRAM suggests doing this without draining the fluid from the system, and I'm at least willing to give it a shot.

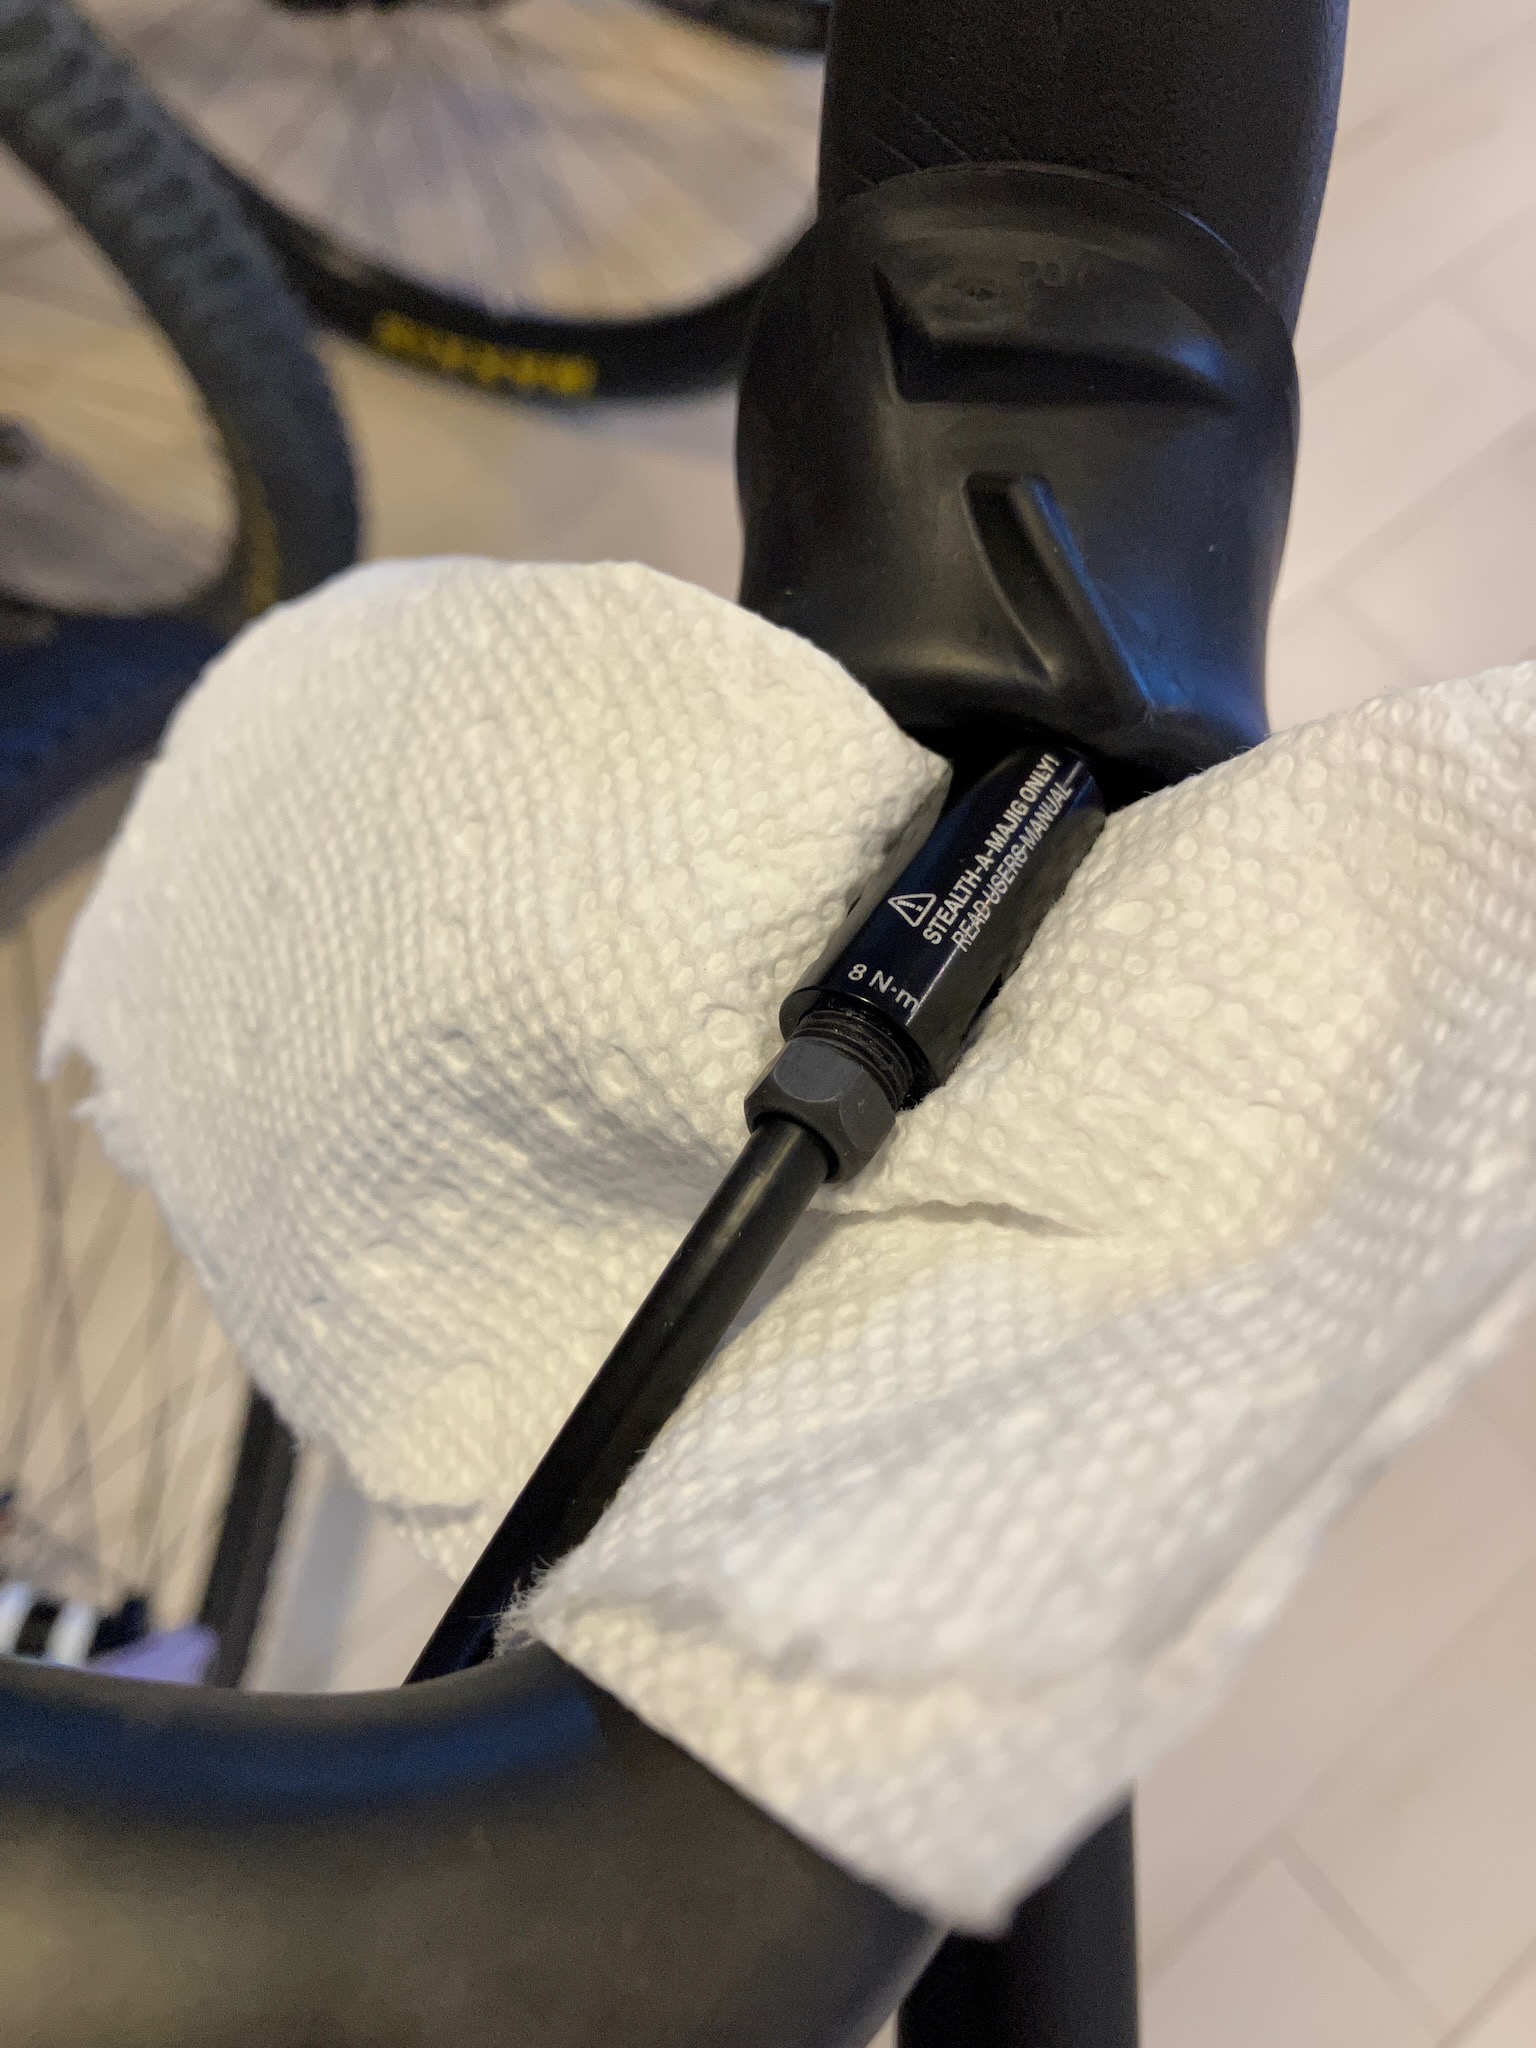
With a little bit of insurance, of course.

Surprisingly, this insurance turned out not to be needed, as the port inside where the brake fluid passes through is small enough that the surface tension kept the brake fluid from gushing out all over my bike and the floor. Nice.

Anyway, let's get the rear hose run first, since I'll want to be in a good mood for this potential struggle.

Somewhat surprisingly, it wasn't that bad. I had to give it a little encouragement here and there but it only took maybe 5 minutes of faffing around (including the time taken trying to tape the hose to the little pre-run plastic tube, realizing that the combination was too large to fit through the cable port, undoing it and redoing it in a different way, etc). Honestly it feels like people who whine about internal cable routing just want something to complain about.

Now that the brake hose is in place we can bolt the caliper to the frame, just loosely for now as we'll need to adjust it with the wheel in place later.

Speaking of bolting things into place, do be sure to remember to install the port cover and compression nut before installing the barb and olive on the hose end, or you will probably cry.

Luckily there was no crying in this bike assembly.

Anyway, with the rear done and out of the way, the front went in with very little fuss.

Even though it won't have a caliper to grip until the new lockrings come in. But that's a problem for future-me. Present me needs to deal with shortening the brake hoses so that they're not flopping around in the breeze and getting caught on branches, car mirrors, stray elk and what have you.

They like to give you an ample amount.

Thankfully trimming isn't too tough of a job. Just takes a sharp utility knife to make a nice square cut, then you screw in the barb, and screw on the olive, and it's ready to bolt back in place.

You'd almost think I know what I'm doing. Here's the rear all shortened up.

With the hoods folded down, it's basically all ready to go, other than needing some bar tape.

But bar tape is also a future-me problem. Before we get to that, let's align the rear caliper. You can get it in the ballpark by loosening the bolts, squeezing the lever, and snugging them back up again, but that usually leaves the caliper a little off kilter. I find it's best to start with that, and then sight down between the pads and rotor to do the last little bit of fine tuning.

When you can see an even amount of daylight on both sides, that's when you know it's perfectly aligned.

The front... well, the front is gonna have to wait a bit for its final positioning.

Let's deal with the chain first, since we're on a bit of a roll.

I was initially planning to get the black chain, but then the rainbow one was in stock earlier so I just had to "settle" for it. Pity me, pity me.

Just a little off the top to get it to the right length.

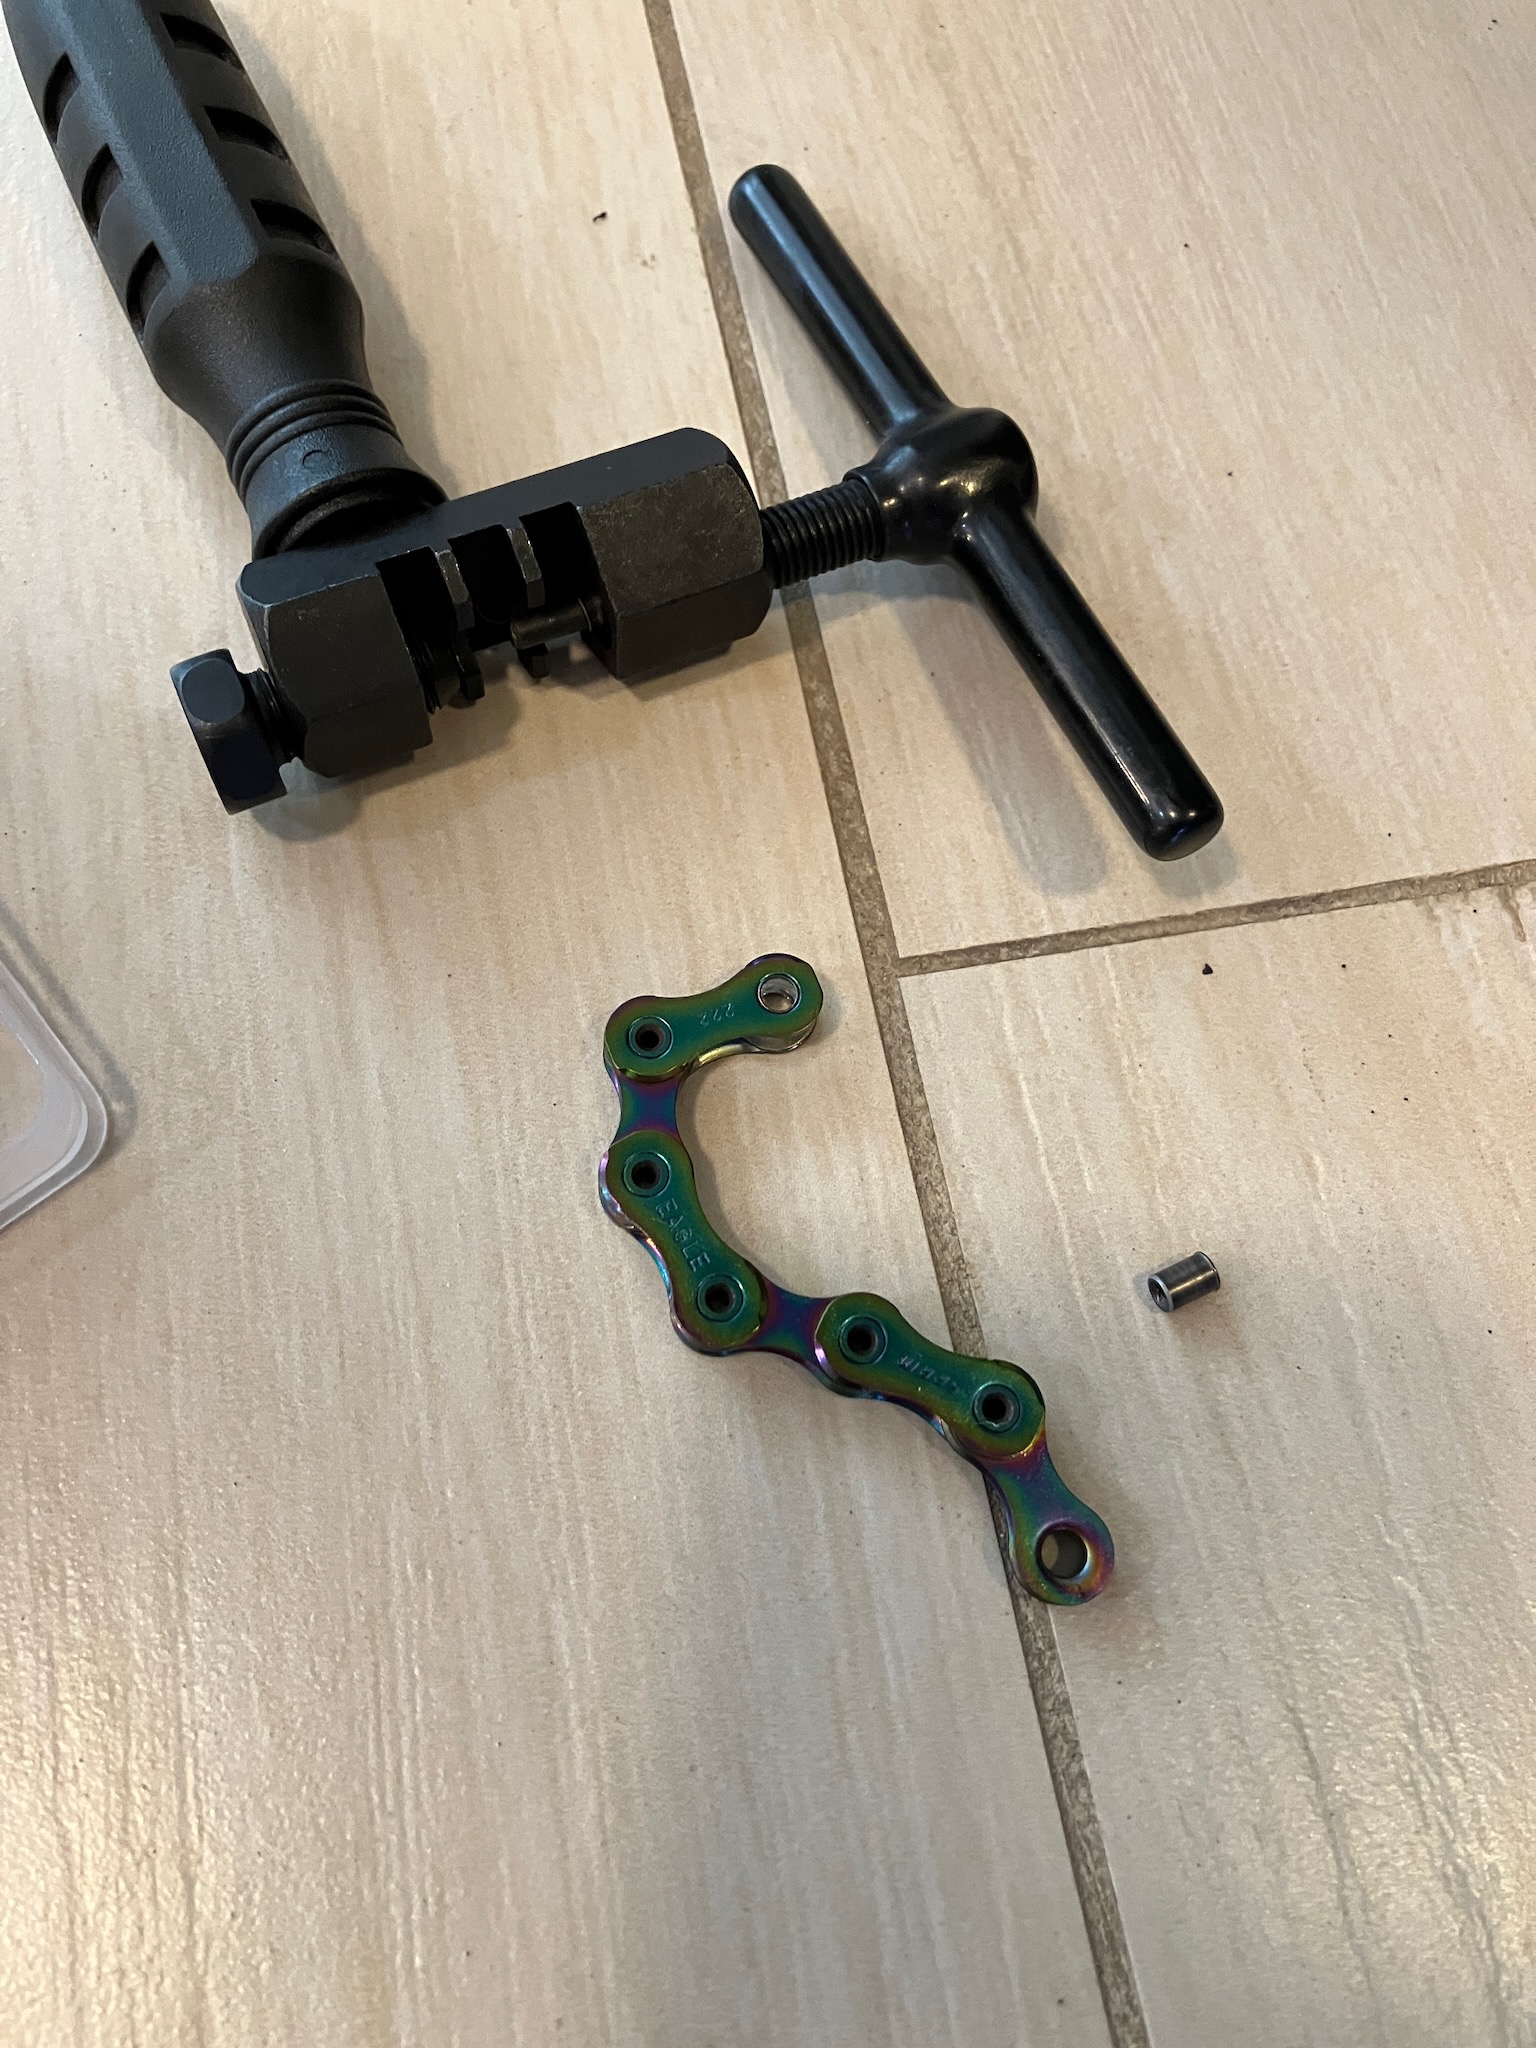
The right tool for the job makes all the difference in the world.

The chain is covered with a sticky anti-rust coating, so we'll give it a bath in acetone to try to clean it off.

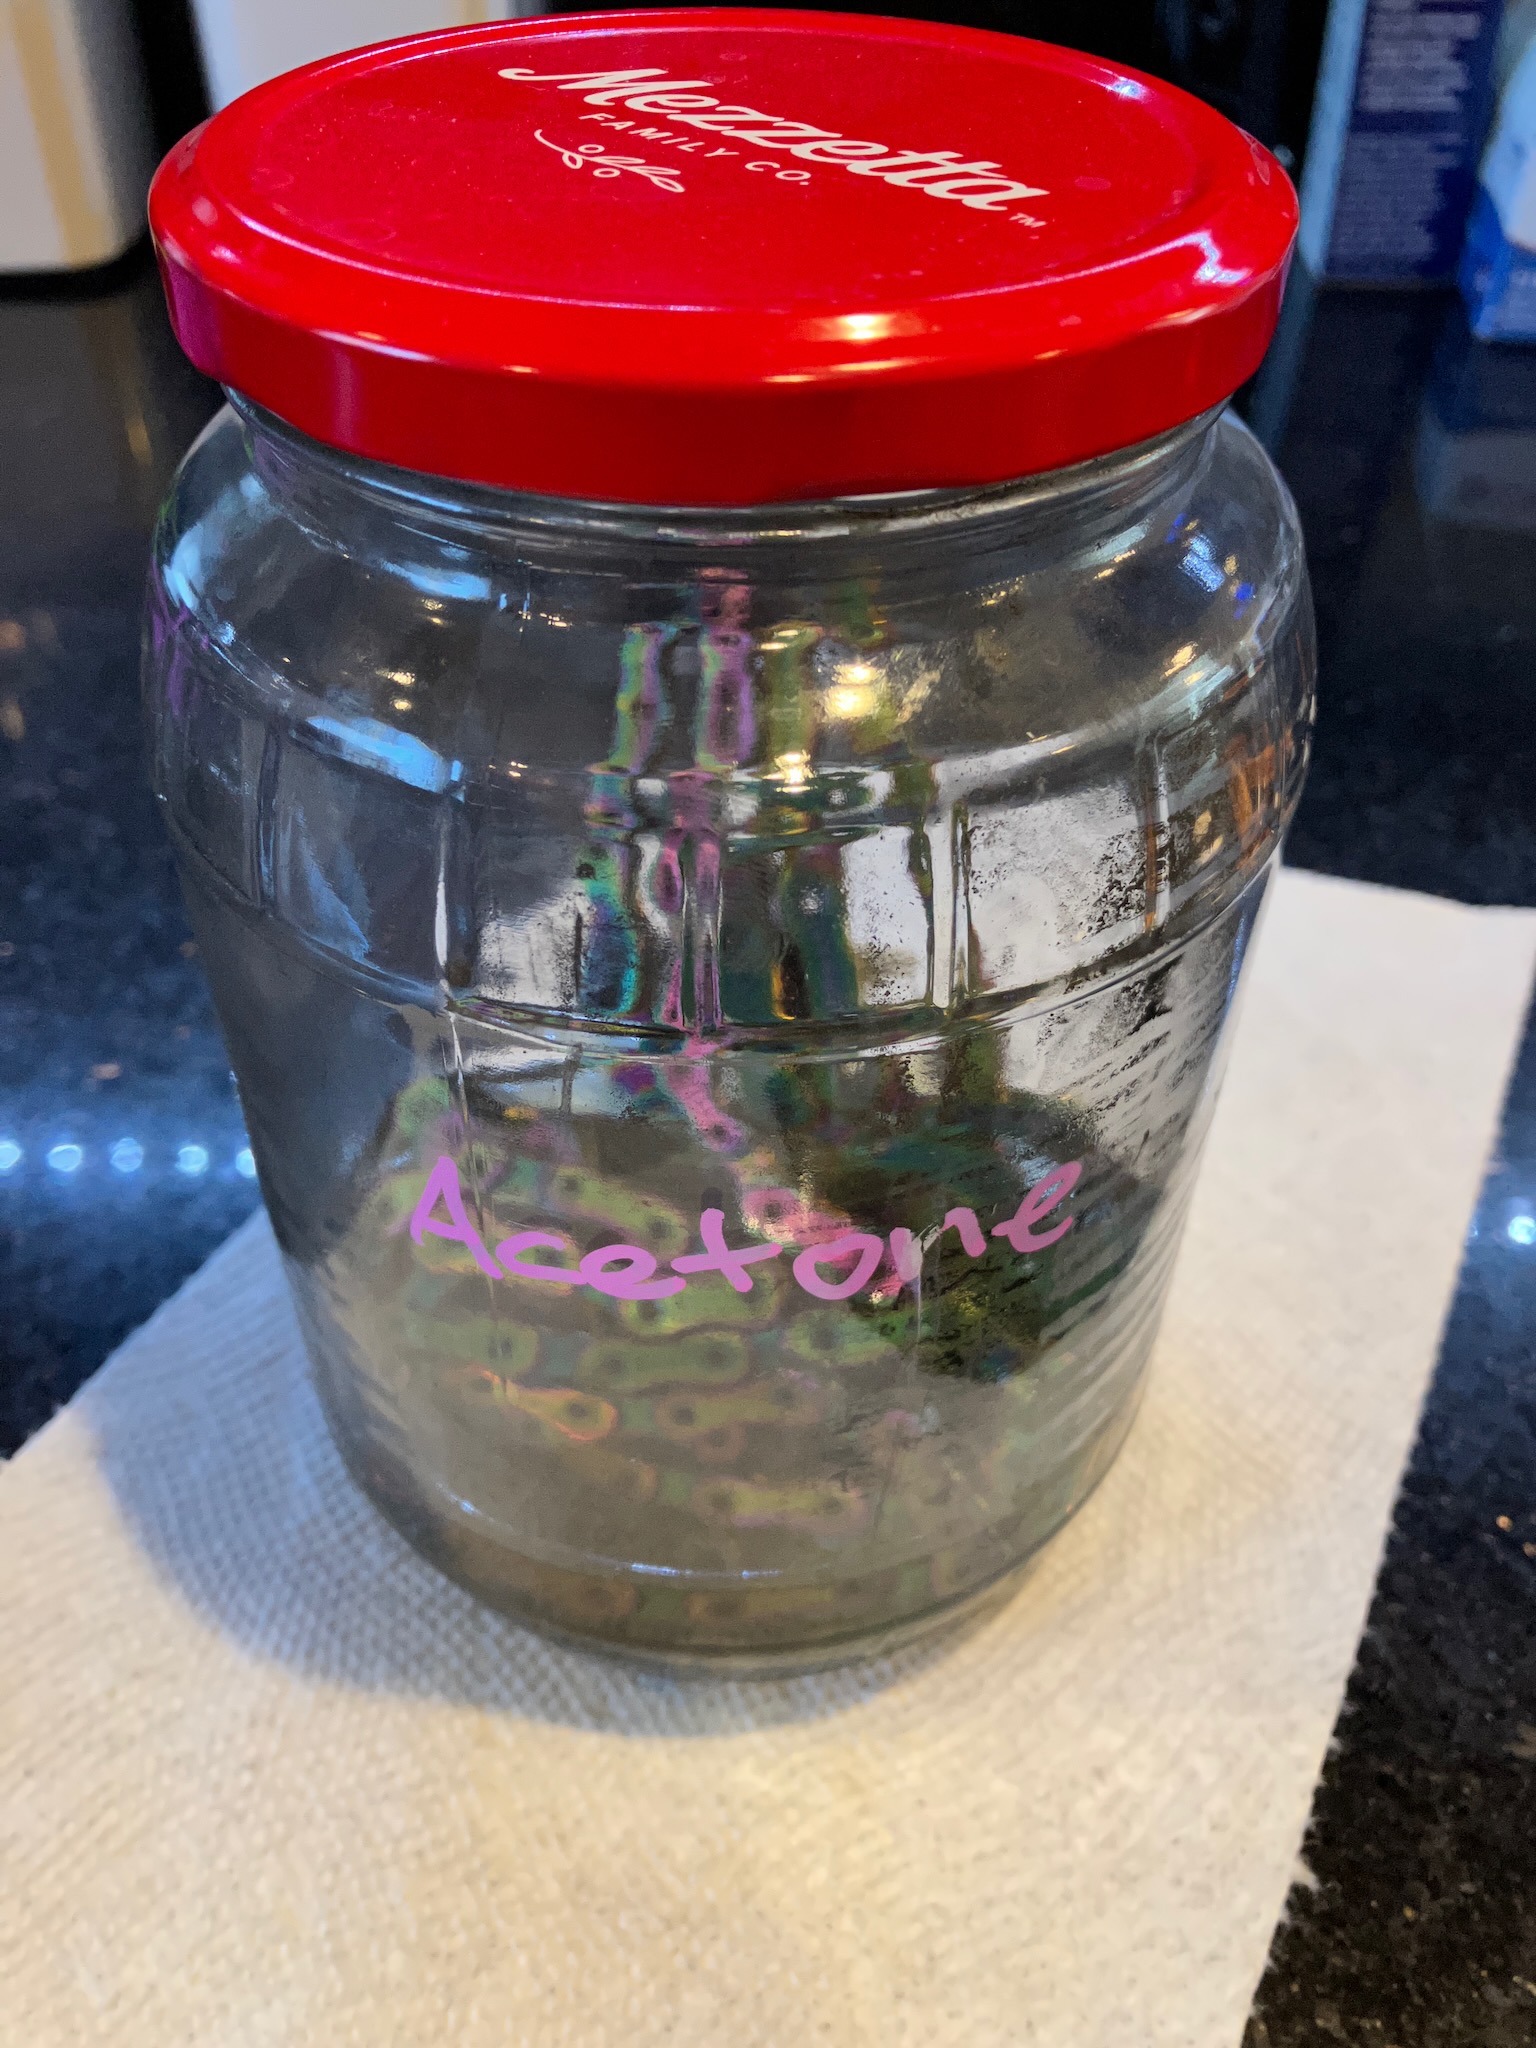
This doesn't actually work, by the way. The chain was just as sticky coming out as it was going in. It is a nice way to clean off the oil and road grime later on in the chain's life, though, so keep a jar on the shelf for that.

It's worth mentioning here, since I showed off my chain tool, that modern chains basically all use quick-links to join the two ends of the chain together, rather than the old-timey method of pressing the pin back into place. You might wonder why this is, and even question whether you can get away with doing it the old way. The answer is no, no you absolutely cannot.

Modern chains are actually riveted together at the pins, and the folded-over metal shears off when you drive the pin out of the link. You can actually hear this as a distinct cracking noise as you apply pressure with the chain breaker. Once that link is pushed out, it's not going back in. Ever.

And that's why we use quick links.

Anyway, the still sticky chain is back on the bike, and a bit of chain lube seems to have made it slippery enough that I don't really notice the packing grease residue, so whatever. It'll be fine after a few miles of riding.

It do look good, though.

And through the miracle of technology, my bike computer can even tell me what gear it's on.

Anyway, the quick spin around the block revealed that the bar and controls were basically in the right place, though the saddle needed a little adjustment both in tilt and height. I'm going to probably take one more quick spin to double-check for any last minute tweaks before putting the bar tape on, probably sometime this week.

Then once the lockring comes in I'll be able to mount the front rotor, align the front caliper, and tidy up the loose ends like mounting the bottle cages... and then it'll be a bike!

Saturday, August 20, 2022

And So It Continues

When we last left our heroes, we were facing a bit of a pickle. We had the wrong lockrings for the brake rotors (at least the front rotor) and we were missing a spacer for the cassette, and the bike was looking a little something like this.

Well as it turns out, one of those problems was a little easier to solve than the other. I remembered that I had a spare 9 speed cassette, which I had gotten for free when I picked up a used smart trainer from a cow-orker, sitting on Dirty Dozen's rear wheel for safe keeping. This is because Dirty Dozen spends basically all its time bolted to the smart trainer, which is where its usual 10 speed cassette is mounted.

Of course, mounting a 9 or 10 speed cassette on an 11 speed wheel requires a 1.85mm spacer, which just happens to be exactly the same 1.85mm spacer needed to mount an XD cassette on an XDR freehub.

So that was an easy fix, the cassette is back on.

While we're at it, I mentioned in the previous post that I had mounted the pedals, so here's a little glam shot of that.

And with that out of the way it's time to make some forward progress again, even if we're still waiting on a part.

On a bike like this, there are four, or three depending on how you count, things you need to trim to length, in order of increasing stress.

  1. The chain.
  2. The brake hoses (2).
  3. The steerer.

Since installing the chain makes it slightly more inconvenient to take the rear wheel on and off, I plan to do it last. The brake hoses will be coming up soon, but in order to make working around the front of the bike easier, it would be really nice to trim up the big 'ol chimney sticking out of the top of the stem.

So, we mark the proper length, install a spare stem and spacer as a makeshift saw guide, and chop it to length.

Measure once, cut twice, right?

Boy howdy, there's nothing quite like taking a hacksaw to your $3000 carbon frame to make you feel alive.

Now we just slip the fork back into the frame and...

Hmm.

Hmmmmm.

That's not right

I get a free do-over on this, right? Let me just google "how to saw something longer," gimme a sec to look this up. I'm pretty sure there's a way to do that...

Lol, just kidding.

Anyway, after sliding the fork back into the head tube properly and installing the expander bolt, we can slip the spacer and stem back on.

Then we twerk down the top cap to preload the headset bearings before tightening up the (self-sealing) stem bolts.

I figured that was enough excitement for one day, so I decided to knock an easy task off the list next: putting sealant in the tires.

I hadn't done this initially as I didn't know if I might have to remove the tires again for some reason (like due to some incompatibility between the wheels and frame, for instance. *cough*), but at this point it felt like it would be a reasonably safe step to take. It would also help the tires hold their air, as they were leaking down a little bit without the sealant helping to keep the air on the inside.

I also ended up topping up the sealant in Crimson Ghost (my trail bike) and Blackbirb (my XC bike) since it had been a few months since the last time, and that seemed like another good place to put a bookmark in things.

It's almost starting to look like a proper bike.

Thursday, August 18, 2022

And So It Begins

A new bicycle has begun to take shape.

We start with the frame, of course, in all its purple glory. The magnificent Santa Cruz Stigmata.

You might not think it, but the first piece to go on (other than the bottom bracket and cranks, which were installed by the shop because I happened to purchase them together on the same order) is the seat post.

Interestingly, this is actually the seat post from The Red Devil, my CAAD9, which later got recycled for Phoenix Down, my CAAD10 when The Red Devil's frame got damaged. Then when Phoenix Down's frame cracked and was replaced by Dirty Dozen, my CAAD12, they switched to a smaller seat post and this one went in the spare parts drawer. But it's a nice carbon seat post, so there's no reason not to use it.

So why, you might ask, does the seat post go in first? Well, it's a simple matter of needing something to hold on to.

Anyway, now that we've got a good grip on things we can liberate the frame from its shipping material.

And reveal its true beauty.

Now that the frame is free from its cardboard prison, we can go ahead and install the fork and headset, and slip on a spacer and the stem while we're at it so the fork doesn't fall right back out again.

We'll also need the handlebars installed, so we'll slip those in place.

I want to be able to get a handle on how the fit of the bike is coming together, so that I know the bars are in the right place before I go trimming up the brake hoses, and to do that I need the wheels on. The wheels, of course, need tires, so let's shave that yak.

Most road bikes tend to run the same tire front and back (as do my road bikes), but in the mountain bike world it's quite common to run a slower, grippier tire in the front to keep you upright, and run a faster, looser tire in the rear to keep things quick and lively. The combo of the Continental Terra Trail in front and the Terra Speed in the back should hopefully balance out nicely for this build.

But the bike isn't going anywhere without a cassette, and it isn't gonna stop going everywhere without some brake rotors, so let's get those in place.

And this is where things start to go a little sideways.

I did not expect this issue. Despite the fact that the Stigmata is specced from the factory with centerlock disc rotors, the lockring on mine is interfering with the fork leg, and the front wheel won't spin.

The lockring isn't an unusual one; in fact it's the official Shimano lockring (Shimano is big on the whole centerlock thing. I'm not sure if they invented it or are just really keen on it, but this lockring should be as close to "this is how it's designed to work" as you could get). It's not some weird knock-off brand or anything like that.

In fact, the DT Swiss wheels on Purple Haze have the exact same lockring, just stamped with DT Swiss, and they clear the fork on that bike, if only by a hair.

But I checked, and installing this wheel in the Stigmata results in the same interference.

SooooOOoOoooOOO I'm gonna need different lockrings, I guess. In fact, I'll probably get two and replace the one on Purple Haze here too, just to give things a bit more clearance while I'm at it. This will also, once again, leave me with two spare lockrings which I can use on my next bike build.

I say once again, because the lockrings I installed here are actually left over from when I built up Purple Haze a few years ago. I wasn't sure if the wheels would come with the lockrings, so since they were pretty cheap I decided to save time and purchase a pair just so I wouldn't be left waiting on parts if that happened to be the case. It didn't, however, so I ended up with an extra pair to toss in the parts drawer, and while I was collecting the bits for this build I thought I was so lucky to have saved them.

Ah well, it is what it is.

On the subject of circular things, I also discovered that I was missing a 1.85mm spacer that's required when fitting an Eagle cassette to an XDR freehub body. Something tells me that the goodie bag of parts that came with the hubs on my new wheels might have gone missing, because at the very least that 1.85mm spacer is supposed to come with the XDR freehub body. HmmMMmmmMmm.

Well, I sent an email to the wheel manufacturer to see what they suggest on both items. They're pretty friendly folks so I think I'm in good hands there.

In the mean time, the bike is looking pretty bike-like.

I actually have the rear derailleur installed too (and the cassette uninstalled until I get the proper spacer), as well as the pedals, but I didn't take another picture to show that. You'll have to wait for the next update to see those, I guess.

At this point I'm not completely blocked; I can install the brakes and levers and will probably get to that either Friday or over the weekend. For now it's getting late and, given I'm not going to be able to complete this without a few more tiny parts, it seems like a good spot to put a bookmark in this build and pick it up later.

Wednesday, August 17, 2022

The Missing Piece

Or missing pieces, as the case may be.

Yes, the last of my bike parts finally came in. And by last I mean "the last for now, until I tinker with it some more, which I wholly plan on doing."

Got the rear tire, the chain (which was supposed to be black, but the rainbow happened to be available sooner), and, quite importantly (and most expensively), the brake/shift levers.

The levers had actually been a point of stress for me. Not only were they the hardest part to track down, but I had previously had a bad experience with building up Purple Haze where the banjo bolt stripped out in the lever on one side, completely ruining the lever body. At the time it wasn't too big of a deal since SRAM sent a free replacement, but I didn't fancy trying my chances twice, especially given the whole parts shortage mess going on.

But, luckily for me they must have learned from my experience, and the new levers no longer use a banjo bolt that threads into the lever body, and instead have a small coupler that uses a regular barb-and-olive compression fitting.

This is going to be so much easier to deal with. And yes, it's called "stealth-a-majig."

For those of you wondering why I'd be so concerned about detaching the brake hose from the lever: I run my front brake on the right hand side, the correct side. In North America, however, due to some asinine reasoning along the lines of "oh no the front brake is scary so we should put it on the left so that people won't use it when signaling with their left hand," everyone else gets stuck with backwards brakes. While the brake calipers on a groupset like this are identical, the front brake hose is only about half the length of the rear brake hose, which is the limiting factor: the hoses need to be swapped to fix the brake-handedness.

And for people who have somehow launched themselves over the bars by grabbing too much front brake: for fuck sake, learn how to ride a bike and stop ruining things for everyone by refusing to take responsibility for your own failures and blaming it on everyone else instead.

Tuesday, August 9, 2022

Pork Pot Pie, Precisely Prepared

It's about time I actually wrote down the recipe for my pork pot pies, as I've gotten them to a place where I'm quite pleased with how they're coming out. I haven't done this earlier, because for the most part I just wing it. It's really just a pork stew stuffed into a pie shell, and pork stew is one of the most forgiving dishes you can prepare.

So firstly, let's get the easy stuff out of the way: the pie dough. It's literally just this recipe, including the optional buttermilk powder. Doesn't get much easier than that.

Now the fun part, the filling. We will need, with no particular precision:

  • 1 head of celery
  • 1 large onion
  • 1 pile of carrots roughly proportional to the two ingredients listed above
  • A splash of cooking oil
  • 1.5-ish pounds of pork from a well marbled cut
  • 1/2-ish pounds of bacon
  • Brine solution made with 2 tbsp salt and 2 cups of water
  • 1 liter or quart of chicken stonk 📈
  • 2 packets of unsweetened, unflavored gelatin
  • 1/4 cup of flour
  • A bay leaf
  • White pepper
  • Ground mustard
  • Oregano
  • Thyme
  • Rosemary
  • Coriander seed
  • Garlic powder
  • Whatever other seasonings you feel like using

Since this will be a long post, let's continue after the break.

Saturday, August 6, 2022

Fix It Again, Tony

Why fix something once when you can fix it twice?

A while back I got a few inexpensive motorcycle covers, only to fairly quickly realize that they are, in fact, cheap. They generally do their job of keeping the sun from baking the plastics on my bikes, but other than that they're kind of a fail, especially considering that half the fabric they're made out of (the lower, silvery half) actually isn't itself UV resistant, and has been slowly disintegrating in the sunlight. Lovely.

Anyway, that's a problem for future-me. Today-me needs to deal with the cheap, shitty snap-buckles they came equipped with to keep the covers from blowing away. They're made out of some kind of brittle, garbage plastic that seems to enjoy shattering at the slightest provocation.

That ain't holding nothin' nowhere. Luckily after the last time this happened I ended up buying a bulk pack of snap buckles, so I had a replacement lined up and ready to go.

A much better quality replacement, which honestly feels a bit pointless to use on this shitty motorcycle cover, but whatever I guess.

Tuesday, August 2, 2022

By Any Other Name

For some time now, the rose bush has had a problem. When I first inherited it, it looked a little (emphasis on 'little') like this.

It has, over the past few years, grown to become a little bit more unruly.

The main problem being that the original stakes were nowhere near sufficient to be able to hold up the new growth, being both too short to reach and too weak to support the weight of the growing plant.

So a few months back I bought a new set of bamboo stakes, with the intent of giving the rose a little haircut and redoing the stakes completely.

Then I got lazy.

But I am lazy no more, as I've finally gotten around to doing a bit of yard work again, and I must say the rose is looking much more under control again.

Dead-headed, pruned back, and staked up with plenty of room to grow.

Into the sin bin with you, old stakes and tangled branches.