It's about time I actually wrote down the recipe for my pork pot pies, as I've gotten them to a place where I'm quite pleased with how they're coming out. I haven't done this earlier, because for the most part I just wing it. It's really just a pork stew stuffed into a pie shell, and pork stew is one of the most forgiving dishes you can prepare.
So firstly, let's get the easy stuff out of the way: the pie dough. It's literally just this recipe, including the optional buttermilk powder. Doesn't get much easier than that.
Now the fun part, the filling. We will need, with no particular precision:
- 1 head of celery
- 1 large onion
- 1 pile of carrots roughly proportional to the two ingredients listed above
- A splash of cooking oil
- 1.5-ish pounds of pork from a well marbled cut
- 1/2-ish pounds of bacon
- Brine solution made with 2 tbsp salt and 2 cups of water
- 1 liter or quart of chicken stonk 📈
- 2 packets of unsweetened, unflavored gelatin
- 1/4 cup of flour
- A bay leaf
- White pepper
- Ground mustard
- Oregano
- Thyme
- Rosemary
- Coriander seed
- Garlic powder
- Whatever other seasonings you feel like using
Since this will be a long post, let's continue after the break.
To start with, we prepare the veggies with a rough chop. I'm doing this the night before because, honestly, it takes a while to get through. We'll start with the celery.

Don't fear the leaves. As long as they're not wilted, just chop them up and toss them right in.
Next I do the carrots.

I never peel carrots, btw. They don't really have a skin. Just give them a good scrub and chop off the stem and you're good to go to use them in whatever dish you like. Here, we're chopping them into bite-sized morsels.
Finally we complete the trinity with the onion.

Don't forget to break apart the layers at this stage, as it'll save you having to poke them apart with a wooden spoon later when we're cooking them.
Now I bought way too much pork, because the only quantity I could get pork shoulder in was "way too much", which is a bit inconvenient. Usually I can find 1.25-1.5lb packages of pre-diced pork at my local grocery store, but today they only had one pack that was a measly 0.75lbs, so I bought a big shoulder roast instead.

Luckily I have a freezer, where half of this will be sitting for a month or so until I need to cook the next batch. Half is actually probably too much, but whatever, this isn't an exact science.
Anyway, we chop up the pork into inch-sized cubes.

You'll want to slice out anything that's especially unappetizing, but for the most part you can just ignore bits of connective tissue, huge knobs of fat, etc, because those will all be cooking down to nothing later.
The first day prep wraps up with brining the pork. Mix together 2 cups of water with 2 tablespoons of salt and dump the pork cubes in.

This then goes in the fridge covered with cling film for 18-24 hours, where the brine will draw out some of the moisture from the meat, and the meat will draw in some of the salt from the brine.
After a good night's sleep we pick up the next day where we left off, starting with the veggies. They go into the pot over high heat with a splash of neutral cooking oil to keep them from sticking and to help with heat conduction, and we're aiming to cook these just long enough to soften a bit and get a little bit of browning here and there.

This process should take about 20 minutes or so, and with only occasional stirring we'll have some time to kill.
The first bit of busy work will be crushing up the coriander seed.

Try to use a rocking motion with the mortar and pestle, to avoid firing the seeds off to land in every inaccessible corner of your kitchen.
Also try not to spend the next 5 minutes sniffing the aroma coming off of the resulting ground seeds.

And believe me, you will be tempted.
So I'm using fresh rosemary here. You can substitute in fresh or dry for any of the herbs being used here today. Since the front of my house is covered in rosemary it doesn't make much sense for me to buy it from the store.

About this much should do. Remember to remove the leaves from the twig, as we're making pork pot pies, not twig pot pies.

Chopping them finely is advised, both to help release the flavours more readily, and because they don't break down when they cook so you'd end up with long, stringy rosemary leaves in the finished dish if you didn't.
We've still got some time to kill, so let's fetch the brined pork from the fridge.

It will look a bit unnaturally pink at this stage, for some reason that probably has a sensible scientific explanation.
Rinse off the excess salt from the brine, and the goo that leeched out from the meat and then drain off any remaining water.

The meat is ready for the heat.
And just in time, the veggies are done their little par-cooking adventure.

You don't want them to cook down to mush, since they're going to get a lot more cooking later once the pot pies are assembled. So we'll set these veggies aside in a bowl and let them chill for a while.
Now, I keep my bacon in the freezer, pre-chopped, because quite frankly I don't go through it all that quickly. You might ask, "doesn't that get freezer burned after a while", and the answer is yes, yes it very much does.

But that actually works in our favour, as drawing out the moisture will help us in the next cooking step, where we're going to shallow-fry the bacon and pork into dry, crunchy meat nuggets.
Of course despite our efforts, this meat doesn't start its cooking journey dry, and as soon as it hits the pan a lot of liquid is going to come off and start bubbling and boiling. You can tell when we're in the watery phase, because the liquid surrounding the meat will be cloudy and boiling, like this.

Crank the heat up to max to help drive off this water, and keep it going until the liquid goes clear and sizzly, more like this.
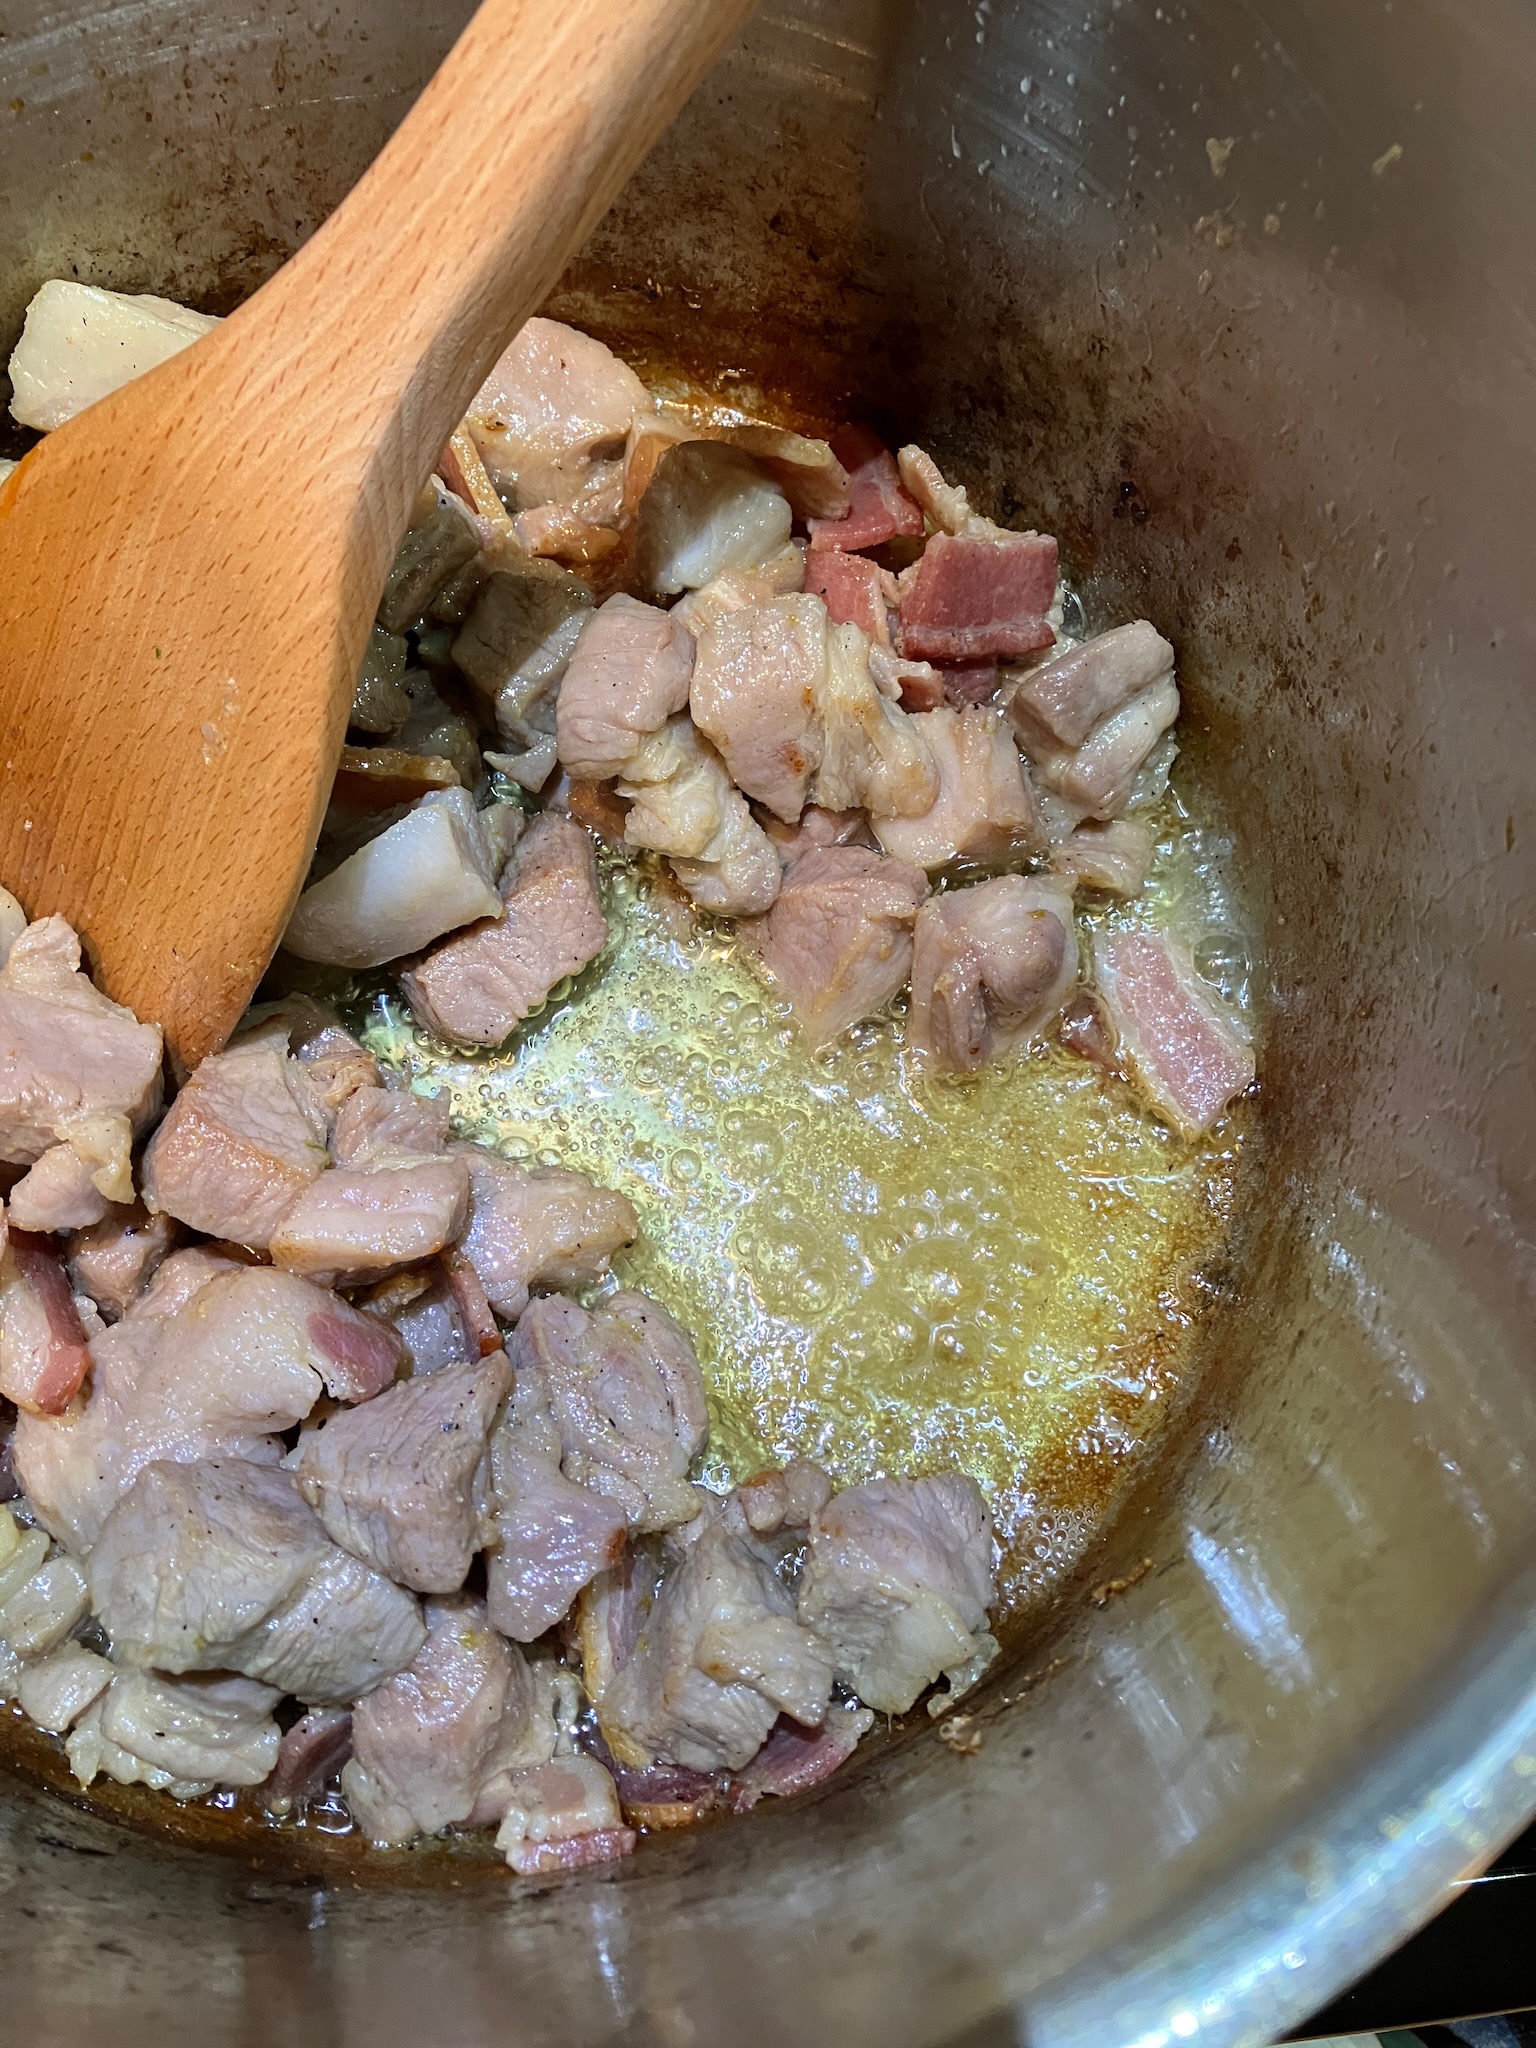
As soon as the liquid goes clear, back the heat way down to at least medium-low. There will be a lot of pork-flavoured fond both stuck to the pot and floating around in the rendered pork fat, and we don't want to burn it. Or the meat, for that matter.
This first stage of driving off the water can take a good 15 minutes or so, so be patient and keep stirring occasionally to prevent the meat from sticking and burning.
In the meanwhile, we can prepare the gelatin, as it needs to hydrate before we can use it. Pour some of the chicken stonk into a bowl (don't forget to shake it first!) and then sprinkle the gelatin on top.

DO NOT give in to the temptation to stir it. Do not. Just let it naturally soak up the liquid. If you stir it, you'll end up trapping air inside little globs of dry gelatin, and that'll prevent the water from soaking in, and you'll create lumps. Mind you, you might get some lumps anyway, but you'll get fewer of them like this.
So after another 15-20 minutes, 30-35 minutes total, the meat will have crisped up to a deep, rich mahogany color like this.

It will, at this point, also have the texture of dry, crunchy dog food. Don't worry about that, we'll be fixing it in the next step. Right now just pat yourself on the back for creating a truly mind-boggling concentration of flavour.
There's way, way too much oil in the pan at this point, so scoop out the meat and pour off the oil (making sure to keep most of the sandy-looking fond in the the pot).

Keep the oil for now, we'll be using a bit of it later. Also you can't get rid of it at this point anyway, as you'll need to put it in the fridge later to solidify it so you can toss it out in the trash. DO NOT pour it down the drain. In theory you could also solidify it in the freezer or fridge and then use the resulting lard in place of the butter to make the pastry, I guess? Never tried it, feel free to experiment.
Toss the meat back into the pot and pour the rest of the chicken stonk on top of it.

This is where the rehydration begins.
This is also where the flavoring begins, so add in the coriander seed, the rosemary, some bay leaves, etc etc; all that stuff I listed at the top.

It's worth noting here that I specified garlic powder instead of fresh garlic. The two are not substitutes for one another, they both have very different flavour profiles, and I think garlic powder suits this application best.
DO NOT, however, use garlic salt. In fact, DO NOT add any salt at all at this point in the recipe, or, really, any other point than when we originally brined the meat. The bacon, brined pork and chicken stonk will bring enough salt to the party for everything to come together perfectly.
In fact, if you taste this right now, you will find it to be overwhelmingly salty, as well as just overwhelmingly flavorful in general. This is expected, and it's only going to get worse before it gets better. Remember that we still have some liquid to add (in the form of the gelatin that's hydrating) as well as all the veggies, and I promise that it will come together flawlessly at the last minute. Have faith and embrace the chaos.
Bring this up to a simmer and leave the lid of the pot half-cracked. It's gonna be here for a while.
Meanwhile, we've got some pie crust to make. Follow the directions I linked above. I'm using my food processor for the first time today, because I got real, real tired of cutting the butter in by hand.

Boy howdy, I sure hope this works.

Wow, ok, that worked better than I could have even imagined. Now I just need to add a splash of ice water and...

Yup, that seals it. I am never, ever making pie dough by hand again.
So, this gets wrapped up to take a nap in the fridge to firm itself up.

I don't have a lot of fridge-clutter. I do have many types of jam, though.
After an hour of chilling it's time for some more busy work, so we'll retrieve half the pie dough and start rolling out the bottoms of our pot pies.

The pie dishes I'm using are about 6 inches wide and maybe 1-1/2 inches deep, and the recipe will fill 4 of them. This is about right for one meal for me, but if you're a less hungry person you can find smaller pie dishes and scale up the number accordingly.
We're not actually making full pie bottoms here, though. The bottom of pot pies always ends up undercooked, so we're instead only making a ring that goes around the outside (around the outside, around the outside).

Rolling out two at once tends to be easiest. Remember your circumference = π times diameter, so make these about 3 times longer than your pie dish is wide. I ended up making these a touch too long, but that's easy enough to correct by just smushing it into place.

It's ready for filling, but is the filling ready? Well, no.
It takes about 1.5-2 hours of simmering to get the meat rehydrated and to break down all the connective tissue. You might need to top up the liquid with a bit of water here and there to keep the meat just barely covered, but after that time we should have something that looks like this.

You can taste this for seasoning, but again be prepared to get punched in the tastebuds. What we really care about at this point is the texture, and the chunks of meat should squish apart into their constituent fibers when you press them with a spoon.

Oh yeah, that's the good stuff. That's what we've been spending hours creating.
So, break up the meat chunks (both the bacon and the pork shoulder) until you've got something that looks a bit more like this.

There is truly an epic amount of flavor in this pot right now.
However, there's still a few more hurdles to leap over before this goes from soup to stew, and the first thing we need to do is thicken things up. (Remember, there's still more liquid that's going to be joining this party in a moment).
To do this, we need to make a roux. Add 1/4 cup of flour to that pot we used earlier to temporarily hold the meat, then pour in just enough of the reserved pork fat to make a paste, and heat this up over a medium flame.

Once properly toasted, it should darken and get all bubbly. Remember to stir this constantly to avoid burning.

Add this to the pot (do be careful, it is extremely hot) and dump in the gelatin mixture while we're at it.

Bring this just up to a simmer, but don't boil it, as the heat will start to break down the gelatin and we don't want it to just go to waste.
You should end up with something that's starting to look a bit more opaque and stew-like.

As soon as it comes up to a simmer, kill the heat and add the veggies into the pot. This is finally the point where the flavours balance out, so feel free to give it a taste and adjust the seasoning as needed.

Just try not to eat the whole pot while you're standing there over the stove.
This is almost the point where we start filling the pie shells, but unfortunately it's still too hot. So, give it some time to chill.
Or, if you're like me...

... be impatient about it.
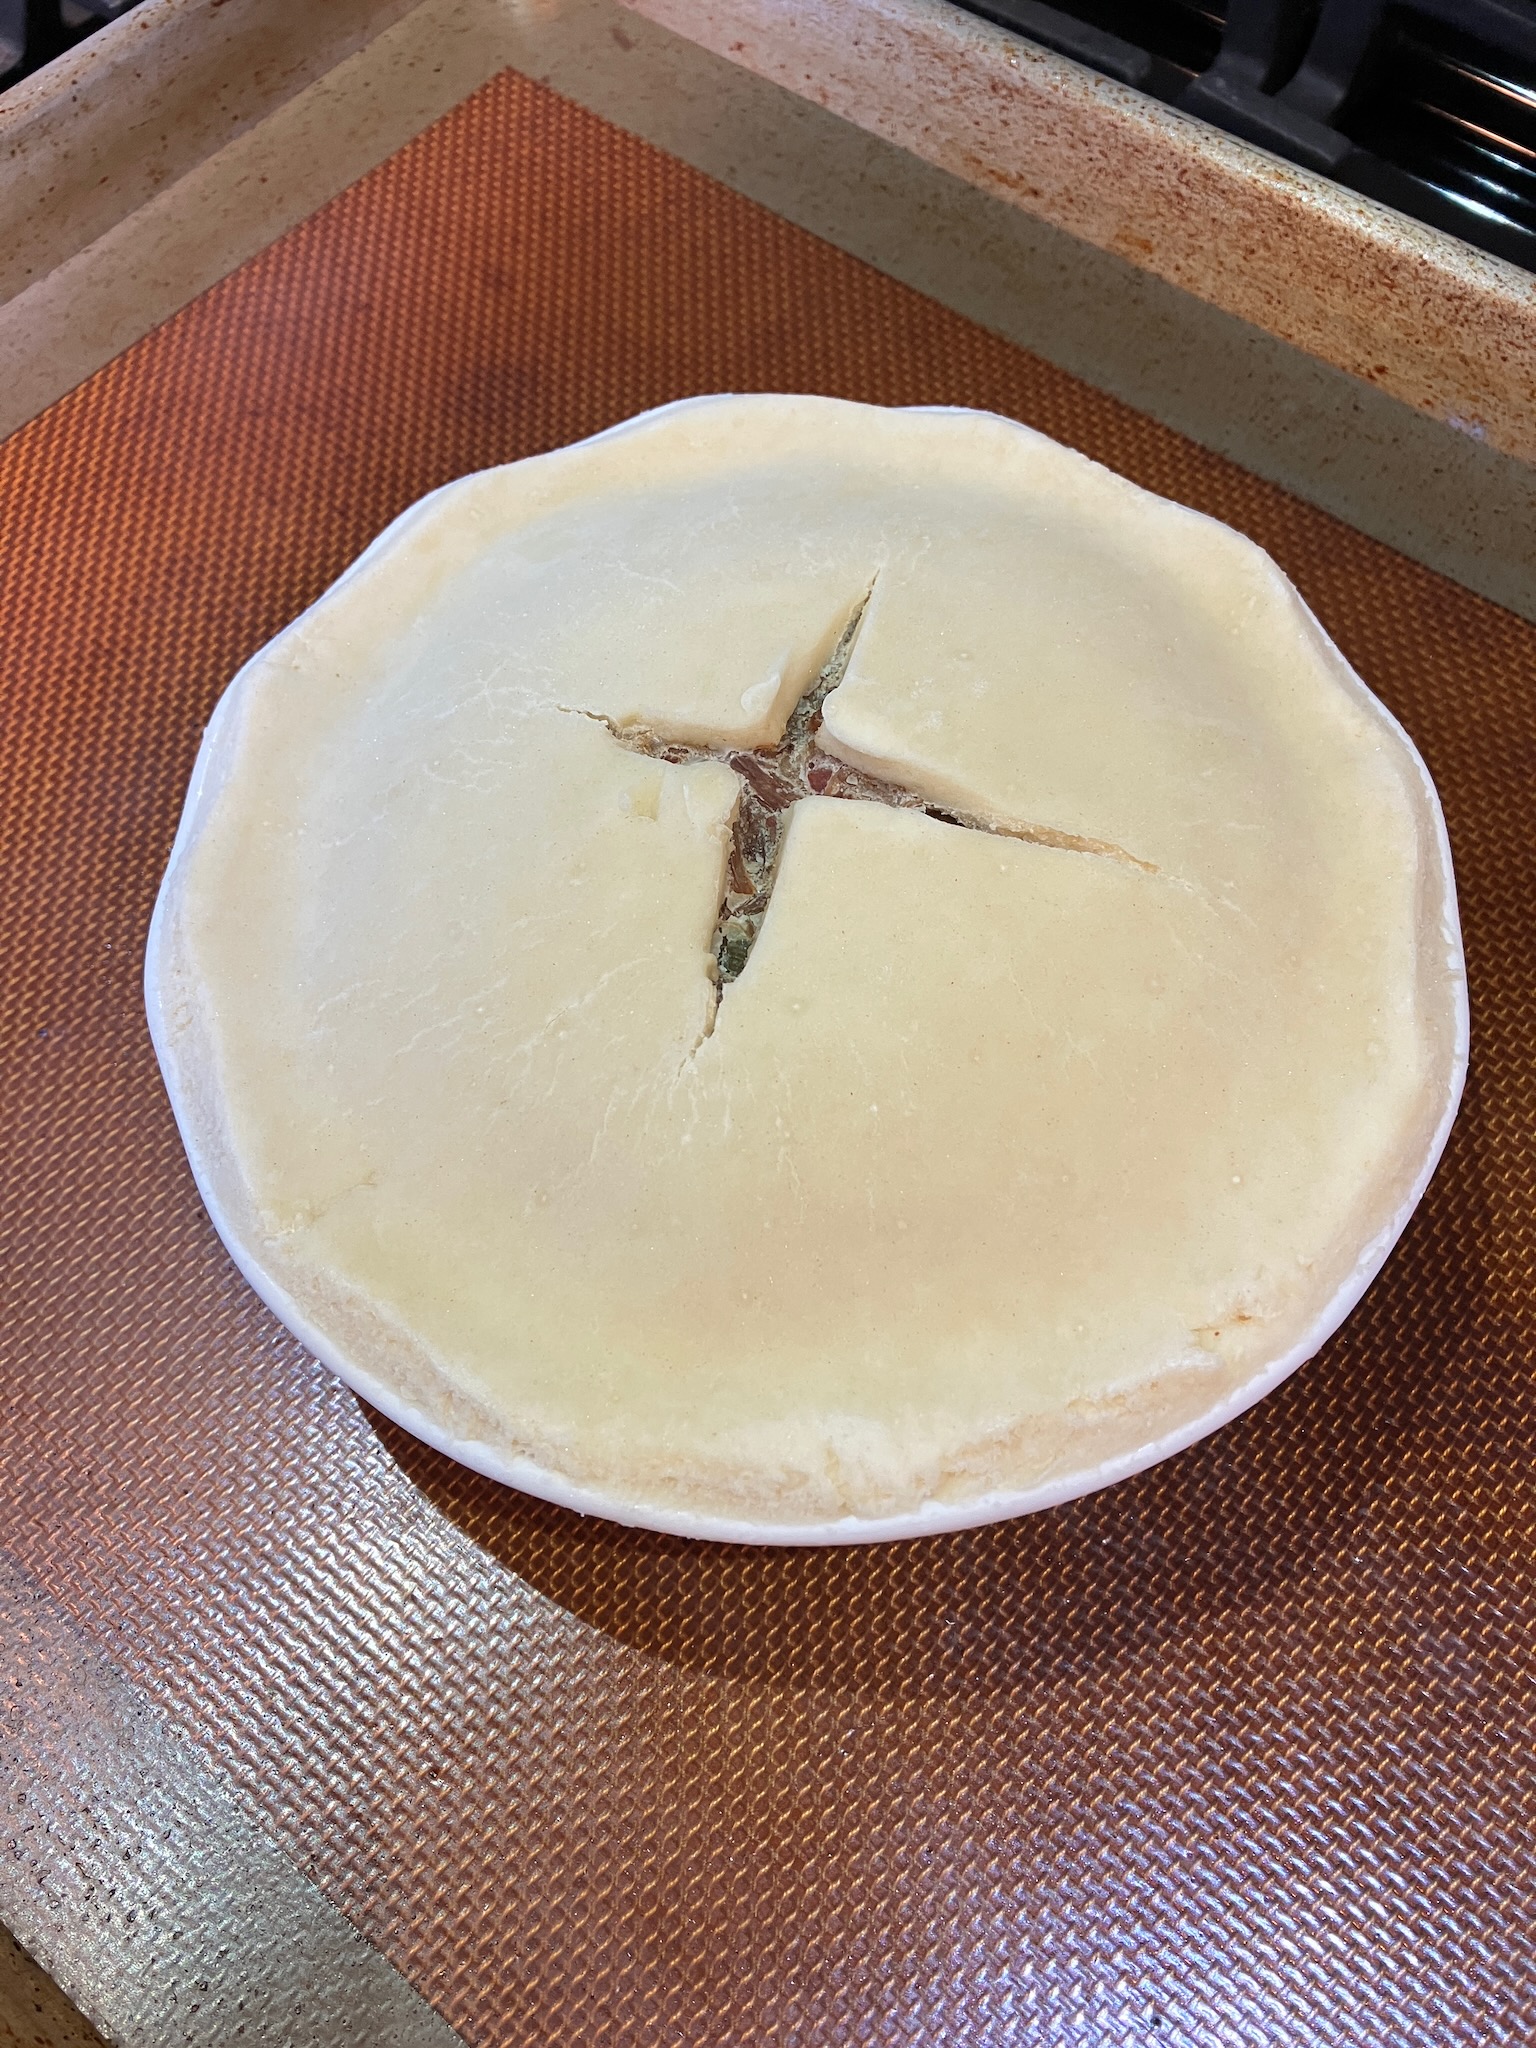
Meanwhile, the pies will need lids, so let's roll those out using the other half of the dough.

Don't be surprised if your sanity starts slipping after all this work.
Anyway, with a well cooled filling and all the pie crusts ready, it's time to fill. I generally aim for a little under 1lb of filling per pie, or 400g because I'm still wired for metric.

You can safely go to 425g or so, but if it starts getting close to 450g I'll just save a portion for leftovers instead. Overfilling a pie crust is inviting tragedy later.
Make sure to dab some water on the rim of the lower crust before pinching the upper in place, in order to get a reasonably secure seal.

And of course it's vital that you trim away any ragged excess dough from the edges, otherwise how else would you prepare a little chef's snack after rolling out those scraps and sprinkling it with sugar and cinnamon?

From here the pies go straight into the freezer. I like to put them in uncovered so that the top of the pie crust can dehydrate a little in the free air rather than form frost crystals on the inside of the foil I wrap them with, but either way they'll eventually get topped with foil so they don't end up mummified.

I suppose you could cook them from fresh too, but you're on your own for figuring out the baking time and temperature.
From frozen they cook at 400f for between 65-85 minutes, mostly depending on how much filling you overstuffed them with (it takes longer for the heat to reach the center). As soon as they reach 160f in the middle they're ready to eat, and should look roughly like this.

So get it onto a plate with a little side dish, preferably something that'll cut through the richness of the pot pie.

All that's left to do is dig in!

Bone Apple Tea.
No comments:
Post a Comment