Showing posts with label Darn It. Show all posts

Sunday, March 30, 2025

Off The Shoulder

So it's time to deal with this t-shirt again.

It's a lovely t-shirt and all, but it's quite obviously made pretty cheaply compared to your average t-shirt (which is saying something). The material is pretty thin, the stitching has already failed in a number of places previously (and repaired in other blog posts), and of particular note is the lack of a certain feature on this t-shirt that almost all other t-shirts have.

You see, a standard jersey knit t-shirt fabric stretches in the horizontal direction a lot more than it does vertically. For the most part this is fine, because the human beings inside of the t-shirts tend to expand and contract much more in the horizontal axis than the vertical one. However, this does pose one minor problem, which is the stability of the shoulders.

The shoulder seams are mostly horizontal, and as such are quite stretchy. However, we don't really want the t-shirt to stretch across the shoulders or across the back of the neck, as this will cause the sleeves to sag or the neck to gape. On most t-shirts, you'll find a piece of fabric tape sewn along the inside of the shoulder seam and back of the collar. On this t-shirt, no such tape exists.

So let's add some. I don't happen to have some exactly matching jersey fabric that I can form some tape out of (orienting the fabric perpendicular, so that the less-stretchy vertical axis supports the seam) and I certainly don't have a 2-needle chain stitch sewing machine with tape feeder that's usually used to apply this detail in an industrial setting.

... must resist temptation...

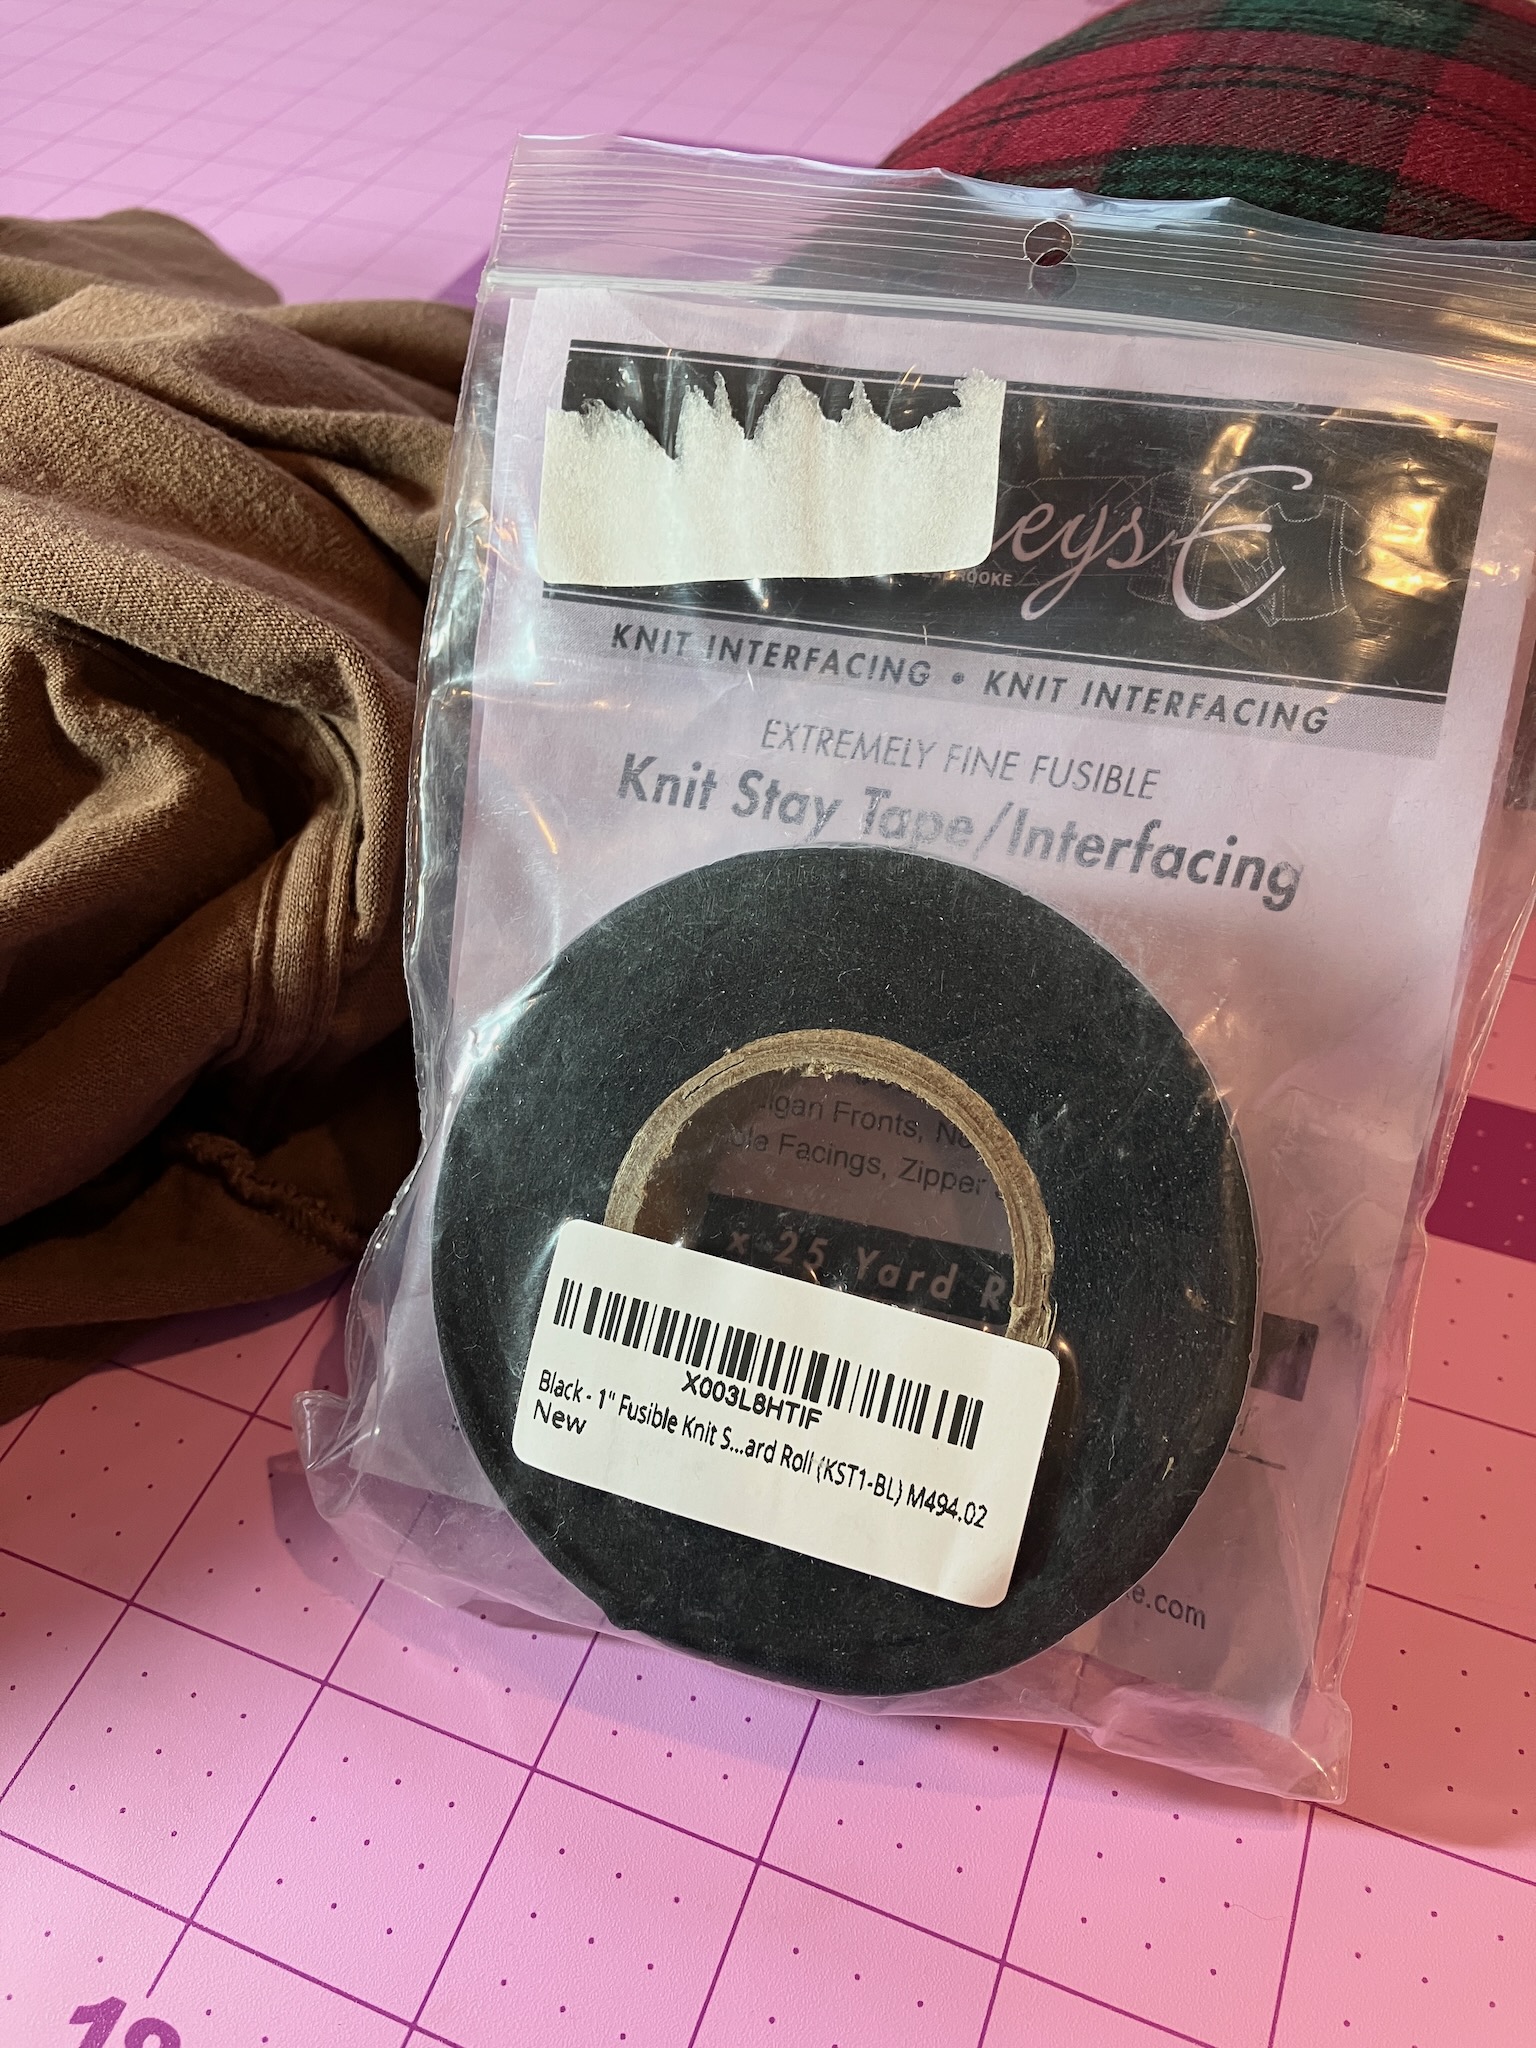
So instead I'll just be applying some fine cotton twill tape instead, using my coverstitch machine to get an even 1/4" spaced pair of seams.

Before we go sewing the tape on, though, I'll need to press the existing seam towards the back of the t-shirt, as is tradition. A sleeve roll makes this operation much easier than trying to do it flat on the ironing board.

Using the coverstitch machine means that the tape will need to be on the bottom side, and given that it's only 3/8" wide, I don't really have a lot of wiggle room to make sure that I catch both sides of it. So in order to improve my chances, I'm going to baste the tape in place first to keep it aligned.

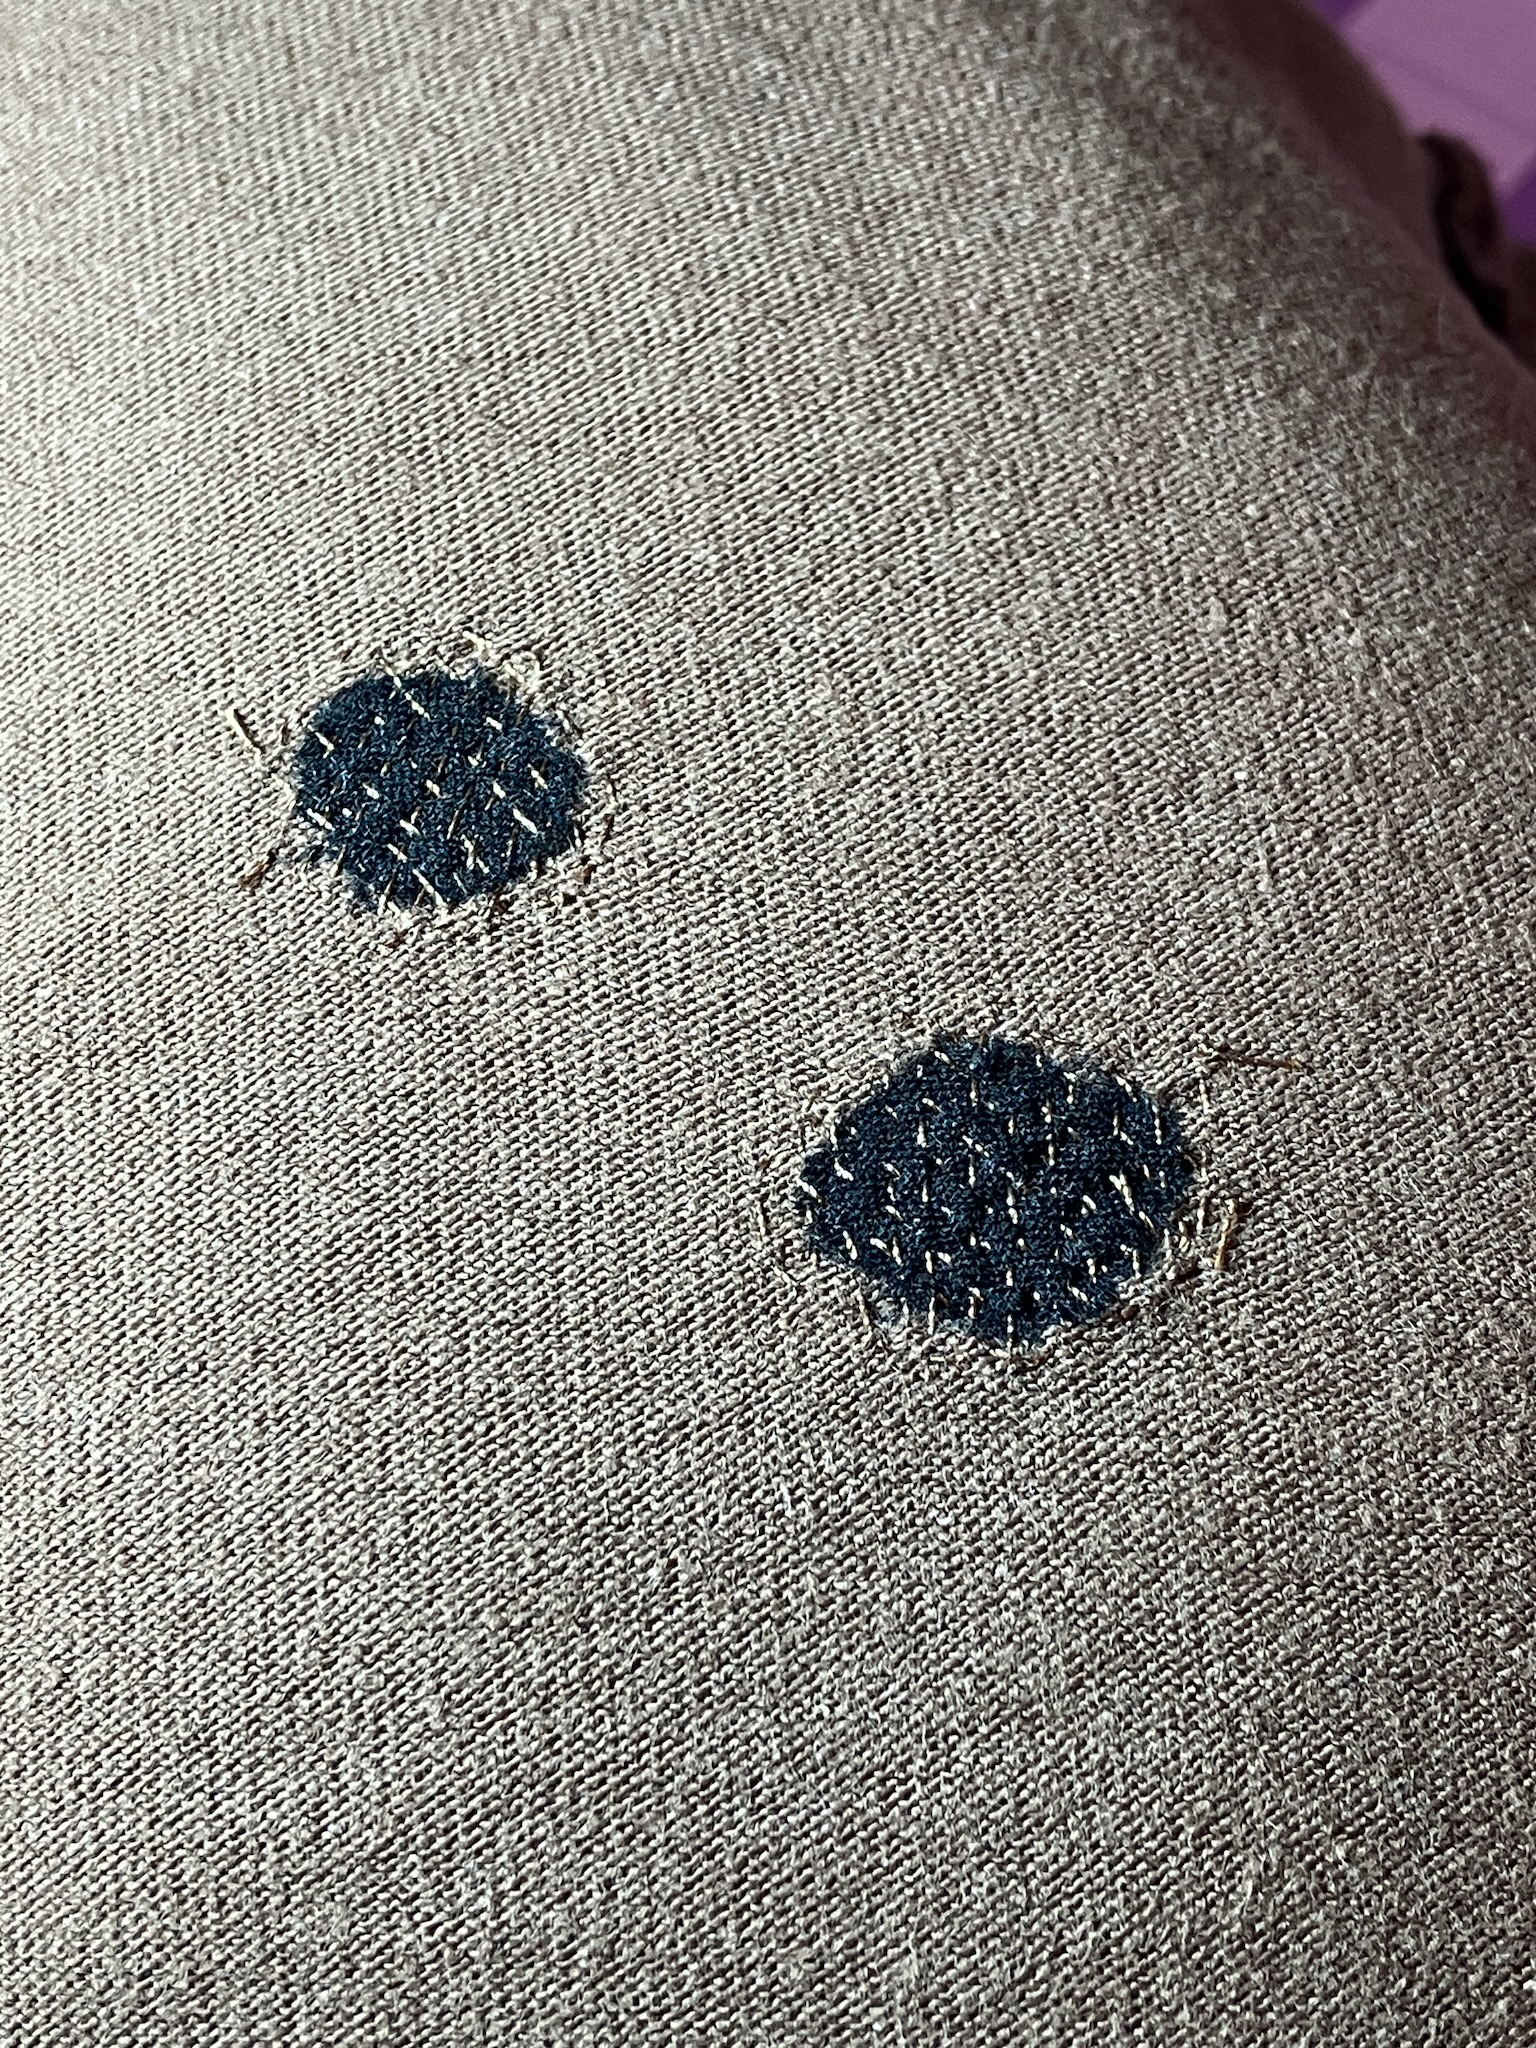
This worked... sort of. I didn't have too much luck keeping the tape aligned over the seam, mostly because the seam itself was rather narrow and lumpy, and sewing machines in general don't really like sewing over narrow, lumpy things.

I picked out and re-baseted a few areas with the sewing machine before finally giving in and doing most of it by hand instead, which I probably should have done from the start.

This definitely would have been a lot easier with an industrial double-chainstitch machine.

Anyway, it's time to sew this into place for real, so out comes the coverstitch.

And I was quickly reminded why I don't often use this machine: it is awfully cantankerous. I did, however, finally nail down exactly what was causing it to be disagreeable, and it turned out to be the particular thread that I was trying to use in the looper.

The issue was that I could walk the machine forward by hand and it would stitch perfectly for as many stitches as I had the patience to manually make, but as soon as I stepped on the pedal to sew for real, it would instantly break the looper thread with no real hint as to why.

As it turns out, there's a particular phase in the stitch forming where the needles are coming down behind the looper, and the looper thread comes exceptionally close to the tip of the leftmost needle. If the looper thread is a little bit unruly, the needle will catch the looper thread and pretty much immediately shred it, and this will generally only happen when the machine is running at-speed.

Thankfully the solution is as simple as just using a different thread for the looper, and I happened to have some on-hand that was in a reasonable enough colour to do the job.

So onward we sew.

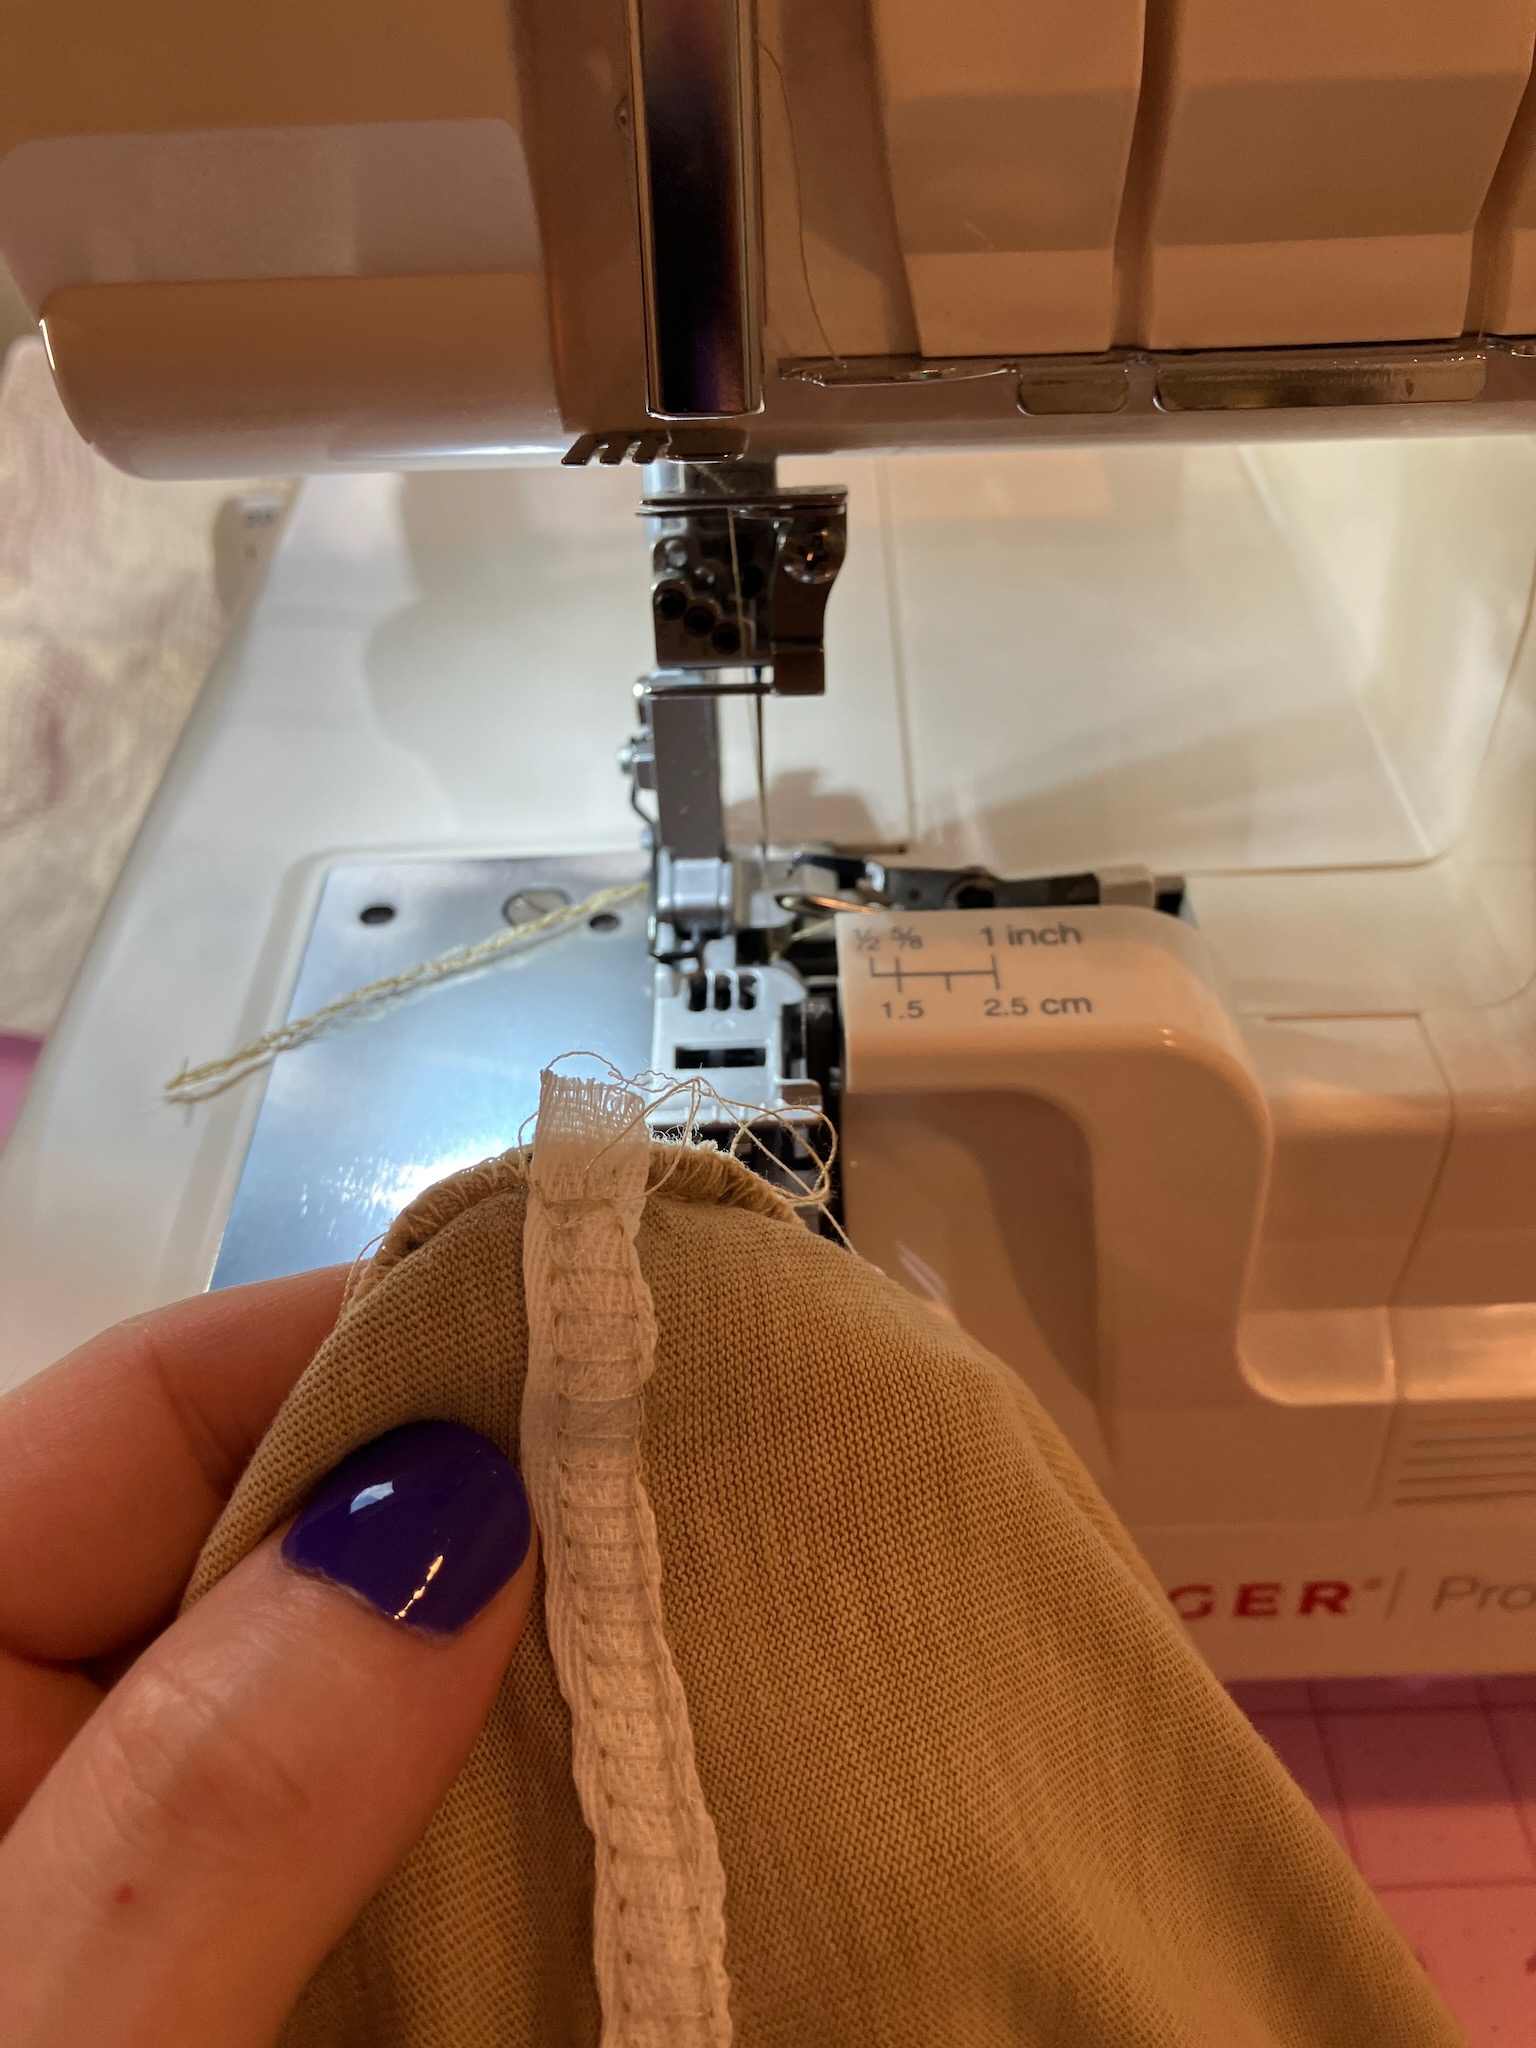
And I'll give a little shout-out to the clear foot here. It is, as you can clearly see, quite useful in this sort of situation.

And after what felt like hours of prep work, the tape is sewn in place.

Is it perfect? It could be better. But it's good enough to do the job, though it's not done yet. (and not just because I haven't yet removed the basting stitches)

Normally, this tape would be applied to the t-shirt before sewing the sleeves on. The sleeve seam would then catch the end of the tape and secure it into place. I don't really want to take the sleeves off of this t-shirt just to get the tape sewn into the seam, especially since I would also have to remove the entire side seam on both sides, so instead I'll just sew over the existing seam.

Away goes the coverstitch machine, and out comes the overlocker... which is also a coverstitch machine in this case; this particular model happens to incorporate both functions in one. Why didn't I use it for both operations? Largely because I wanted to put more miles on the other coverstitch machine in hopes of figuring out how to make it less cantankerous, which I did manage to do, so mark that down as a success.

Anyway, enough digressions, let's get overlocking.

A one-needle 3-thread overlock is the stitch of choice here, matching the original seam done at the factory.

Then after another quick press to help close up the stitching holes from the basting, the t-shirt now has much better stability across the shoulders, and will be way less prone to sagging and stretching when worn.

And don't worry, you won't see the white twill tape when there's a person inside it. Instead, you'll just see a t-shirt that hangs much better across the shoulders.

Monday, March 10, 2025

Darn It All, Again

These grey socks are going to be the death of me. This time I found a pair of holes right under the ball of my foot.

So, time to get the needle and thread out again and darn it up.

Though I feel like the socks are getting pretty thin, so they might not be long for this world despite these efforts. Ah well.

Saturday, February 1, 2025

Darn it again

On the gurney today rolling in for treatment is one of my t-shirts, which happened to grow a few unfortunate holes on the back of one of the shoulders.

Since t-shirts are a knit fabric, you really don't want to leave holes like this alone, as they'll have a tendency to grow over time. So let's dive in.

The first step is to apply a bit of ultra-light knit interfacing to the back. This mostly comes in either black or white, and since we're dealing with a dark colour the black will blend in a bit better if it happens to show through somewhere.

The good news is that I have a roll in my stash. The bad news is that it's definitely not knit.

Yeah, that's definitely woven. Sigh. Well, whatever. T-shirts don't need to stretch all that much, and I can just apply it on the bias and it'll be fine.

So, on it goes.

And even without doing anything else, we're already looking quite a bit better. The glue on the interfacing is holding down the loose threads nicely, though the fact that we also just pressed it with a hot iron is certainly contributing to the improvement too.

And on the backside, things look well adhered.

But a little light heat-set glue and some pressing isn't going to last more than a few trips through the wash, so we need to get things secured a bit more permanently. Last time I used machine darning to close up the holes, but that leaves quite a bit of thread showing on both the front and back, and I want something a bit more hidden this time. So, we're going old-school.

We need a very fine needle for this work to prevent punching huge holes through the fabric, and a #12 is about as fine as you can readily get these days.

I'm not sure the black oxide coating is really all that much more special than a chrome or titanium nitride coating, but whatever, they'll do the job.

So in we go with a basic running stitch. Since t-shirt fabric is knit stockinette, it tends to stretch from side to side, but not up and down. So we'll do the stitching on the bias (much like how we applied the interfacing) and even go a little further by angling both directions of stitching more vertically than a plain 45 degrees.

The goal here is to keep most of the thread on the back side here, catching only enough of the front of the fabric to keep the stitches secure. This will minimize the visibility of the stitches on the right side.

Once we've stitched back and forth in one direction, we come back across at the opposite angle.

We also want to make sure that we're not pulling the thread tight. It should be just pulled through so that there's no loose loops, but not making any pulls or puckers in the fabric. Also, since I'm using a somewhat slippery polyester machine embroidery thread here, tying off both ends is vital for keeping everything in place.

We don't need to completely bury the patch in stitches, just get it sewn down enough so that it fully reinforces the hole and can't come up around the edges.

From the top side, we can see that we were largely successful with keeping the stitches from showing through.

However, with a raking light it's still obvious that there's some unevenness here.

This is unavoidable, but we'll be rectifying it shortly. But first, we need to sew down the second patch.

Speaking of sewing, and especially since we're using a very fine needle, now is a good time to cover the proper use of a thimble. The uninitiated might assume that the thimble is intended for the off-hand, to armour one's fingertips and protect them from the jabs of the pointy end of the needle. However, this is not the case.

Rather, it is for wearing on the sewing hand, and is used to push against the butt of the needle when you're forcing it through the fabric.

A needle that's fully woven through the fabric like this can take a fair bit of force to push through, and the thimble prevents the butt of the needle from pushing back through your finger while you're applying that force.

Anyway, second verse was the same as the first, and both patches are now secured.

And on the front side we're once again greeted by stitches we can't see, but puckers we can.

At least in this harsh, raking light.

But the solution is as obvious as it is straightforward: pressing.

The heat of the iron on the "cotton" setting actually softens the polyester thread, causing it to conform to the shape of the stitches. This both allows the fabric to flatten back out, as well as kinks the thread so that it's much less likely to shift or pull out as the fabric moves around during wear and washing.

And now, particularly in much less harsh light, you'd be hard pressed to see where the darning was even done, unless someone pointed it out to you.

Ok here, I'll point it out to you.

The slight light spot you can see is only really visible in the photos, and is just due to the pressing having flattened some of the natural fuzziness of the t-shirt fabric. It's not apparent in person, and will vanish completely after the next washing.

So, chalk up yet another successful repair.

Saturday, August 10, 2024

Darn It

For a while now, one of my tea towels has had an issue.

Specifically, it's had a small hole in the relatively coarse waffle woven fabric.

Now this is certainly not the first time I've had to deal with fixing holes in fabric. For example, the handle on one of my shopping bags got caught in the trunk lid catch of a rental car once.

I used a back-and-forth technique on this repair, using my Brother CS6000i, and it went rather slowly due to it being a computerized machine (computerized machines tend to be very slow when sewing backwards).

More recently, as in earlier this week, I went through and darned all the holes in my wash cloths using my Brother Nouvelle 1500

The wash cloths in particular turned out very good, with the repairs only barely visible.

Since the Nouvelle 1500 is a mechanical machine, it can sew in full speed going forwards or backwards, and can transition between the two basically instantly.

That meant I could just put my foot to the floor and toggle the reverse lever with my right hand while my left hand guided the fabric such that it would slowly walk from right to left as the sewing machine fed it back and forth.

For the tea towel, however, I decided that I wanted to try out free-motion darning, and so it was back to the CS6000i, since that's the only machine I have a free motion foot for.

On a smaller machine like this it also helps to have an extension table, so that you have a bit more room to plant both hands on the fabric while you're moving it back and forth.

And don't forget to drop the feed dogs.

But before we get to the darning, we need some matching thread, and in terms of sewing thread I don't seem to have any good greens for this particular shade of faded tea towel.

The leafy green would have been a bit too bright and the mossy green would have been a bit too brown. The neon green would have been obviously a bit much.

Of course, I do also have machine embroidery thread.

The colour match is almost spot on, which is great. The only downside is that embroidery thread tends to be a lot glossier than sewing thread, but I think I'll be able to get away with it.

So we'll wind up a bobbin (which feels a bit weird to do with embroidery thread) and then get to sewing.

Curiously, free motion darning is one of those techniques where it's actually a lot easier to go fast than it is to go slow. The fabric only moves when the hopping foot is up (the needle bar screw lifts up against a bar on the foot at the top of the needle stroke), and so having that motion happen more frequently makes the motion much smoother.

So the trick is to drop the hammer and just go for it.

The hole closed up nicely here, but I've only done the darning in one direction (vertically in the photo). I turned the work 90 degrees and did another pass to ensure that nothing would be coming apart again.

The waffle weave did obviously flatten out a lot in the darned section, but it shows up a lot less in person than it does on camera.

And with the hole patched up, there's nothing left to do but put it back in service.

Not that I would ever hang towels from the oven door handle. No, not me, no sir.