Saturday, June 29, 2024

These Feet Were Made For Walking

Soooooo this followed me home.

This is a Consew 18 walking foot industrial sewing machine. It is a clone of the Singer 16-188, and dates back to the 1940s, at least in terms of its initial introduction. I don't actually know what the full production run of this model was, or what year this particular unit dates from.

Now you might ask why I've brought home another sewing machine, and the answer is "it was 'broken' and therefore extremely cheap". If you know me, you know that a broken sewing machine is just a functional sewing machine that someone doesn't know how to use, and this one was no different.

When I went to pick up the machine from the CL seller, who happened to only live about a 10 minute drive away, I gave the handwheel a spin to get a feel for what might be wrong, and I quickly noticed that the inner and outer walking feet were hanging up on each other.

Now "inner" and "outer" is a bit misleading in this machine's current set-up, since this walking foot set is for zippers or welting and thus the outer foot has only a single toe instead of two, but the convention is that the foot that the needle goes through is considered the "inner" foot, and the other one is the "outer" foot.

Anyway, once I got the machine home, the diagnosis couldn't have been easier.

The screw holding the outer foot in place was simply too long, and it was hanging up on the inner foot. I initially thought I might have to modify this screw to grind it down, or maybe order a replacement, but it then occurred to me that both feet are held on by screws with the same thread.

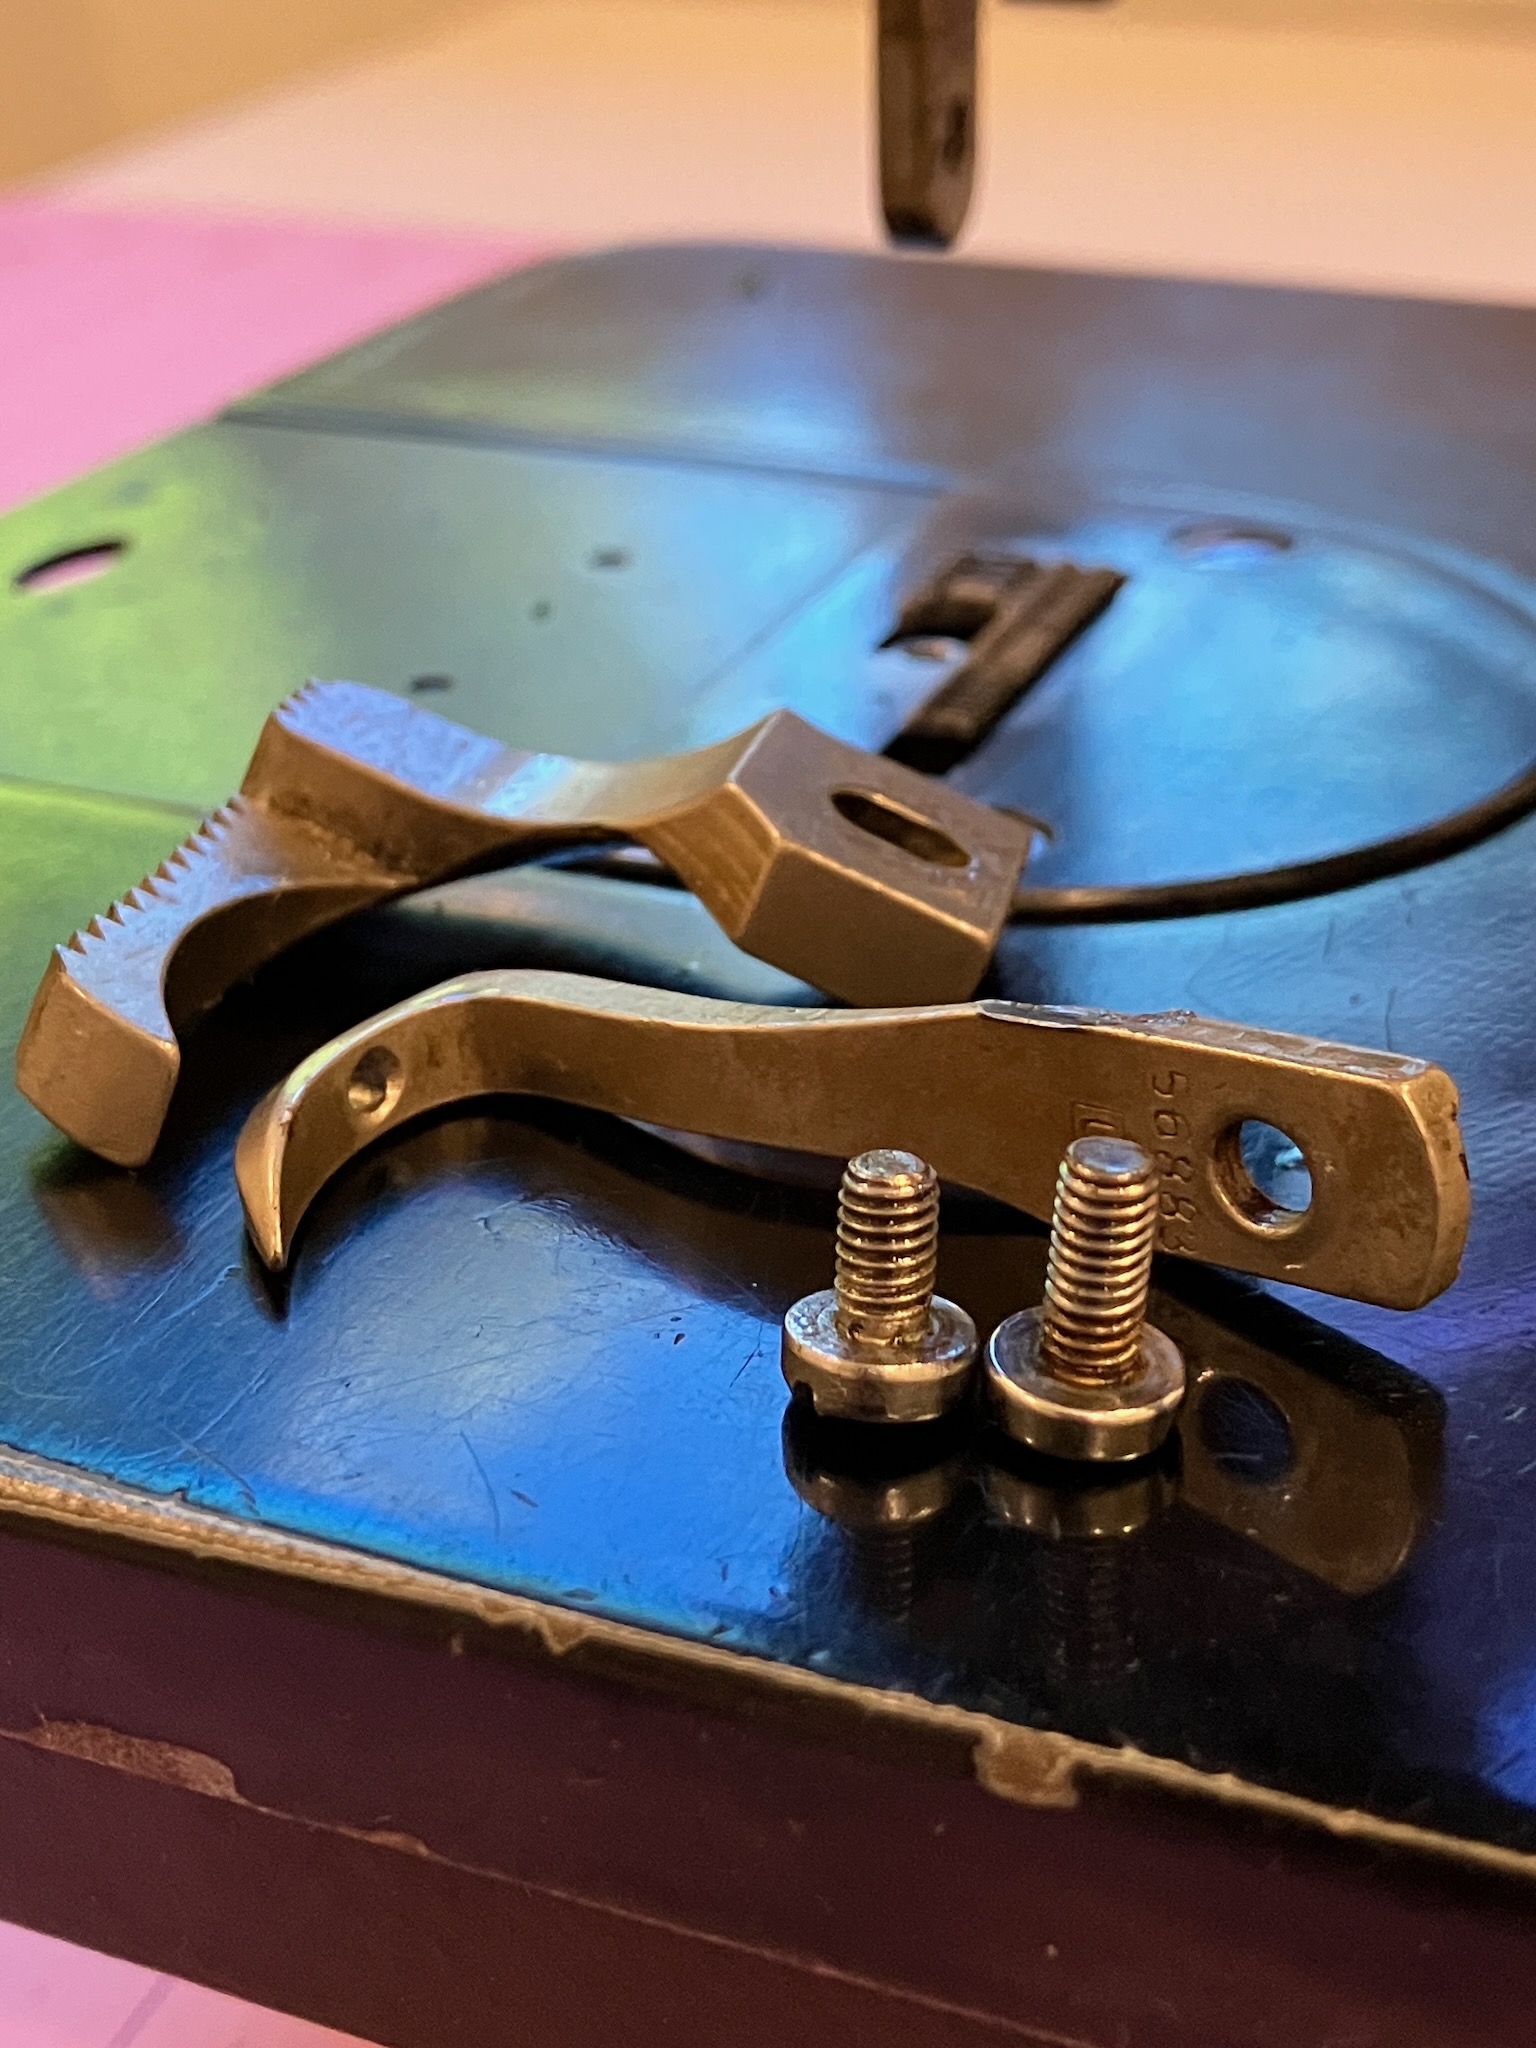
And the one that's supposed to be used for the outer foot is just a wee bit shorter than the one used for the inner foot (which doesn't have any interference concerns).

Ok, that's one problem down, but there was still one to go. When I looked at the photos on the CL ad, I noticed that the needle plate screws weren't screwed in all the way, and that was a good sign that there was a problem brewing somewhere in that area.

Now the feed dogs on industrial machines can sometimes cause a bit of a fuss, because they're not always manufactured to the exact same specifications. This is accounted for by the mounting screw holes having a little slop, and the idea is that you're supposed to lightly snug the screws at first, then put the needle plate in place to line up the feed dog with it, and then remove the needle plate again to tighten down the feed dog screws.

I tried to do this, but every time I cycled the machine, the feed dogs seemed to get knocked out of alignment, which didn't seem right. That's when I realized that someone must have messed with, or didn't know that they should have adjusted, the feed dog offset adjustment.

You see, the feed dogs are driven by a pair of shafts on the underside of the machine. In the case of this machine, the shaft towards the operator side controls the up and down motion of the feed dogs, while the shaft at the rear controls the fore and aft motion. Both of these shafts have a clamp that can be loosened so that you can adjust the height of the feed dog, as well as its position within the needle plate, respectively.

For the height adjustment, the clamp is just next to the hook area underneath the machine, and for the fore-aft adjustment it's on the opposite corner underneath the column of the machine.

You just have to loosen this screw, nudge the feed dogs back and forth so that they're centered in the needle plate, and then snug it back up again.

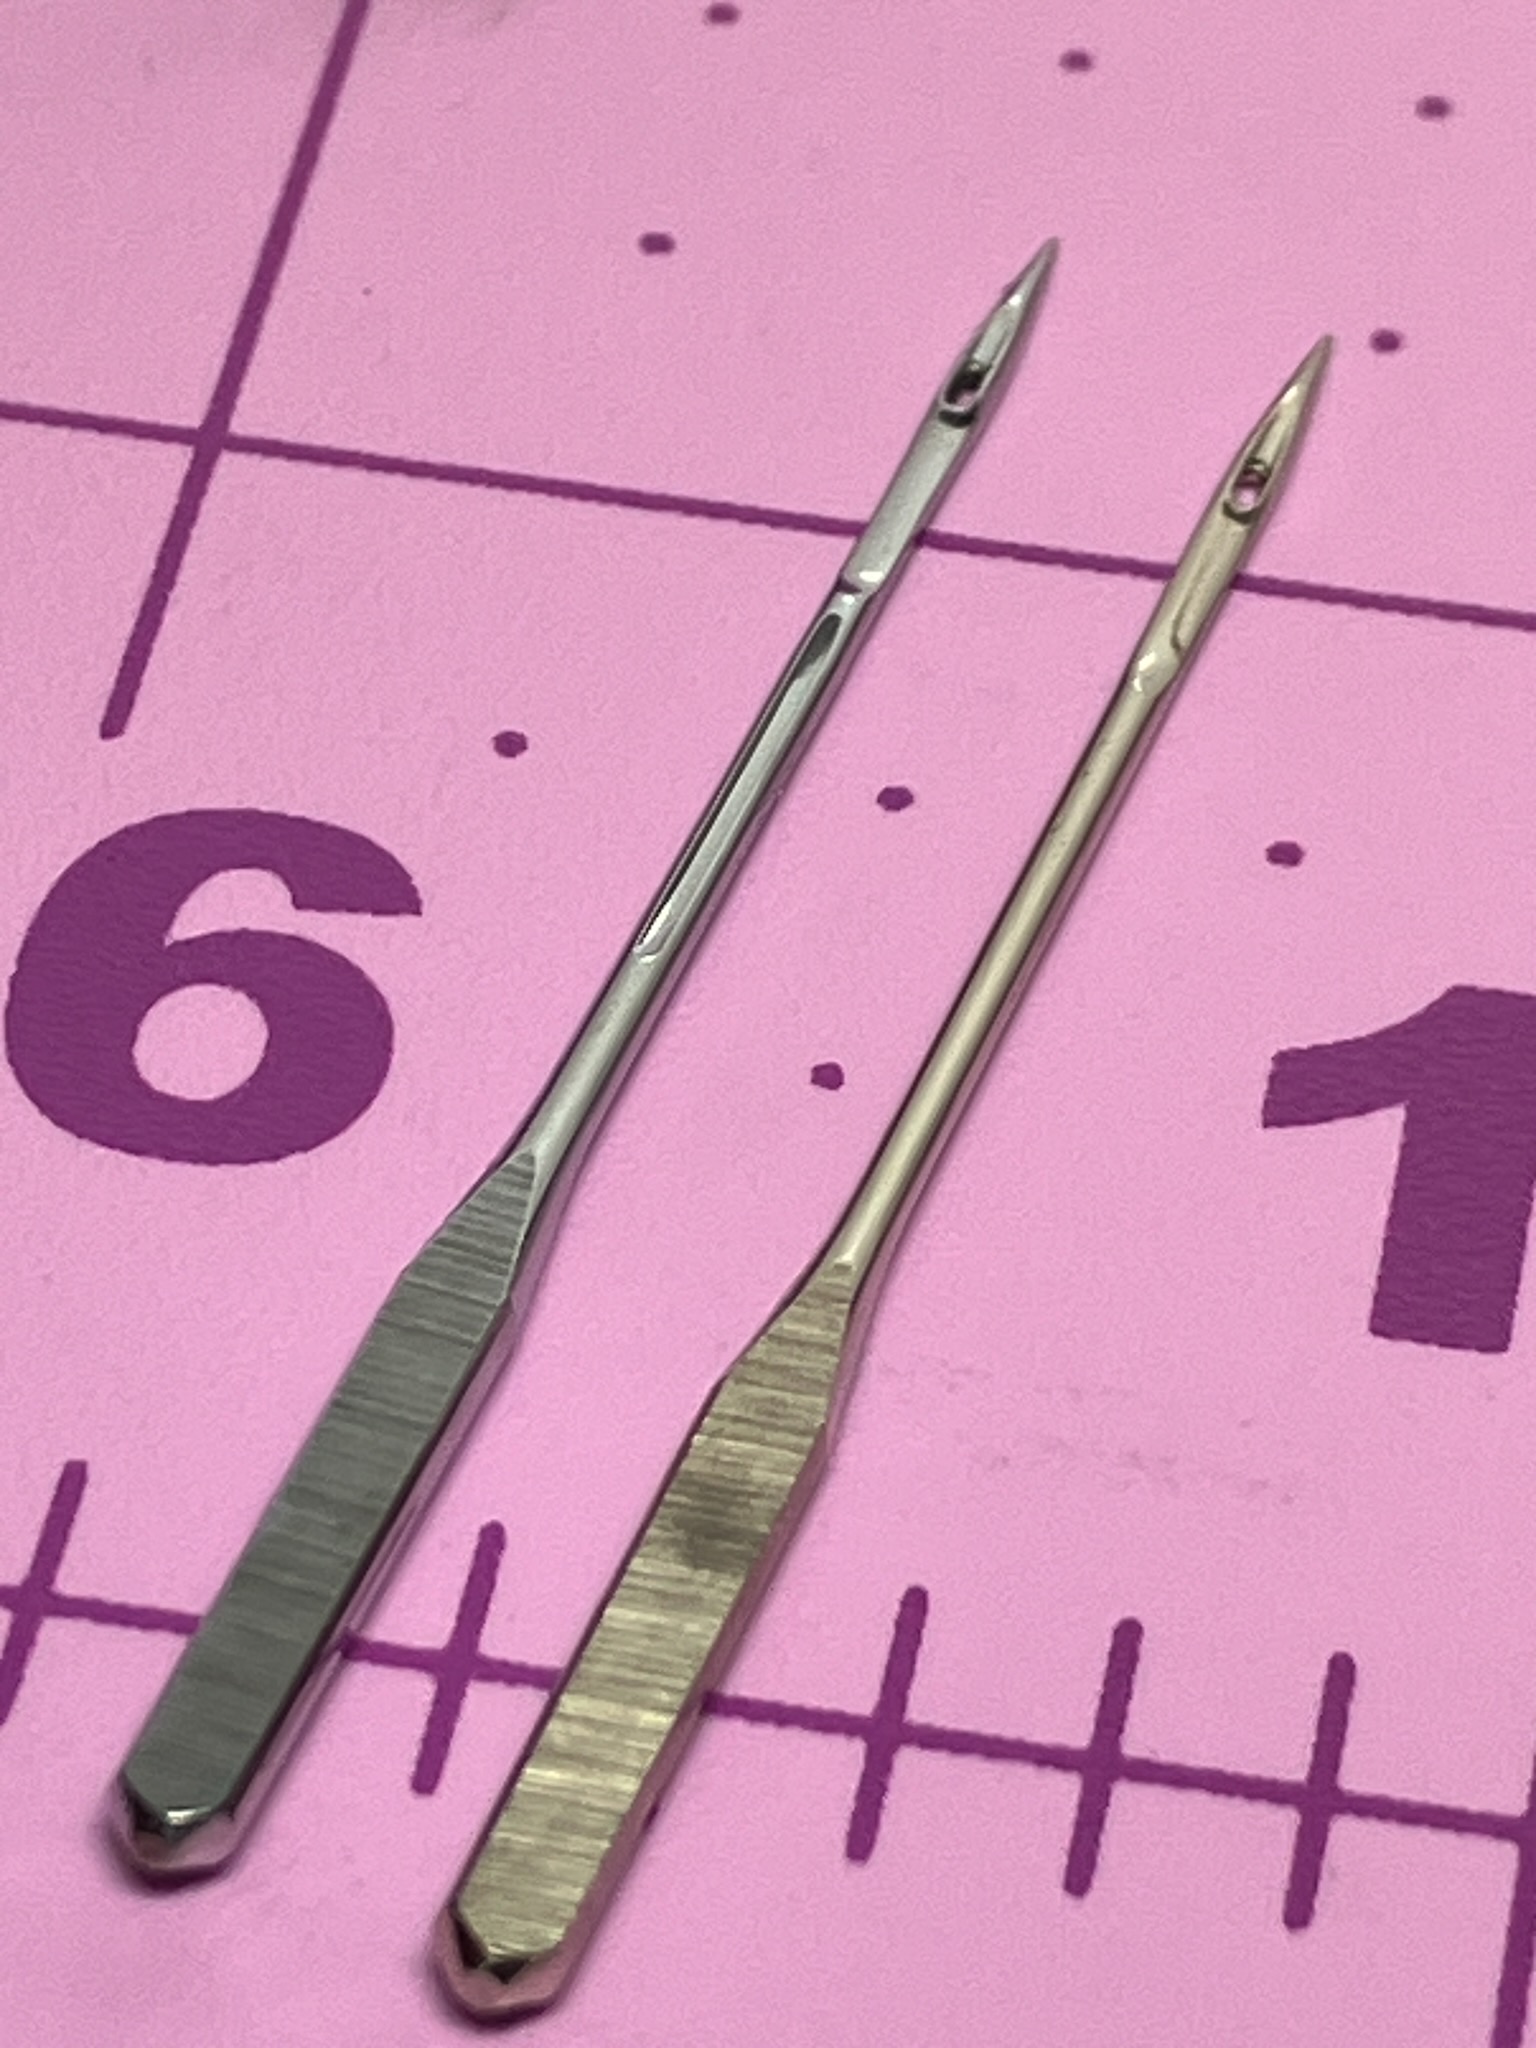
Now for the final adjustment, I decided to retime the machine for a different needle system. The machine originally came set up for the 16x63 needle system (as it was, of course, a clone of the Singer 16-188), but that's a somewhat uncommon needle these days. Much more common for walking feet machines is the DBx17 (aka 135x17) system, but that needle is slightly longer (and thus incompatible with) the even more common DBx1, DPx5 industrial needles, and HAx1 (aka 15x1, or 130/705h) domestic needles. So, given that all my other machines take the latter needles, I decided to go for that.

Now if you just install a HAx1 needle in this machine, what you get is a machine that won't sew, since the needle is too short to reach the hook, and thus the hook won't be able to grab the thread and loop it around the bobbin.

Thankfully, the solution is very simple: you just need to loosen the set screw clamp holding the needle bar, which is conveniently accessible through this little hole here.

And then you watch this video where I explain how it all works.

Friday, June 28, 2024

Being Picky

The plums have been doing well this year, and mostly I've been harvesting them by either grabbing the ones I could reach, or using my 8 foot stepladder to get the ones higher up. However, this means I have to move the stepladder around quite a bit while picking, and I also can't necessarily reach the plums that are hiding behind too much foliage that blocks my access.

But technology to the rescue.

This type of wire basket fruit picker is ideal for plums since they're a very soft fruit and, once they're ripe, they fall easily from the branch with just a little coaxing.

There's still a few branches I can't reach without using the combination of the ladder and the picker, but it's much more convenient than using the ladder for everything.

These aren't all quite ripe just yet, but I'm picking them a little bit early to keep them away from the rats, and because they'll ripen up nicely on the counter in a day or two. Then it's a quick wash and into the freezer with them so I can turn them into jam once the season comes to a close. More on that when the time comes.

Wednesday, June 26, 2024

Uncovering Stitches

If you will remember back a few weeks, in a previous post I mentioned that my Brother CV3550 Coverstitch machine was being a pain in the ass getting itself jammed up by grabbing two loops of needle thread at the same time. What I didn't mention at the time is that all signs pointed to there being too much friction in the needle thread path, and so today we're going to have a look at it.

Yup, looks like a coverstitch machine.

First things first, Brother, for some reason I'll never understand, specifies and ships this machine with standard domestic HAx1 needles. Universal tip, even. There's two things wrong with this.

First off, I'm probably mostly going to use this machine with knits, so it makes a whole lot more sense to get ball-point needles so that the needles go between the threads rather than through them.

Secondly, the ELx705 needle is much more appropriate for chainstitch machines like a coverstitch or overlock machine.

But why is that? After all, on the front of the needle everything looks the same between them. On the left is the ELx705 needle, and on the right is the HAx1

Both of these needles have roughly the same groove up the front, basically the same eye, and almost the same tip (the needle on the left is a ball point, which is ever so slightly more blunted).

But if we flip them over, what do we see?

The scarf is basically the same, but what's this? On the ELx705 needle on the left, we can see an extra groove! This groove is very important.

You see, when a regular lockstitch machine forms a stitch, the needle thread from the previous stitch is already pulled taut and there's no slack to take up, thus there's no excess thread behind the needle that needs to be drawn down through the fabric of the new stitch. But not so on a chain stitch machine, there's still a significant amount of excess needle thread on the looper when the needles come down through the fabric to begin the next stitch, and that excess thread needs to be pulled down through the fabric behind the needle, which is what that extra groove on the back of the needle facilitates.

Obviously if the needle thread gets jammed up behind the needle, then the loop from the previous stitch won't be pulled out of the way of the looper, and you'll get two loops on the looper leading to a jam.

So that's one mystery solved, but we're not quite done here. Let's take a closer look at the top of the machine for a moment.

When the thread comes off the cones in the back, it goes up around the thread tree just out of view, then comes back down and goes under these silver rectangular... things. I call them "things" here because Brother explicitly and deliberately doesn't give them a name. In fact, in the manual, when describing that you should route the thread under these things, it rather obviously avoids naming them, only referring you to an illustration of where the thread should be placed. Curious. Let's remember this part and come back to it later. First, we need to disassemble.

We'll start with the upper looper assembly.

This comes away easily with two tool-free clips.

Next we'll need to get rid of the thread tree, since it's in the way of one of the screws we need to access in the back.

I promise I can aim a screwdriver when I'm not holding a camera.

Next we'll remove the free-arm insert.

And this is a good place to raise a beef about modern domestic sewing machines. They waste so much space to the left of the needle for absolutely no reason. Like that entire plastic shelf under the free arm? There's nothing inside there. And that wart behind it? The only thing in there is one counterweight which could have been made much more compact.

See that? Nothing in there.

Anyway, rant aside, we need to pop off the magical thread take-up door.

Which does literally just pop off.

Then it's just a couple screws to get the top front cover off.

And we'll also want the lower front cover off, and while we're at it we might as well get rid of the rear cover too.

Now that the machine is properly naked, we can get to "servicing" it. Brother claims that you don't need to lubricate the machine, and instead you should take it to an authorized dealer for "servicing" periodically.

That "servicing" is literally just cleaning out the lint and squirting it with sewing machine oil. In this case I'm using Juki's New Defrix #1 because I happen to have a lifetime supply that I bought after I picked up my LS-321.

The name of the game here is "if it moves, give it a drop of oil (no more, and no less)". Most of this machine is actually lubricated with grease, but the grease will thicken up over time, and mixing in fresh oil like this will loosen it back up. Ideally the entire mechanism should nearly spin freely other than the drag from the motor. You can remove the belt to test this, or just not do that and learn to recognize what the machine should feel like with the motor still hooked up.

Now remember back when I mentioned those curious silver rectangles at the start? And how I also mentioned that the needle thread in particular had a lot more friction than I would have expected? Well, it turns out that Brother was pulling a sneaky trick.

Those metal clips are hiding a set of five thread oil sponges. Instead of making sure that the thread path is properly polished for low friction, they just trick you by lubricating the thread instead so that it slides a bit better through the cheaper-to-manufacture machine. Of course, over time these sponges dry out, which is why when you take your machine to the dealer to get it "serviced": one of the lubrication points is to soak these sponges in thread oil.

A little something like this, in fact.

So let's slap the machine back together and see how we did.

And as we can see, the bottom side of this coverstitch looks perfect. No dropped stitches, no weirdness, no issues at all.

And it's the same story on the top side, the stitches and top cover turned out perfectly.

Of course, we can also make different stitch lengths, and they also look just fine on the bottom.

And on the top.

Of course I could probably do to tweak the tension on the various threads but that's something I can deal with when I'm sewing a real project and not just testing the stitches on a piece of paper towel.

So there you are, all the secrets of the CV3550 that Big Brother doesn't want you to know.

Thursday, June 20, 2024

A Sticky Situation

I've been keeping a bottle of molasses in my cupboard for quite some time now. Not the same bottle, of course; I use it up, buy another, use it up again and so on.

I've been buying this brand in particular because it comes in this nice narrow-necked bottle that makes it very easy to pour out a tablespoon or two at a time without making a big mess.

Or, well...

It used to come in this nice narrow-necked bottle.

I've been holding onto this bottle for a while, refilling it from the new jars, but being glass I didn't trust it to last forever and so it was high time I figured out a better long-term solution.

And this solution comes in the form of a 6-pack of brand new swing-top bottles.

They're 16oz instead of 12oz but it's better to be too big than too small.

And I think I like the style.

Wednesday, June 19, 2024

I Need a Lift

Scooty-Puff Sr is a motorcycle with an unusual feature: it has a trunk. Much like most trunks these days, there's a gas strut to keep the trunk lid open when it's open, which you can see here.

This gas strut does a great job of keeping the trunk lid, which is also the seat, open... well, assuming it has a little extra help.

Luckily, through the miracle of suspiciously cheap Chinese parts sellers, I managed to procure a replacement.

Now it might be theoretically possible to replace this gas strut without removing the seat, but it's pretty tight quarters in there so...

Removing the seat is actually a little bit of a pain in the ass, but probably slightly less of a pain than doing the job with it still in place.

Access to the strut is much easier now.

Step number one of doing this strut swap is, surprisingly, to disassemble the new strut. While the new strut came with perfectly serviceable ball joints, as it turns out the balls on the bike side of things are actually welded in place, so we have to separate the joint by sliding up the retaining clip.

And to remove the old strut, the same operation is performed: sliding up the little retaining clip and pulling the head of the ball joint off of the ball.

Also seen here: the blue shop rag that I stuffed in the opening right below the strut after playing "oh god what circle of hell did that clip disappear into" for about 10 minutes before finally fishing it back out of the bodywork of the bike. Mental note: stuff the blue rag in there first next time.

Anyway, the new strut pops onto the ball joints on top and bottom and the clips clip it into place.

And then the seat goes back on, with a bit of struggling.

And magically it holds itself aloft without any external assistance whatsoever!

Truly a miracle of modern science.

Saturday, June 15, 2024

Honsetail

Horsetail is a peculiar plant. It's a reed-like herbaceous plant with hollow, segmented stems that many people confuse for a type of bamboo, and has the peculiar property of propagating via spores rather than seeds. It also has a running habit, sending out lateral roots that can sprout new plants many meters away from where it's growing, and these roots can regenerate even if sliced up into relatively small pieces.

All this makes for a rather obnoxious garden plant, despite its otherwise pleasant appearance.

And so this horsetail in front of my house needs to go.

Preferably before it takes over my entire yard.

You might think, given the above description, that this would be a difficult task. And it might be, if I were not armed with the gardener's secret weapon: a very sharp hoe.

Luckily I am indeed armed with a very sharp hoe, which made quick work of it.

Now I'm quite sure that this plant will try to come back as it's nearly impossible for me to remove every last bit of its roots. But the good news is that my hoe isn't going anywhere and I won't hesitate to use it to keep it knocked down.

With any luck it should be dead and gone by next spring at the latest, at which point the current plan is to plant some lemon thyme here, which should pair nicely with the rosemary bushes just on the other side of the hose reel.