So the time has finally come for me to deal with the front of my house.

This will be a long post, so join me below after the break.
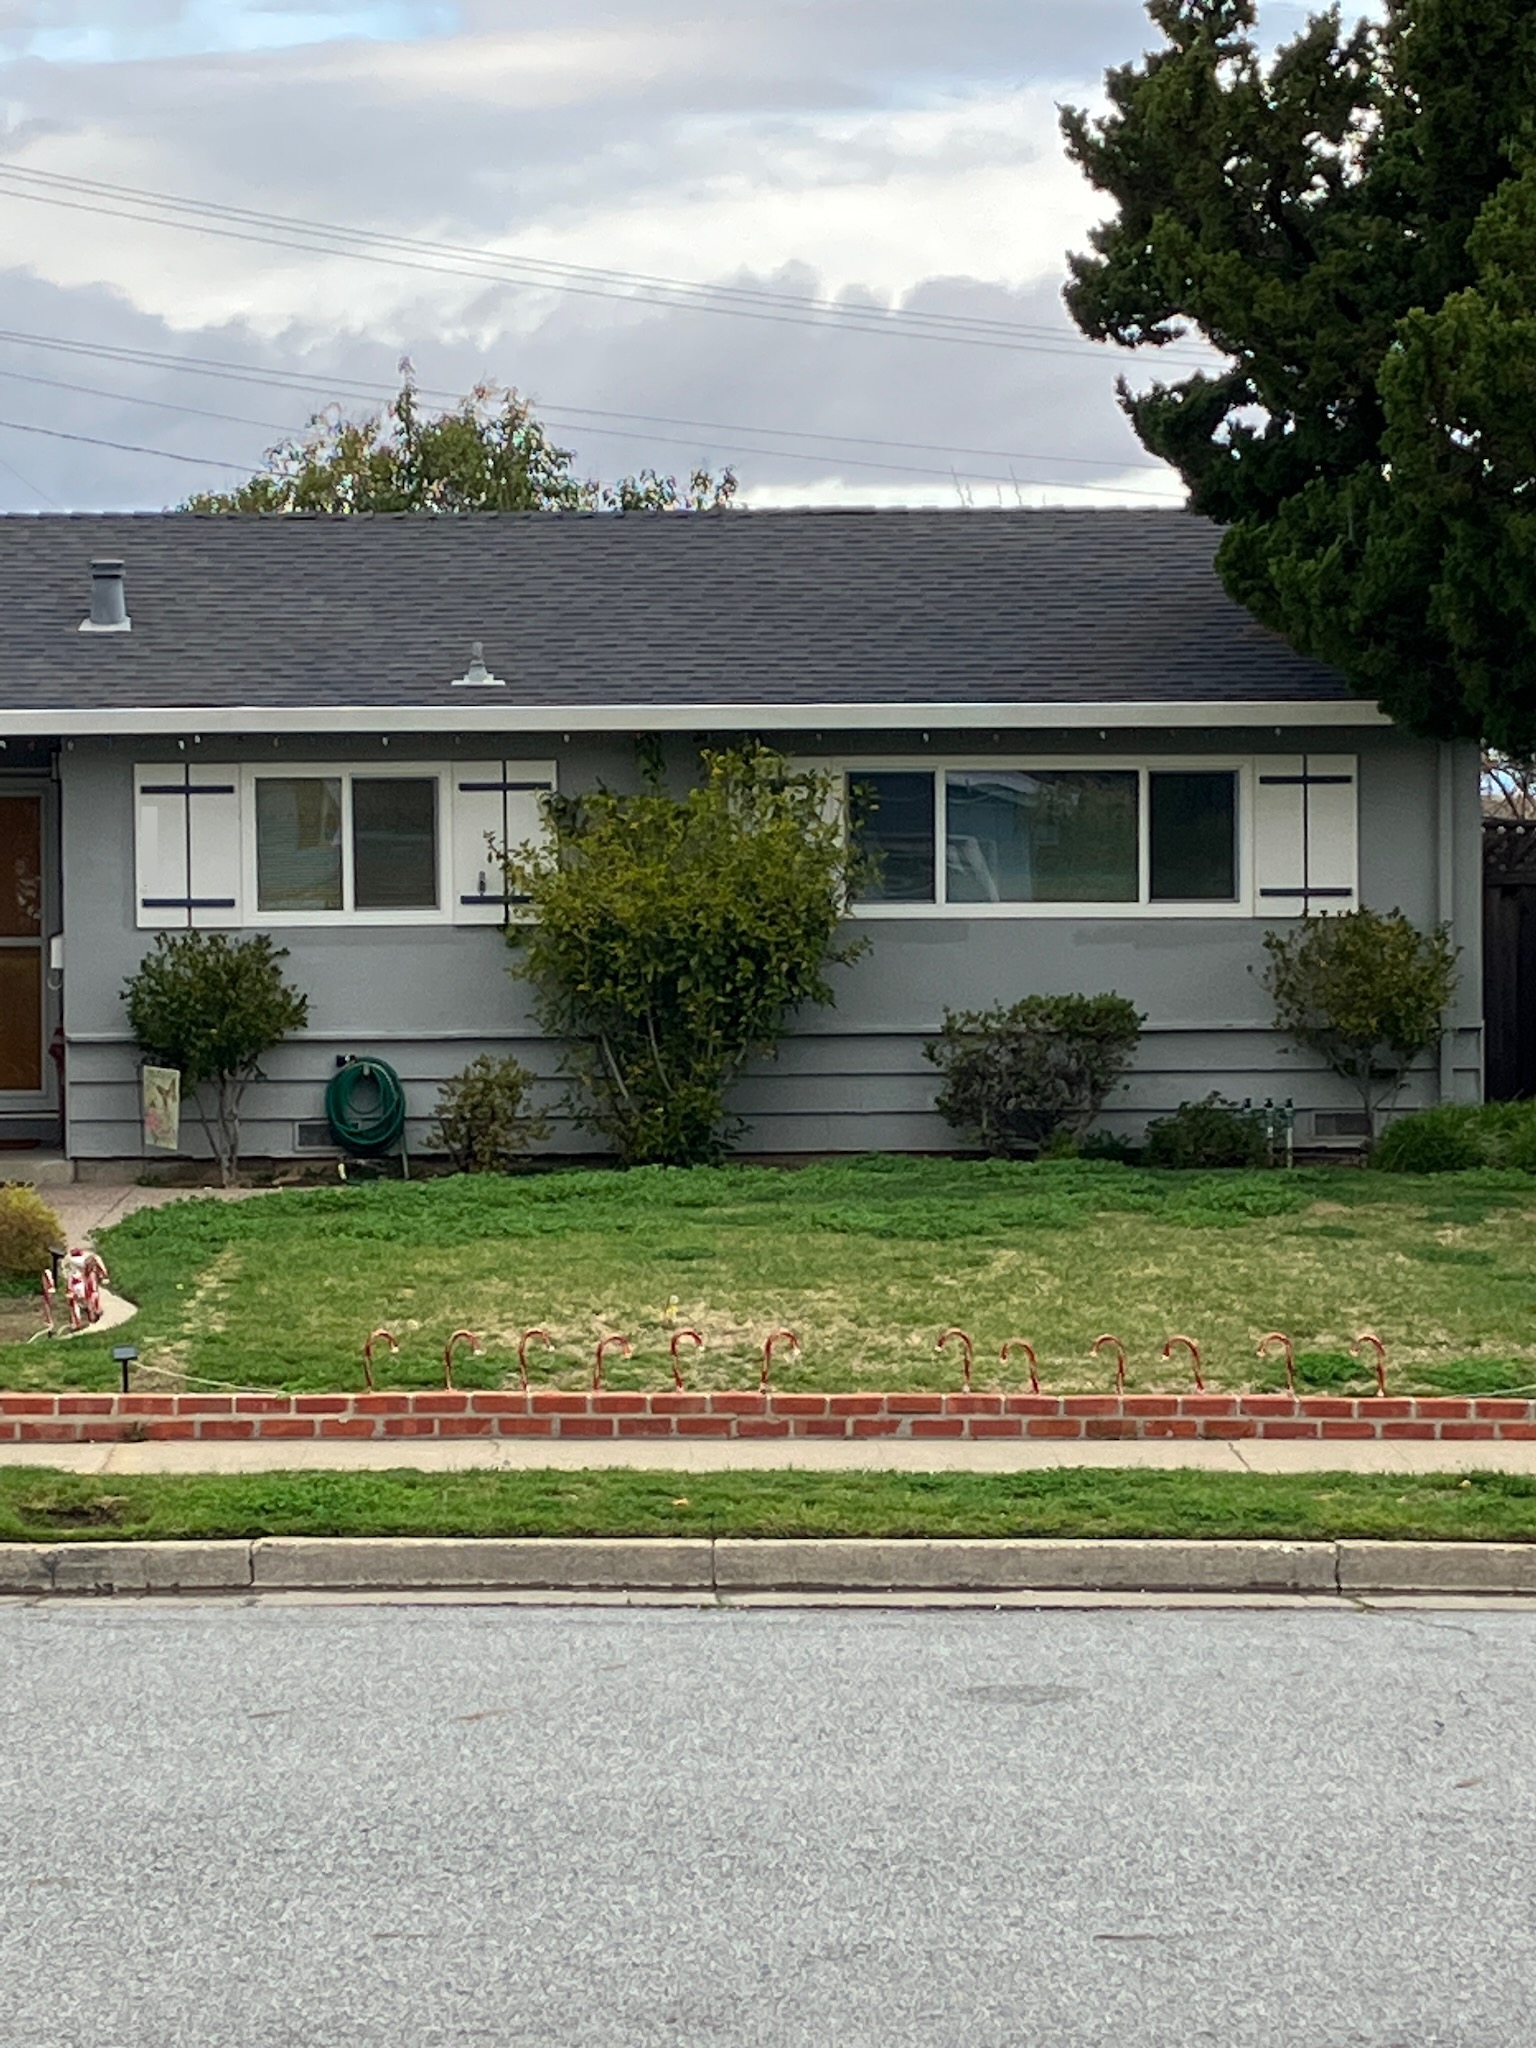
Now you may look at this wall and think that it doesn't look too bad. A bit bland, a tiny bit dated, but generally inoffensive. What could possibly be wrong with it? Well, we'll get to that soon enough, but in order to get there we have to go deeper.
So, off come the shutters.

I'll be reusing these later, as there's really nothing particularly wrong with them.
Next up, the vinyl siding needs to go.

Do you see it yet? No? Let's have a closer look.

That right there is a rat nest inside my wall, conveniently located right beside my head when I'm trying to sleep. The vinyl siding was, as you may guess, installed incorrectly.
The siding was installed with the assumption that it would be an impenetrable barrier to nature and the elements. As such, the installers were not concerned about the gaps that were left in the underlying wall that went down to the tar paper, nor were they concerned about the missing crawl space vent covers. What could possibly get in past that vinyl siding, after all?
And, you know, this might have worked. Might have. If it weren't for the fact that they left a 1 inch gap wide open at the bottom of the siding, where all manner of critters could make their way freely in and out of my house.
So that's why we've embarked on this adventure. Let us continue, by removing the strapping.

This task was made quite a bit easier by the fact that the installers were idiots (see above) and used a nail gun to shoot nails through the strapping boards and into the stucco. That's... not how you secure things to stucco. I'm pretty sure the only reason that the siding didn't just straight up fall right off the wall is because the upper trim piece was wedged into the corner formed by the rafter tails and the stucco wall.
Anyhoo, this also gives us the opportunity to see the original colour of the house, which is a very 60s appropriate dusty rose.

We can tell that this is the original colour because it's actually a tinted stucco; a completely maintenance-free finish that never has to be painted over... You know, unless you're some kind of irrational, crazy person who doesn't want their house to be dusty rose for all time.
Luckily if painting over the stucco becomes too much of a burden to keep up with, you can install vinyl siding, a product that lasts for decades without ever needing to be repainted... You know, unless you're some kind of irrational, crazy person who doesn't want their house to be sunny yellow for all time.
Sure are a lot of crazy people around.
But it is what it is, let's get out the pressure washer and evict some spiders.

The tinted stucco darkens considerably when it's wet, by the way.
And on the subject of getting wet, I need to deal with the remains of the water table molding. Most of it was rather crudely broken off to make way for the vinyl siding strapping boards, leaving a few chunks still stuck to the wall here and there.

This process is made a little bit more difficult by the nature of how water table molding works. Here's an example illustration of a profile very similar to the one stuck to my house.

That little nubbin at the top fits under a piece of z-flashing, and then a coat of stucco is applied over top as one normally would apply stucco.
The picture is, by the way, from Ashby Lumber up in Berkeley, and it's entirely possible that it's literally the same molding that was originally installed on my house back in the 60s.
Anyway, it does make things a little bit tricky.

Especially considering that the moulding is nailed on at an angle from above, so the nail heads are partially behind the flashing, which is itself fully behind the stucco. I ended up chipping out a half inch of stucco along the whole length here to get sufficient access.
While we're doing stuff down here, I had previously replaced (and by 'replaced' I mean 'installed where they were missing completely') some crawl space vent covers under the vinyl siding, but had left two of the existing ones in place because they weren't completely unserviceable. However, they also weren't particularly great.

Luckily it's an easy thing to fix.

The finer mesh screen will help keep more bugs out, and it's also now held in by 6 screws, whereas the previous one was held in by "it's literally just sitting there loose".
Getting back to the water table molding, with the old stuff gone the task at hand was to replace it with some new stuff. Using new water table molding was a possibility, but with the flashing and stucco already in place it would have been way more of a headache than it was worth. Instead, I opted to mill my own, this time without the nubbin.
I got some redwood 2x6 boards, split them down the middle at a 10 degree angle so they would roughly match the slope of the top of the old molding, and then routed in a few features: a drip groove near the front edge, and a rabbet near the back to fit over the top of the wide clapboard siding.
I started with a sample piece to dial in the fit.

I didn't bother with the drip groove on this piece. We can also see here how I'd be drilling some countersunk holes at an angle to screw the molding pieces into the studs (the positions of which I marked with blue sharpie).
With that taken care of, it was time to mill up the stock for real.

I managed to get all the molding I needed out of two 8 foot 2x6 boards, with a little bit left over which will come into play later.
Before I install this molding though, it makes sense to get the clapboards painted. And before they get painted, a little bit of wood filler and sanding will help smooth out some dings and dents.

And now I can get the colour on.

This paint was rather curious. It had the consistency of stirred yogurt, but it brushed on ok so I guess it's fine. Just a bit weird.
Of course it also pays to paint the molding before it goes on, so that I can get to the hidden sides to seal them up too.

While this stuff dries for a while, I have some time to take care of the nail holes in the stucco. For this, I used a quikrete concrete repair caulking, which has some coarse sand mixed into it. Squirting it into place, smushing it in with a putty knife, and then blending it out with a damp sponge float yields a surprisingly good texture match for the stucco.

Now I just have to do that 500 more times.

And also use some standard caulking to fill in these cracks in the vinyl window frames where the installers shot nails through them.

Some real top notch installers, there. Yeah.
Speaking of caulking, this is a good time for a public service announcement: remember to wrap up your caulk with the appropriate protection, or you might not be able to use it again later.

Moving right along, once the paint had cured on the new molding, installing it went fairly smoothly.

Fairly smoothly, except for the part where I had straightened out some of the z-flashing that had gotten chewed up when removing the old molding, inadvertently bending the flashing down such that it no longer left a sufficient gap for me to wiggle the new molding into. So yeah, had to go back along the whole length and bend it up again. Oops.
And here we can see the tunnel of love that was once filled by the nubbin of the water table flashing.

It will forever be empty and alone.
To ensure it stays that way, I'll entomb it with more caulk.

Quite a bit more caulk.

This was not exactly the most cost effective way to fill in this gap. Using a bag of stucco mix would have cost considerably less, but it also would have needed a full 4 weeks to cure and ain't nobody got time for that.
Meanwhile, as I wait way less than 28 days for that to cure, I can go ahead and use the leftover redwood to fabricate some trim boards to cap off the ends of the clapboard siding. There were originally some trim boards here as evidenced by the fact that the stucco had been pressed up against it when it was installed and by the fact that the clapboards just kind of end in a void of nothingness; however, these trim boards went missing when the vinyl siding was installed and so I need to make new ones.

Thankfully it just needed to be cut to width and then trimmed to length with a 10 degree bevel cut at the top.
And, you know, paint.

Red is maybe a bit of a peculiar choice here, but there's a reason to my rhyme. I felt like going white would box in the clapboards a bit, and add a weird bit of verticality to what was, otherwise, a very horizontal facade. I honestly went back and forth on it a few times in my head, but in the end I was glad I went with the red.
On the subject of red things, I will be reusing the vinyl fake-shutters, and so while I had the paint out I gave them a little refreshing. First, the pressure washer again, to evict more spiders.

And then a fresh coat of paint. This wasn't strictly necessary as the paint was in good shape already, but this gave me the opportunity to make sure the shade matched exactly (despite using one of these for the colour match) and also to get the gloss level to match (since I went with a satin rather than a flat).

Yeah, they look pretty much the same.
On the subject of small details, the ends of the new water table molding needed their corners clipped. This would keep them from getting snagged on my pockets when I came around the corner a bit too close.

And it would also match the existing molding elsewhere on the house.

With the paint dry on the new trim pieces, they can get installed now too.

No screws or nails needed, just a bit of construction adhesive is more than enough to keep them in place.
I also needed to fill in some areas of concrete patch caulking that shrunk a little due to being applied a little bit more thick than it was designed for.

Again, blending it in with the damp sponge float worked magically.
While I'm caulking, let's seal up those new trim boards, and paint the cut ends of the water table molding.

Anyway, as we saw above, the window frames needed a little bit of love. The old caulking had gone yellow, and the new caulking didn't blend in perfectly with the vinyl frames... and would probably turn yellow. So, since I had the paint out...


It's never really ideal to have to paint vinyl windows, but this is definitely a step up all things considered.
Once that paint had dried, it was time for the biggest transformation: painting the stucco itself. The window frames had some lumpy caulking around the edges, and a few spots where the nail holes had warped the edges, and so I decided to camouflage those issues by covering it up with a nice sharp paint line.
Luckily I had some painter's tape laying around and...

Yeah, that's about exactly how much I expected to have left on that roll. It's a good thing I had another one stashed away.

That's just how these things go.
With the windows and water table molding masked off, all that was left was to slap on the paint.

And here we have it, the transformation.

With one teeny, tiny problem. The raw stucco where the original shutters had been installed was causing some ghosting through the paint due it being more absorbent.

But a second coat over those areas fixed it up well enough.

There's still a tiny bit of ghosting, but the vinyl shutters will be installed here and so it won't really be noticeable.

That sure does look better, but we're not done yet.
The shutters need to go back on, for one thing.

Now you might stop me here, as I'm racing towards the finish line, and say "gosh, a two-tone paint job seems a little bit bold, doesn't it?" But, you need to remember that this house was built in the 60s, and was very clearly designed with a two-toned paint job in mind.
Sure, I could have painted it all one colour, like the neighbours did across the street.
There are many ways to paint a house like this, all equally valid. Except for that way; that way is objectively and unambiguously wrong, because it's not two-toned.
So, two-tone it is. (I will give them props, though, for keeping what appear to be the original shutters.)
Anyway, to wrap things up I also need to deal with the downspout over at the far end. It had previously been installed flush to the vinyl siding, but there was now no longer anything to be flush against, especially since the wall now had a water table molding part way up.
To deal with this, I decided to space the downspout away from the wall. A couple brackets would do the job nicely.

I had some cedar fence boards left over from a previous projects, and laminating them 3-thick with some construction adhesive gave me just the right spacing for mounting the downspout. I laid out a nice octagonal pattern and chopped them up once the glue had cured enough to hold together.

And I painted them white to match the molding.

Though you might be wondering why I didn't paint them grey-blue to match the wall colour. The answer to that comes down to one of the fundamental principles of design: if you can't hide it, make it look like it was intentional. Nothing stands out more than a poorly camouflaged bodge.

Speaking of things standing out, those paint gaps in the downspout just won't do.

So it's a good thing I have some matching paint to touch them up with.
Now I did consider going full camo-mode on the downspout and painting the lower section red with a white stripe, but then a heat wave moved in and the temperature outside rocketed up past 40c (which is about 13 billion in freedom degrees I think. Idk, I'm not American). So, I quickly found myself with plenty of motivation to call this project done rather than drag it out for longer.

And so, it is done.
No comments:
Post a Comment