Monday, October 31, 2022

Guaranteed Waterproof

(Not a guarantee)

When I specced out The Stig, I always had in mind that I wanted a frame with built-in fender mounts, so that I could use the bike in the winter when the rain started to fall. I picked up the fenders a few weeks ago, and this week I finally installed them.

The install went pretty smoothly, though a few modifications were needed here and there, as is tradition.

I had been slightly concerned that there might not be enough clearance to the toolkit in the underslung bottle cage, but luckily there's just enough space to be comfortable.

I took it for a spin this morning and everything seemed to hold up just fine, though as you might expect, the roads were dry as a bone. I'm sure I've single-handedly doomed all of California to another year of drought.

Getting A Handle On Things

So when we last left our bench multimeter, its handle was in a disappointing two pieces.

I had tried using super glue, and that didn't really work at all. Then I realized something.

One of the best ways to glue PVC is to do solvent welding with a slurry of solvent and dissolved PVC. And this just happens to be available off-the-shelf, in the plumbing aisle.

ABS cement is a mix of MEK, ABS resin and acetone, plus natural and artificial flavours and colours.

So let's give it a try.

Not exactly colour matched, but if it works it works, right? Just need to let it set up overnight and then flex it gently onto the bench meter.

Oh well, it was worth a try. It held up better than I expected, but it wasn't quite enough.

Tuesday, October 25, 2022

Getting Saucy

In making my pastry cream the other day, I found myself getting a little bit of it stuck to the bottom of the pot. This was due to the fact that a pot with a relatively square transition between the side and bottom doesn't allow a standard whisk to reach all the way into the corner.

There is a solution, though.

A very obvious solution.

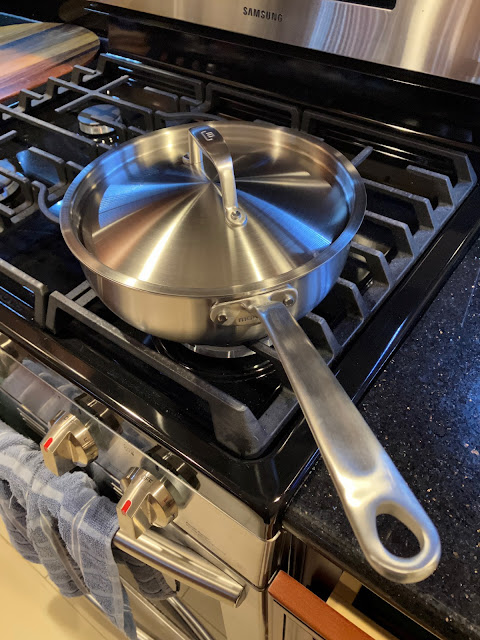
And it's called a saucier.

And it is a pot that is specifically designed for a whisk to be able to scrape all the way into the edges. Because you mix sauces with a whisk. Thus its name.

The french have blessed the culinary world with a lot of great things, but creative names aren't always their strong point.

Ah well, it's a good pot by any name. Nice and thick, stainless with an aluminum core, and a bit larger than I was expecting. Apparently 3 quarts is a lot of quarts. However, this does fill in a little gap in my current pot sizes, and it's better to have too little food in too big of a pot rather than the other way around, so it all works out in the end.

Notworking

For a while now I've been using a second wifi router as a network switch and access point in my living room, to connect my Mini and Wintendo via ethernet, and to give a bit more wifi goodness to my various mobile devices.

This wasn't especially ideal though, as my primary wifi router was only maybe 12 feet away, and so it wasn't really adding much to my wifi coverage.

With this in mind, I decided to move the router to my craft room, which is a bit further away and on the other side of some walls.

This did, however, leave me without a hard wired connection for my Mini and Wintendo. Or at least it would, if I didn't have an 8 port switch just kicking around collecting dust.

I quickly rediscovered why this 8 port switch was just kicking around collecting dust: when I powered it on, the power LED just blinked and the ports remained lifeless.

I looked up this symptom online, and everything I read said "oh that means the power supply is shite" and despite knowing that power supplies are quite often shite, I somehow didn't believe that was the issue.

Luckily it was easy enough to test: it just needed 12v 1a on a standard sized barrel jack, and I happened to have an extra wall wart kicking around. I plugged it in, and the switch came to life.

But for some reason I was convinced that it still might not be the power supply that was to blame, and so I double checked by switching back to the other power supply, and indeed it just blinked the power LED. Switching to the other supply again resulted in a fully functional switch.

Ok, I guess this wall wart is shite. Problem solved.

Monday, October 24, 2022

Cake and Cream

Following on from our previous experiments using lemon pudding as a pastry cream substitute, this week we embark on making a proper crème pâtissière. Given my previous experiences with food influencer recipes, I went right to the source for this one.

I did, however, opt to make some modifications straight out of the gate. I added two lemons worth of zest to the milk at the start, and two lemons worth of juice to the finished cream at the end. Lemon is a risky ingredient when dairy is involved, but fortune favours the bold. I figured that once the milk was fully custardized there wouldn't be any risk of curdling, and my suspicions were correct. I also added an extra 1/4c of sugar to balance out the tartness of the lemon juice.

The result?

Well, it looks a little lumpy in the photo but I can assure you that it is smooth as silk. It's just a little firm from sitting in the fridge, and I needed to stir it up a bit more before serving it to get it looking a bit more photogenic.

Oddly, the recipe yielded about 4.5c of finished pastry cream, where the recipe claimed to only yield 3c. I find their claim somewhat dubious, as the recipe calls for 3c just for the milk, and so unless there was going to be a lot of loss along the way it wouldn't make sense for the final yield to be only that much.

Anyway, the cream is smooth, rich, just sweet enough and delightfully tart and lemony. A great success all around.

Saturday, October 22, 2022

A Little Spit Shine

Ever since I moved in, the shower pan in my ensuite bathroom has been a little...

Lackluster. Literally. It was apparently shiny at one point in the distant past, but now it is anything but.

Thankfully, we have technology.

The reviews on this buffer are equally split between "my car has never been shinier" and "my physiotherapist was right, this is the best massager ever," which is a bit of a curious cross-over. I actually did get it to see if I could get the paint on the pedovan to shine up a little, but figured I'd give it a test run on the shower too.

So how to the results look? A wise man once said "if you do your job right, people won't know you did anything at all."

I guess I did the job right.

Wednesday, October 12, 2022

Large Green Friend

This fellow happened to be chilling by my front door when I went to grab my mail at lunch.

I think they were a good 3 inches long or so? Sadly they didn't make much of a dent in the population of small flies that seems to have taken up residence in my doorway.

Can't have everything, I guess.

Tuesday, October 11, 2022

A Few Loose Ends

Back when I put together The Stig, I had a few niggling issues, one of which was the lock rings on the brake rotors. I couldn't use the external-style lock ring on the front wheel because the fork didn't have enough clearance to fit it, and I couldn't use the internal-style lock ring on the rear wheel because my lock ring tool wasn't deep enough to clear the end of the axle cap.

Well, I solved that problem today by buying a new lock ring tool.

Now my lock rings match front and rear, which is something that literally nobody but me will ever, ever notice. But I do notice it and it's nice that they match.

The other issue I had was with the rims not holding air. An early suspect was that the valves weren't seating properly on the rim, so I had swapped them out for a different set that had a profile better suited for narrower rims. That didn't end up fixing the issue, and I eventually tracked down the problem to improperly installed rim tape.

However, after I replaced the rim tape, I kept using the other set of valves stems, even though the silver colour of them didn't really fit in with the colour scheme of the bike.

So, since I was messing with things anyway, I decided to give the original valve stems another shot. We'll see if I regret this decision later, I guess.

But they sure do look nice!

A Chill Is In The Air

My AC unit has, for pretty much as long as I've lived here, had a bit of a hard time starting. To be fair, it was installed somewhere around 1998 so it's not like I have high expectations, but all the same I'd like to keep it going rather than drop a ton of money on replacing it.

Well, technically 3 tons of money.

I'd measured the run capacitor a while back, which is the usual suspect when these things start misbehaving, and found it well within spec. I put off dealing with it for a while, but it was always in the back of my mind that I should probably do something about it.

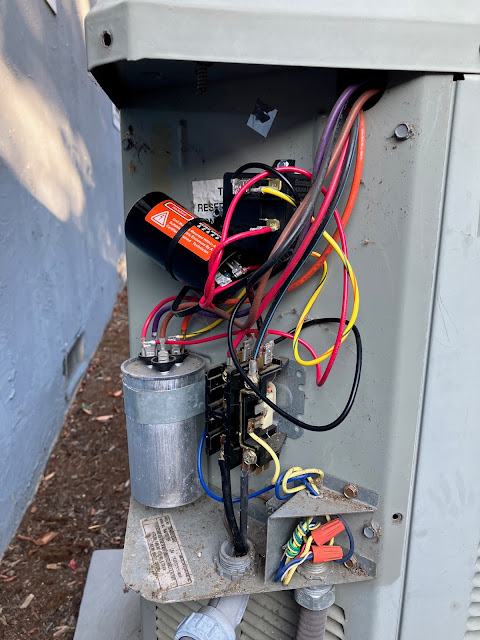
That "do something" is to install a hard start kit. Basically it's an extra capacitor that gets switched in during startup, and helps kick the motor over. Then the potential relay (which is an odd name given that it's an actual relay, not just something that has the potential to be one someday) disconnects it and allows the regular run capacitor to do its thing.

This is the actual name-brand made-in-USA one. The cheap import ones cost half as much, but are also about 4 times as sketchy. Given that it's $50 instead of $25, and that I'd be paying an HVAC tech probably $500 if I weren't doing it myself, I decided that it made sense to splurge.

First step: switch off the power, open the access panel, and glue the wiring diagram back onto the inside of the cover, since the adhesive had long since dried out and crumbled to dust.

I didn't take a "before" picture, but it was a wrinkled, shrivelled mess. It did, conveniently, include wiring information for exactly this kind of hard start kit, and so I was able to verify that its directions matched up exactly with the instructions included with the kit.

So, in it goes.

Not the tidiest installation, but it'll do.

I powered things back on and turned on the cool and the AC unit didn't explode in a shower of sparks, so that was certainly a relief. It also still spit out cold air inside, so that's worry #2 knocked off the list.

Does the hard start kit actually work? It's kind of tough to say. The sluggish startup was only really an occasional issue in the first place, so success is really measured more along the lines of "it doesn't not work". I'll just have to keep an eye on it and see if I notice it chugging when it starts up.

But so far so good.

Keeping the Sun Off

Generally speaking, motorcycles are designed to get wet. They're designed to have the sun shining down on them. They're outdoor machines engineered to survive the elements. Sort of.

The problem is that they have bits made of plastic, and that plastic, despite being chock full of UV stabilizers, doesn't last forever when the sun is a deadly lazer.

Luckily motorcycle covers exist. Their only purpose in life is to be resistant to the elements. They shed rain, they scoff at UV, they...

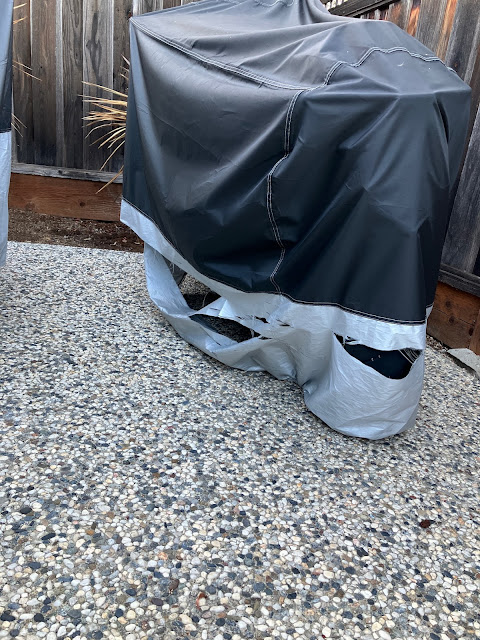
... sometimes don't hold up as well as one might expect.

These motorcycle covers are made out of two types of fabric. The upper fabric is a fairly generic oxford cloth, which is (supposed to be) a polyester fabric with a polyurethane coating. It's held up reasonably well. The lower fabric seems to just be a fairly plain, probably polyester cloth with no special coating. It is most definitely not resistant to rain, UV, or heat for that matter. It will quite cheerfully melt onto a hot exhaust pipe, for instance.

Anyway, the damage we see here is due mostly to UV exposure causing the fabric fibers to degrade. I started noticing this a while back, and in fact I even invested in a much more expensive motorcycle to replace the one that was on Orthrus, my R65. For clarity, the subject of today's mending is the cover for Gregg, my CB650F.

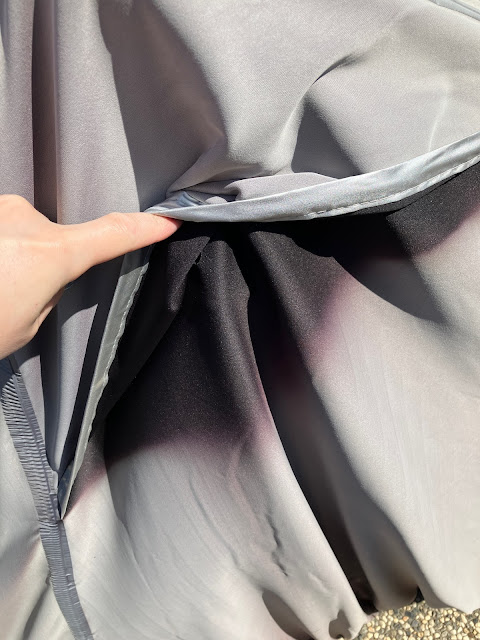
This cover is made out of a much higher quality fabric that is resistant to rain, UV...

Well ok, the fabric is holding up pretty well under UV; the black dye maybe not so much.

Anyway, the point is I had a spare motorcycle cover laying around that used to be on Orthrus, and which was still composed of at least 60% usable fabric, so I figured it was time to make use of it.

To begin the operation, we must first make an incision.

The dearly departed organ donor must also be dissected.

I didn't really have a long enough straight edge to make this cut, so I ended up improvising a little.

Well, no going back now. Time to turn this pile of fabric back into a motorcycle cover. For that job, we use my new favourite sewing implement: the overlock/coverstitch machine.

After a few minutes of threading and configuring all the knobs and cams, the settings look pretty good on a test piece.

This marks the first time I've done an overlock with the cutter engaged, which is its own little adventure.

But enough talk, have at you!

For stitching the pieces together I just used a wide 3-thread overlock stitch. I'm basically just sewing a really wide tube that I chopped up out of one motorcycle cover onto the bottom of the other cover to replace the fabric I trimmed off of it, in case you've lost track of where I'm going with this.

I'm also sewing on an elastic hem, too.

For this one I'm using a 4-thread overlock, and I've also switched to the elastic foot which has a little friction roller that you feed the elastic through. This pre-stretches it, which automatically causes the sewn elastic to gather the fabric, as you can see above on the test piece. Very, very convenient.

Really, once you have it set up, you just have to buzz around the hem and it all just magically falls into place.

The original construction only had two relatively short bits of elastic at the front and rear. I decided to put elastic all the way around because quite frankly it was easier than stopping part way, especially since I needed to hem the whole thing anyway, and I also wanted the elastic to actually be useful. It really wasn't, before.

Anyway, the results are really quite good if I do say so myself.

The original construction also had a set of buckle straps that went under the motorcycle, but now that I've got a proper amount of elastic on there it really doesn't need them, so I didn't bother sewing them back on. I can still go back later and add them if I feel the urge, but that seems a bit unlikely at this point.

Of course, I still have two other motorcycle covers with shitty, UV-baked fabric on them, so I'll need to do some careful considering about what my plan for them will be.

In the meantime, I've found the proper home for the silver fabric I removed.

Off it goes to break down into microplastics and poison all the marine life in the great pacific garbage patch. Goodbye, shitty fabric. You will not be missed.

Monday, October 10, 2022

Cake, Elevated

I've been frosting my cakes with a pretty basic buttercream icing for a while now. It's easy to make, it tastes good, and it has lots of nostalgia value for me. But, I figured it was time to try branching out a bit, and try something different.

I did a little introspection about what I felt like I wanted, and decided that going down the road of pastry cream might be an interesting idea. However, pastry cream requires, among other things, separated egg yolks. I'm perfectly capable of separating eggs, but I tend to avoid it since that leaves me with an imbalance of egg to yolk. I can fix this problem by using powdered egg yolk, but before I invested in that I figured it was worth a test run.

As it happens, Jello instant pudding makes a decent first-order approximation of pastry cream. It's basically sugar, corn starch and flavour/colours, which you mix with milk. It's not really the same thing, but it's close enough to get a feel for it.

The verdict is: I think I like it. It adds a nice smooth creaminess to the cake eating experience, which I feel like I had been missing before. Since this is lemon jello pudding, it helps boost the lemon flavour in the cake, which is pretty subdued.

Perhaps I will get the ingredients to make a proper pastry cream for the next batch of cakes.

Sunday, October 2, 2022

Do Fence Me In

For a while now I've been bothered by some of the lattice on my fence. It's made by just stapling the crossing pieces of wood together, and inevitably those staples loosen up as the wood shrinks and warps and so on. Two of the vertical pieces had become dislodged and had shifted out of place, though luckily they didn't go missing, and so today I crawled up there with my brad nailer and bradded them back in place.

I didn't take a "before" picture, but just imagine a few of the vertical slats being out of place. It looks much better now.

By the way, have I mentioned I don't like squirrels?

Well, I don't like squirrels.

Anyway, while I'm up here, let's take a nice silhouetted picture of my palm tree.

Those billions of seeds hanging from the flower stalks are why I need to get it trimmed every spring. Otherwise I end up with billions of palm seedlings popping up all over the place, which I don't want.

But it's not spring yet, so they can just stay up there doing their thing.

In other news, the fog in the morning these days is sometimes picturesque.

It's a nice change from the heat wave we had a few weeks ago.