This weekend saw a bit of yard work being done, and it all started with my R65 leaking gas all over the place.
So it's Thursday morning and I decide to ride Orthrus, my R65, in to work, since the weather is finally half decent and I haven't stretched its legs in a while. I turn on the petcock, start it up, and it's definitely in mosquito fogging mode. I give it a quick look over and I see that the carbs on both sides of the bike are leaking gas out of the overflow, indicating that the floats are stuck. I start giving the float bowls a bit of percussive maintenance to try to free them up, and notice that the bike seems to be wet with fuel above the carbs too, and that's when I spot a pinhole in the fuel line.
I didn't ride Orthrus to work on Thursday. I shut off the gas, pushed it back to its parking spot, and rode Rabbit Season instead.
Fast forward to Saturday and I head out on Scooty-Puff Sr to drop by San Jose BMW to schedule an oil change for Scooty and pick up some new fuel line for Orthrus. Things go well and I get that half of things done. I have lunch, and then decide to skip the second trip of the day to pick up some carb cleaner (since I'm fresh out), and put that off until Sunday. Instead I spent some time replanting some yarrow that the squirrels had destroyed.
Sunday rolls around and I roll out in the PedoVan. I was going to stop off at AutoZone or something to get some carb cleaner and a fresh can of brake cleaner, but I noticed that it was available at Home Despot, so I combined two stops into one and picked up the cleaner along with some grass fertilizer, grass seed, perimeter insecticide, and some misc stuff like satin white interior paint and some fresh brushes (I'm progressing well with amassing my collection of every single variety of white paint).
The grass in the back yard was looking a bit thin after the grubs chewed up the roots last fall, so I did some overseeding and spread some fertilizer. I might take a second pass at overseeding though, as the spreader I was using was getting a bit clogged up on the large grass seeds and not really depositing at the rate I was expecting.
I haven't had any problems with insects or termites in the house, but the perimeter insecticide is pretty cheap and supposedly lasts for a whole year, so I figured I'd give it a try. It even comes with a little battery powered sprayer wand, which was... mildly effective. I made sure to take the batteries out when I was done, though, as I'm sure they would have exploded and leaked all over the inside of the spray wand had I left them in there in anticipation of doing another application next year with the remaining half of the insecticide.
In all I didn't get as much done this weekend as I might have intended, but it was still productive and fulfilling.
Sunday, January 26, 2020
Thursday, January 16, 2020
Old School Kaizen Foam
Not that long ago I bought a cheap set of spade bits. They came in a nice big blister pack that looks great on the shelf and lets you see all the sizes you'll get in the package. This blister pack was not great for storing them, though, as it was quite a bit larger than necessary and somewhat difficult to get the bits in and out of.
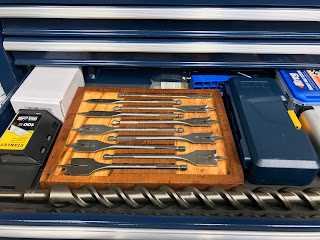
Given I have some old shelf boards laying around, I decided to put some of it to use as a reasonably nice bit holder for this set of bits.
I grabbed a short section from the pile and noticed it was split in a few places, so I snapped it the rest of the way through so I could get some glue in to it and assemble a reasonably sized piece of solid wood out of it. Once the glue dried I decided that actually that was a bit pointless as I have other pieces of shelf board that aren't split that I should use instead, and so swapped to using one of those.
I arranged the bits in a reasonable pattern, figured out some dimensions, and plowed out some wood with my router using the 3/8" bit I got a while back. I probably could have saved some space using a 1/4" bit but I didn't have one and it worked out fine in the end so whatever. I cleaned things up with a chisel and sawed the completed piece free from the board.
And it fell into two pieces, because it was split too.
Ok, glued it back together and did a bit more cleaning up with a chisel, softened the edges and smoothed the surface with some sandpaper, and...
Well that ain't half bad. You might notice that the slot for the 9/16" bit went a little off course. Let's just say it wouldn't be a router project if I didn't at some point forget I was following a fence and end up a little ways into the weeds. It's fine though, it adds character.
Speaking of cleaning things up with the chisel, I did learn during this project how helpful it is to have a strop block on the bench while using one. Whenever I found myself trying to shove the blade uncooperatively through the wood fibers I just gave it a few quick rubs on the strop and next thing I knew the chisel was just slicing through the grain with no more force than mere gravity pulling it down. The fact that I needed to do that fairly regularly might say something about the quality of chisel I was using; if you told me they forgot to harden it at the factory I might not go to any great lengths to try to disprove that assertion, but it got the job done so whatever.
Speaking of getting the job done, a little more sanding and chisel-massaging later, plus a coat of wiping varnish, yielded quite a handsome end result if I do say so myself.
Not half bad for literal garbage wood. But if it was nicer wood it'd probably feel weird to use it to hold a cheap home-gamer set of stamped spade bits.
If I did this project over again I might made the dividers in the center a little shorter so that the bits overlapped a bit more, and save a bit of overall length. I was concerned that there might not be much meat left if I used a maximal overlap though, and this leaves a bit more room to get my fingers in and pluck out a bit when I need one.
Sunday, January 5, 2020
Finishing that thing I started 5 years ago
So last week I went out to my van to go drop by Trader Joes to fill up on Trader Joe's Organic Fair Trade Cocaine or whatever it is I usually buy there. I turned the key and nothing happened. Unfortunate, but perhaps not unexpected.
You see, I'd spent the past few months not actually driving the van basically anywhere, ever, and in the past few weeks only made a few short trips here and there, mostly to Home Despot to collect supplies for all the projects I was doing. So the idea that the battery was perhaps not fully charged was the first thing on my mind.
So I grabbed my jumper pack, hooked it up, and the van started no problem. Off to Trader Joes I go.
Somewhat concerningly the van also didn't start in the TJ's parking lot, though I had the jumper pack with me and the few extra pixies did the trick to get things moving.
Now I do have a solar panel installed in the van which should in theory keep the battery topped up, but it just so happens that it's winter and my van is parked on the north side of my car hole, so it's not necessarily collecting a lot of deadly lazer rays. The solution, I figured, was to augment this with a plug-in battery tender.
A few days of Amazon Prime cooling off period later and...
I perhaps should have purchased an extension cord to go along with it. Perhaps.
Oddly enough the battery wasn't particularly low, and it only took maybe 30 minutes before the tender indicated that the system was back to full charge, so now I'm thinking that the non-starting might be due to a different issue. Like perhaps me being an impatient dork and not waiting for the glow plugs to start glowing when it's fucking cold outside. Because it's never fucking cold in California so I forget that things like glow plugs exist. Maybe. Further experimentation is warranted.
Anyway, since installing the battery tender leads is best done with the battery disconnected, and since replacing the steering wheel requires temporarily removing the airbag which is also best done with the battery disconnected, I took the opportunity to finally replace my steering wheel.
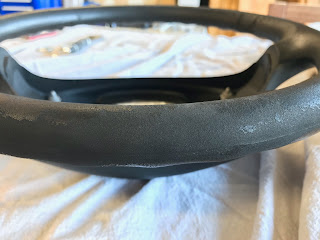
Ooh, shiny. Much better than the old, sun-baked one.
This is the project I started 5-odd years ago. I had intended to replace the wheel at the same time I replaced the sun-baked wheel switches, only to be stymied by a recalcitrant steering wheel bolt that I was unable to coax into cooperation with hand tools. I had, shortly thereafter, purchased a battery powered impact wrench, but never actually got around to actually doing the thing. This is partly because I was worried I might have to obtain a steering wheel puller, and partly because I just had more interesting things to do. As it turns out, Mercedes steering wheels can be removed without using a puller. Good to know.
Anyway, that wraps up the last project of the winter break. Back to work tomorrow!
Only 3.6 roentgen
Not great, not terrible.
Went on a little adventure up in the attic to run the ethernet into the car hole so I could feed them into my security cameras. Went quite well, the tyvek suit was really nice. I'm glad I did it in the winter and not the summer though, as even with the cool air up there I still got a bit sweaty.
Since the door camera was already mounted up it was a pretty simple matter to just plug it in.
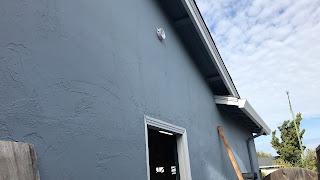
The second camera still needed installation though, so I painted up a block of wood to give me enough surface area under the eave to screw in the base and got it taken care of nicely.
The view is maybe just a tiny bit low but easily covers everything I actually need to see. I didn't want to mount the camera too far down so that it wouldn't stick out and be too conspicuous/ugly/distracting.
The hose in the lower left is usually wound up in the hose reel but I left it out last night because I was using the pressure washer to clean off the shelf boards I've been removing.
Speaking of those shelf boards, the last of the shelving on the house side of the car hole has been successfully removed, leaving only the section above the car hole door remaining. I decided that discarding the wood was both kind of a pain in the ass and also kind of wasteful so I've been, as mentioned above, pressure washing the crap off of it and saving it for scrap wood to use in projects later. We'll see if I come to regret this decision.
Thursday, January 2, 2020
Wednesday, January 1, 2020
The Light of My Life
So today I finally got around to installing the motion light on the east side of my car hole (known to the fancy-pants amongst us as a "garage"). I picked up the lights from Le Amazon shortly after I moved in, but I've had other projects keeping me busy in the mean time.
Step one, mount the box.
Ok, so far so good. Step two, run the wire.
Right. Apparently the coil of 12/2 I'd been slowly chipping away at has finally wired its last. Off to the Home Despot it is. Thankfully they were open today.
It's worth mentioning that another section of hantavirus shelving came down this morning so I could better access this side of the wall, leaving only two sections left, this one adjacent to the house, and another section over the car hole door.
The end is in sight. Anyway, with the wire acquired I finished tying things together and got the light mounted up and ready to go.
It does a great job of illuminating the side yard by the trash bins. And yes I still need to dispose of the old broken water softener. One thing at a time.
Speaking of not doing one thing at a time, I figured that since today was an electrical day I'd also swap out the ugly fixture in my front door entry cavern. It was an ugly, shitty lamp before,
Which I would never remember to turn on, and occasionally forget to turn off. Its replacement has a dust-to-dawn function and looks much, much nicer.
Of course it also has no view whatsoever of the sky so it may be permanently stuck in dusk. It's a good thing LED fixtures don't draw much power.
Also I cleaned my mailbox.
Subscribe to:
Comments (Atom)


