A little while back, you might recall that I had an issue swapping out the presser feet and feed dogs on my Consew 18 sewing machine. I had remarked that the part I needed was apparently available, but that turned out not to be the case; I had merely stumbled across an obsolete listing for an out-of-production part.
As such, I was stuck with no way to correctly mount the new, shorter outer presser foot to the machine.
And the issue was none other than this outer presser foot bar here.
Well, as it happens I managed to find a different source for this part.
It just comes in a bit of extra packaging.
But once we pull off the outer layer of mill scale and excess steel, I have been assured that I will, indeed, find the part hiding inside.
First step: get the mill scale off.
This 3M stripping disc effortlessly melts through mill scale thanks to the silicon carbide abrasive and open matrix structure that prevents the disc from clogging up. It's really the perfect tool for peeling the bark off of hot rolled steel.
Hot rolled gives us two advantages. The first is that it's cheap: these two sticks cost me under $5 combined (and I'm really hoping that I don't screw up the first one and end up needing the second, but for the price it pays to be prepared). The second is that it's naturally stress relieved: if you try to mill a piece of cold rolled steel, you'll often find it curling up into a banana shape as the internal stresses get released unevenly due to the material removal. You can normalize the steel to get around this, but it's easier to just go with the cheaper option and deal with the mill scale.
Anyway, let's start getting rid of some of that excess steel. Now that we have a nice shiny surface, the Dykem layout fluid will show layout lines very nicely.
A utility knife makes for a decent scribe for these sorts of situations. The blades are very hard and very disposable, so they'll make a nice sharp line in the layout fluid.
Which even shows up in photos pretty nicely.
Now while I don't have a milling machine to do all the hard work for me, I do have some power tools that I intend to put to work for this job. The first of these is this 4x36 belt sander.
It comes with an 80 grit aluminum oxide belt, and I spent about 13 seconds using it before switching it out for something with a bit more tooth to it.
A 24 grit zirconia belt should eat through this steel a bit quicker, I think.
And eat through it, it did. Of course, it leaves a bit of a rough finish, so I'm following it up with some draw filing to smooth out the surface and bring it down to final dimension in a bit more of a controlled manner.
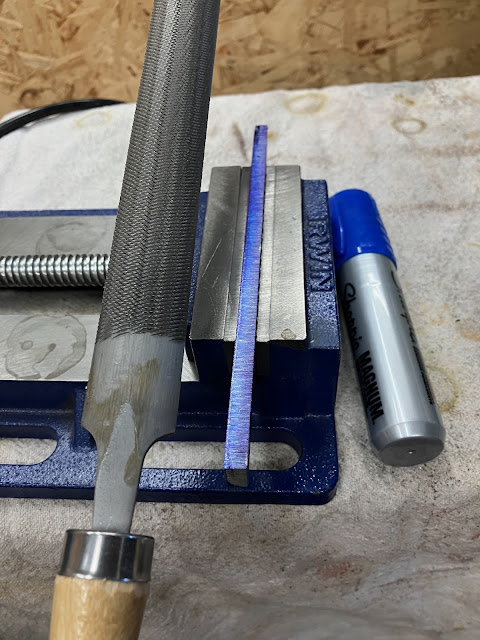
A bit of blue sharpie (it dries quicker than layout fluid, though is much less durable) makes it easy to see where the file is taking off material.
And once both sides are trimmed up, we're at the final width of the part.
But notably, not the final thickness.
This was actually supposed to be 3/16" thick material, but either some wires got crossed at the metal supply shop or they decided to give me a free bonus upgrade, and what I ended up with was 1/4" thick instead.
I would have had to remove a bit of thickness either way, but now I have to remove a bit more than I was planning on.
But nothin' to it but to do it.
Half way done on one side. Fun fact: while Dykem is much more heat resistant than sharpie, it will fade out to nothing if you get it really hot. I decided to start dipping the part in a water bucket between grinds at this point, both to save the layout lines and to save my fingers, which were getting a little toasty even through the gloves.
Then we're back at it with the draw filing to pretty up the faces and get things to final thickness.
And for all that work we have a piece of raw stock that still looks nothing like the presser foot bar. But it's at least getting closer.
But now's the fun bit where we start actually giving this part shape, starting at the top end.
Once again, sanding and filing is the name of the game.
Then we do a bit of layout and it's time to poke some holes.
I used a carbide spotting drill (which is not the same thing as a center drill) to start the hole, in order to reduce wandering as much as possible. The spotting drill has a very sharp tip angle compared with regular twist drills, and is specifically designed to be able to start holes with as little wandering as possible.
This small divot ensures that the web of the twist drill doesn't end up walking all over the place while it tries to get started, instead engaging the cutting flutes on the edge of the spotted hole.
And it worked decently well. This drill bit is 1/64" undersized from the target hole size of 7/32 for two reasons. The first reason is that I need to run a counterbore bit on this hole to recess the are where the head of the screw will sit.
And it just so happens that a metric M5 counterbore bit is both incredibly cheap and easily available, and the 5.2mm pilot tip is just the right size to run in a 13/64" hole, which is the first reason I drilled it undersize.
The second reason is that this hole needs to be a snug running fit on a 7/32 boss on the mating part, and regular twist drills tend to drill oversized by often tragic amounts. However, reamers will clean out a hole on-size when you run them in a pilot hole 1/64" undersized, which is exactly what I used.
And the result is a beautiful fit.
But there's still more work to do, and to get there we need to get all bent out of shape.
Lining things up on the features we've machined, it's easy enough to transfer the position of the first bend across, and then it's just a simple matter of bending it.
This then allows us to transfer the position of the second bend and repeat the procedure.
This step is honestly the part that I had been the most unsure about. It's all well and good to remove bits of metal little by little, but when it comes to just wholesale bending an entire workpiece, things can go wrong a lot quicker, in ways that can be difficult to recover from.
But thankfully things did not go wrong, and we're right into the home stretch.
Once again, we transfer some measurements from the original part.
The screw hole for the linkage is remaining in the same spot relative to the upper mounting hole, but the screw hole for the foot itself needs to move down a half inch. It would be a bit silly to do all this work and leave it in the same place as the original, since the whole point of this project is to lengthen this exact section.
Now the curious thing about sewing machines is that they were originally engineered prior to the standardization of UNF and UNC systems, and so you find a lot of thread sizes that are almost, but not quite, what you expect.
For example, the upper hole here, which holds a screw that connects the linkage for the front-back motion, is a 3/16-32 thread. You might think that this is a 10-32 thread, because 10-32 has a 3/16" major diameter, right? Wrong, actually: 10-32 has a major diameter of 0.190", whereas 3/16-32 has a major diameter of 0.1875". This is close enough that a 3/16-32 screw will thread securely into a 10-32 hole, but a 10-32 screw will not fit into a 3/16-32 hole.
The good news here is that I'm making the hole side of this system, so a common 10-32 tap will, in fact, suffice.
But the lower hole, the one that secures the foot to the presser foot bar that we're making, is a 9/64-40 thread. Again, you might assume that this is a 6-40 thread, but the situation here is reversed: a 6-40 thread has a major diameter of 0.138", and 9/64-40 has a major diameter of 0.140. So a 9/64-40 screw will not thread into a 6-40 threaded hole.
So what you see in the above photo is actually a genuine 9/64-40 tap, which is a bit tricky to find but not completely impossible to obtain.
Anyway, with the holes drilled and tapped, all that's left to do is to cut the part to final length and do a bit of shaping on the end.
And then we're ready for a final test fit.
And we are victorious, at least mechanically speaking.
But we still need to make things look nice, first with a bit of final filing and sanding.
And then with a chemical bluing treatment, which adds an oxide layer to the outer surface of the metal. This both looks really neat, and also helps prevent rusting to some extent.
And now I can install it, along with the new presser foot, needle plate and feed dogs, and the machine is finally configured how I wanted it.
Fun fact: the needle plate is actually coated with a green teflon coating, which makes it much easier to feed sticky materials like vinyl through the machine. I'm not sure how much of a difference it'll really make, but it was only a few bucks more so I figured why not give it a shot.
Anyway, this was the last upgrade I needed to make to the machine, so at this point it's good to go. Or at least it would be good to go if I had a table to drop it into, but that's a problem that will find a solution in due time. Stay tuned for that.


