Sunday, April 21, 2024

Smooth or Chunky

So it used to be that jams were, for the most part, made for purpose. Fruit would be minced and macerated into a relatively smooth paste, mixed with sugar and extra pectin, and canned to preserve it in a shelf-stable form. This would result in a product that could be easily spread on toast, mixed into oatmeal, dolloped onto a slice of cake or a serving of yogurt, or used in whatever way you might fancy.

But then people got upset about their food being "too processed". Food that wasn't physically reminiscent of its original form was considered evil and unhealthy, and food that retained some resemblance of its constituent ingredients was wholesome and enlightened.

Let me be very clear about this point: No matter what it looks like inside, these...

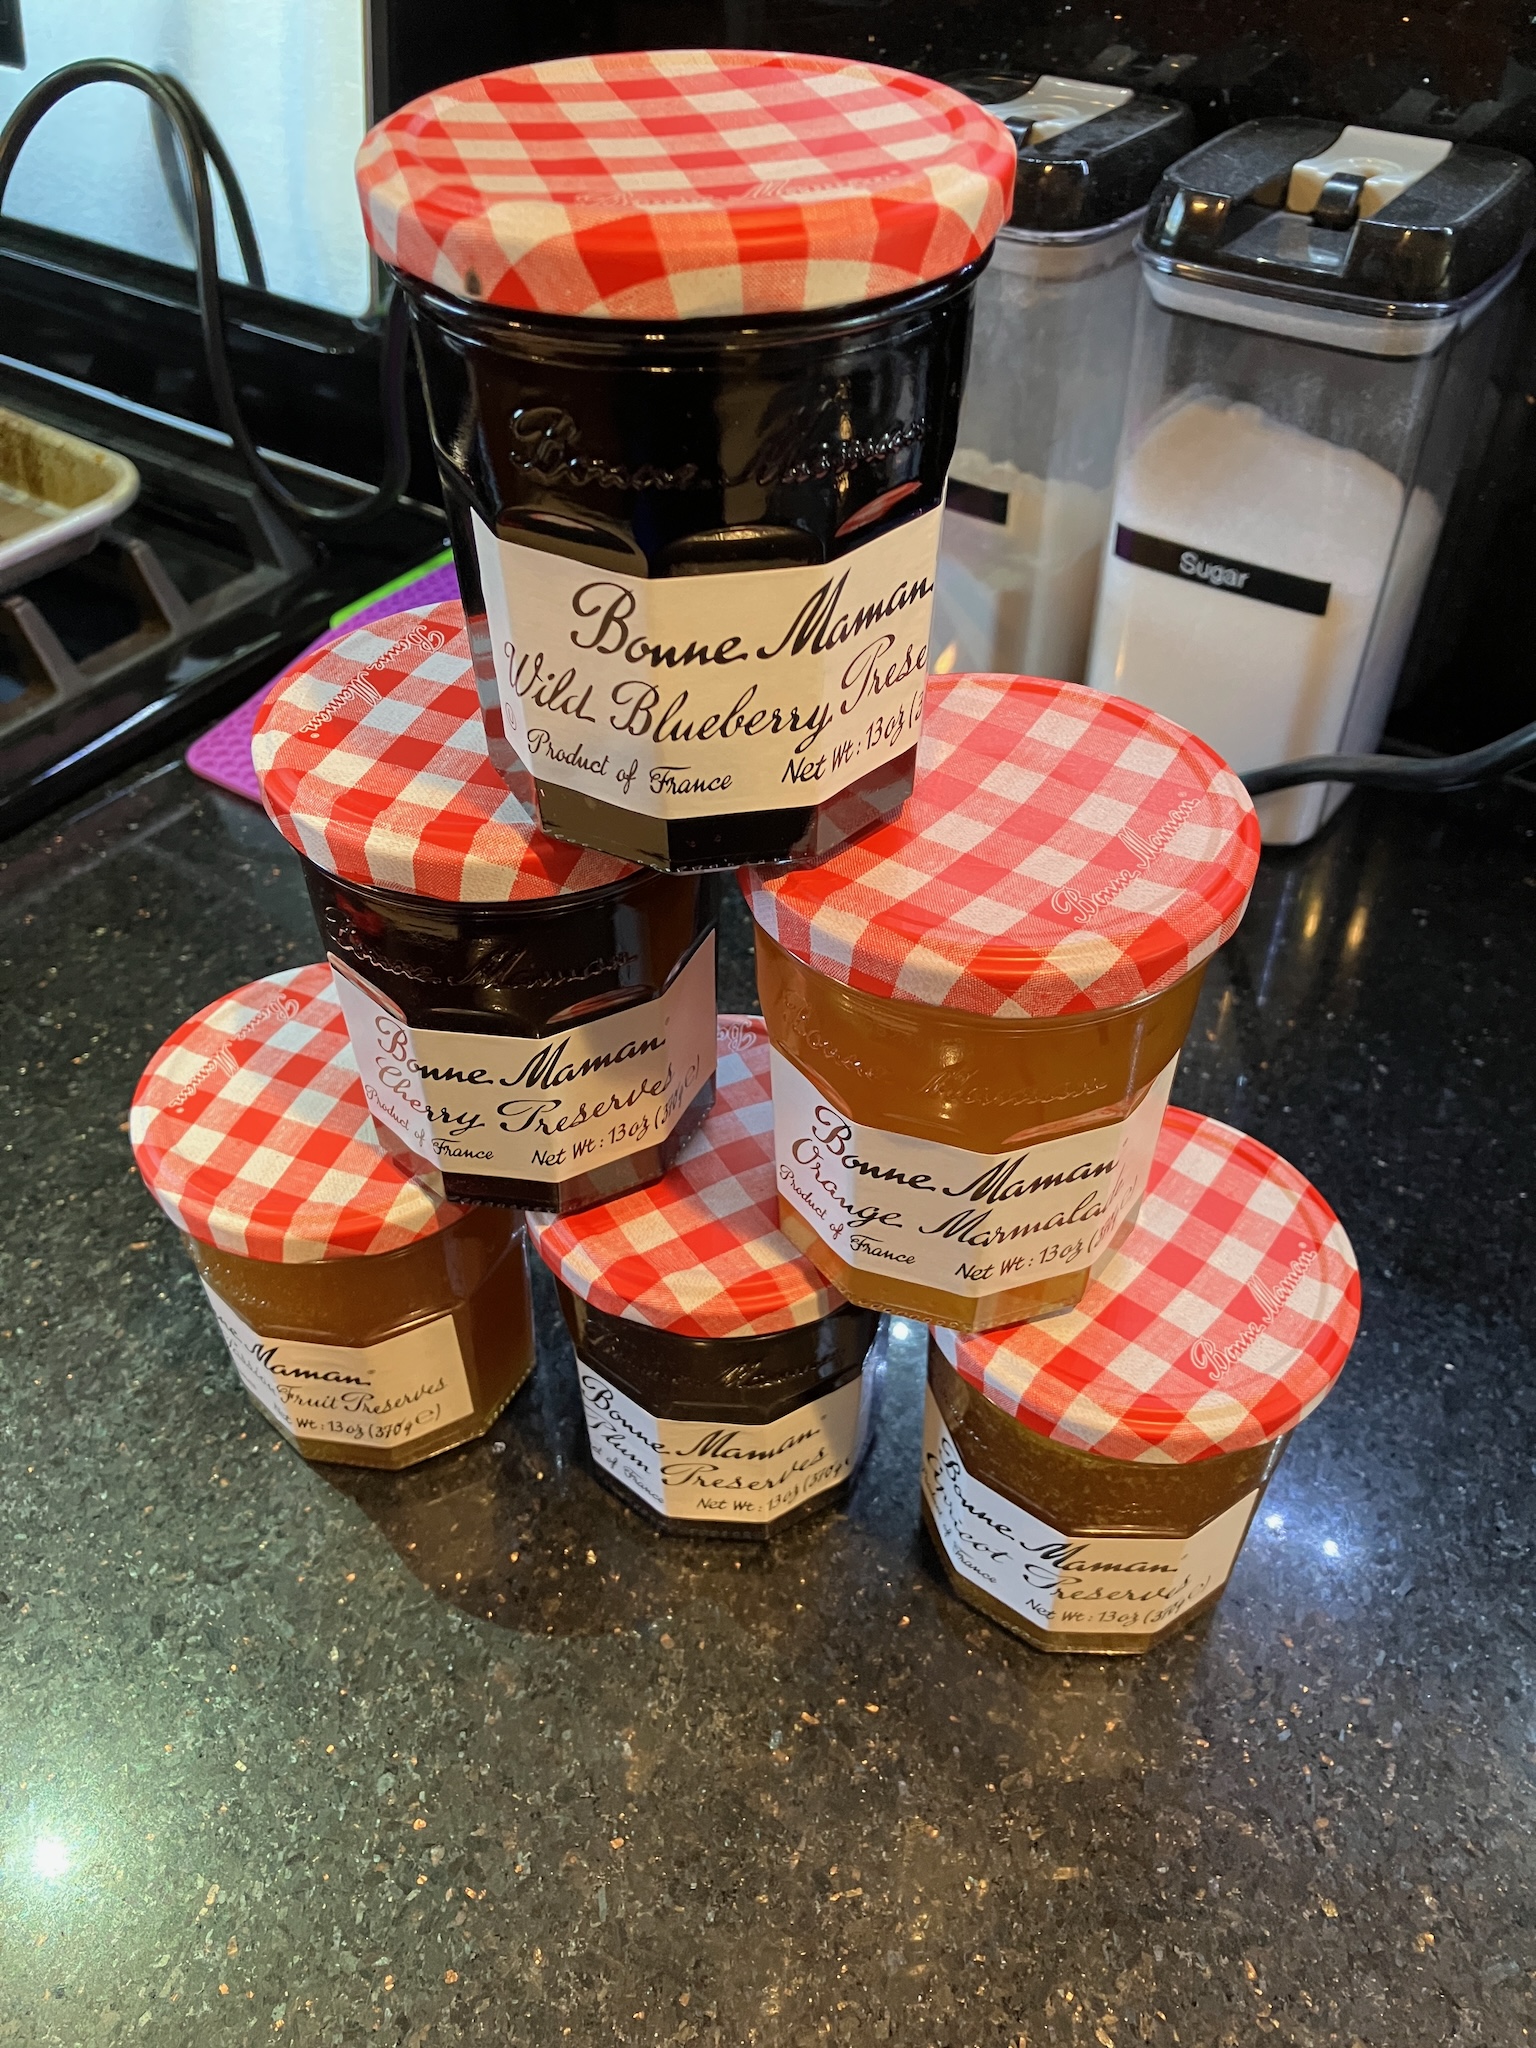
...are just fancied up jars of sugar. They might have a vitamin, they might have some traces of fiber, but the majority of it is just plain old sugar, and not any good kind either. They are, as Based Cookie Monster would call it: sometimes foods.

Anyway, this process of wholesome-washing meant that many jams no longer contain finely minced and macerated fruit, but instead feature large chunks of fruit in order to try to fool you into thinking you're eating something healthy.

This means that while trying to spread a nice thin layer of jam on a piece of toast, let's say, you'll often find yourself trying to spread out an entire half of an apricot that got stuck in the jar, put there only to give it a rustic ambiance.

To be fair, for some fruits this isn't a great burden. Wild blueberries, for instance, are small enough that the whole fruits are largely inoffensive.

And marmalade has a long and well established history of being correctly minced, so it is rarely troublesome.

But when we come to jams that contain plums, pineapple, cherries or apricots?

Oh, that's when all hell breaks loose.

You see this? These are chunks of apricot, floating stealthily in the otherwise smooth and spreadable jam.

And it's time for them to meet their maker.

Now we can't just buzz the jam in the food processor and then call it done. For one thing, it whips a bunch of air into the jam, which makes it opaque and light coloured, and increases its volume fairly significantly.

And it also, of course, whips in all sorts of ambient mold spores that are floating through the air around us, which could, despite refrigeration, cause early spoilage.

Luckily there's a solution to both of these problems.

We just need to boil it (with an extra tablespoon of water to make up for the evaporation). The boiling kills off enough of any contamination to make it fridge stable again, and also boils out the fine bubbles that the food processor has whipped into the jam.

Depending on the specific jam there will still be a little bit of foam left on top, but the majority of the tiny bubbles will burst during this process, and the remainder will float to the top in the jar and not be any major concern.

So we repeat that process four more times for the plum, pineapple-passionfruit, cherry and apricot jams.

And now we finally have the jams in the form that they should have been in the first place.

Saturday, April 20, 2024

It's Free Monts

I wanted to put some miles on Gregg today, now that I finally changed the oil, so I took a little trip up to the top of Fremont Peak, the southiest south of the south bay, which is named after the famous Gordon Freeman, a leading figure at Black Mesa.

The weather was a bit more brisk than I had counted on down in the valleys, but once I popped up above the marine layer the temperature rose and the skies cleared up nicely.

The views up there are really quite lovely, and I hadn't realized until I got up there that it's actually a giant campground with a bunch of drive-up campsites, which is kinda neat.

Perhaps one day I should camp there; it would make for a decent test run of my van, once I finally get around to doing something with it.

Perhaps.

Thursday, April 18, 2024

The Power Within

So I've let my motorcycles sit for probably somewhere around a year at this point? Maybe more? Time is an illusion. Needless to say it's been a hot minute since I put some miles on any of them, and while they've handled their unscheduled nap quite well, for the most part, it has taken its toll here and there.

This is the battery from Gregg, my CB650F. It was measuring 3 volts before I put it on the charger for 24 hours. Now it's up to 7.3v. This is a great voltage reading for a 6 volt battery, it's just a shame that it's supposed to be a 12 volt battery.

Anyway, this is the original battery that Honda shoved into this bike back in 2018, so it's high time for replacing it with something newer, and what better opportunity to also upgrade to something more modern?

This LiFePO4 replacement is much lighter than the original sealed lead acid, and as a bonus to that upgraded chemistry you can actually pack the same performance into a much smaller package. In fact, previous LiFePO4 batteries I've installed have been comically small compared to the OE battery they replaced, and simply came with some self-adhesive foam blocks for you to stick onto the sides to pad it out to fit into the original space of the lead acid it was replacing.

Thankfully the product design has come a long way since then, and now we get a battery that's actually sized to fill the appropriate amount of space (even though it's mostly air inside) plus a stack of injection-molded spacers that adapt it to a variety of different standard SLA sizes.

Of course I don't actually need any of those spacers for my bike, so they ended up just going straight into the recycle bin, but I suppose it helps cut down on SKUs.

Anyway, on with the show.

The CB650F has a pretty classic layout with the battery under the seat.

The old battery was already removed, so it's just a matter of dropping the new one into place and strapping it down.

Unfortunately this is where the first slight wrinkle comes in: the connectors on this bike are designed specifically for the 3-way terminal blocks on SLA batteries, and the manufacturer of this LiFePO4 battery decided to get a little creative and move the screw inboard a little ways, meaning that this tab on the edge of the connector which would usually hang over the edge of the terminal now prevents the connector from sitting flush.

But it's easy enough to just flatten that out.

Since the negative connector comes in from a different angle, the tab isn't an issue there, and so connecting things up from here is a snap.

With the battery just sitting there and the bike powered on but not running we see a very healthy voltage.

And everything looks good with the bike idling as well.

So now it's all ready to ride.

Thankfully I didn't have to discover this right before I was about to go out on a ride, which would have spoiled my fun. I actually noticed it when I was changing the oil, for the first time in about 4 years. That might sound neglectful, but I'd only put about 450 miles on the bike in that time, so really it was more like a premature waste of oil.

Ah well, oil is cheap and it's better to be safe than sorry, and I at least put more miles on this bike than on Scooty-Puff, my BMW C600; whose oil I changed at the same time (Rabbit Season and Orthrus are going to have to wait for next week because I ran out of oil recycling containers).

Speaking of Scooty-Puff, it does have a LiFePO4 battery in it already, and despite sitting for just as long, it not only still had a charge left in it, but in fact had enough charge to easily start the bike right up.

Colour me impressed.

Saturday, April 13, 2024

Turn Down For Watts

A fair few years ago I purchased a power meter off of Ivor, a cow-orker at Google. It was my first power meter, which I dutifully mounted to my CAAD 10 road bike, and it started me down the road of quantifying my on-bike fitness in real time.

When my CAAD 10 frame cracked, I ended up building an S-Works Tarmac to replace it, and the power meter was one of the parts I brought along. It's been serving me well ever since.

However, serving me well doesn't mean serving me perfectly. Since I bought the power meter second-hand, I wasn't able to pick the configuration to exactly match my preferences, and so I've been making do with these Shimano Ultegra chainrings.

What's wrong with them? Well, first off they're a 52-36 combo, which is commonly known as "mid-compact". It was created as a middle ground between what was previously the standard chainring setup of 53-39, and the newer compact chainrings that sported a 50-34 tooth count.

Those extra two teeth aren't the end of the world, but given that I spend a lot of my time in the hills and exactly zero time drafting in a group, I really wasn't getting any benefit from the taller gears.

Also, must more importantly, they're the wrong colour.

You see, the Quark Dfour power meter was designed to match up aesthetically with the Shimano Dura-Ace R9000 chainrings, which have a silver-on-black colour scheme and a different shaping where they meet the spider. They're also lighter, which is nice, and more expensive, which is why most people don't bother.

But I bothered.

So let's get these on the bike!

The first step is to take the pedals off. This might seem like a peculiar first step, but there's a method to the madness here, which I'll come back to in a bit. These are XTR SPD clipless pedals, so they come off using an 8mm hex in the back side.

Next we remove the drive-side crank arm so that we can pull the crankset from the bike. If you've ever removed a SRAM/Quarq crank arm, you'll know what the right tool for the job is.

No I am not kidding.

Now we reveal why I removed the pedals: I'm going to swap the power meter from this set of crank arms to the S900 crank arms that I used to build up my CAAD 12. The reason for this is that I've standardized on 170mm crank arms, and the ones that came on this power meter are 172.5. It's not a huge difference, but since I have the parts I might as well do the swap.

Except...

Yeah, I forgot about that part. The S900 uses the 3-bolt mount for the spider, whereas the Quarq uses the newer 8-bolt mount. RIP.

Oh well, 172.5 isn't all that bad. Plus having everything apart and the pedals out of the way makes it easier to clean things up nice and shiny, so it wasn't a complete waste.

Anyway, getting back on track, I mentioned that the Dura-Ace chainrings are lighter, and here's the proof.

Mind you it would be alarming if they weren't lighter, given that the DA chainrings are also physically smaller in this case, but it's nice to see that there's a meaningful difference between the two.

With that out of the way, it's just a matter of reassembling things, adjusting the front derailleur, and we're good to go.

Now that I've got this smaller chainring set, what effect will that have on my riding? Well, on the low end I'll be going from a 36:32 ratio to a 34:32 ratio, which means that if I'm grinding up a hill at about 60rpm I'll go from 5.3mph to 5.0mph. On the high end, I'm going from 52:11 to 50:11, so if I'm pedalling my legs off with a tail wind at 100rpm, that'll drop me from 37.2mph down to 35.8mph.

Is it a big difference? No, no it is not. But it's a difference in the right direction, and more importantly it looks way, way better now that the spider and chainrings aren't mismatched. My only regret is that the Quarq spider hides the silver ring on the 34t chainring in the back.

Loafing Around

So as I do every second week, I made a new batch of bread.

This time I apparently decided to make the loaves slightly too long, so they ended up a bit squiggly, but that's beside the point.

I used largely the same recipe as usual, but as a bit of a change I decided to try the yudane method. This is where you set aside about 5-10% of the flour and mix it 1:5 with boiling water (also set aside from the original recipe, not added on to it). The recipe I use calls for roughly 500g of flour and 170g of water (more water comes from the eggs, which isn't useful right now), and so that limited me to 34g of flour if I used all the water for the yudane. This was about 7% of the total flour, a perfectly reasonable amount.

Anyway, this yudane mixture is just incorporated into the dough with the rest of the ingredients, and everything else proceeds as normal.

The bread came together quite nicely and the dough was noticeably firmer and easier to handle when kneading and rolling, which is a nice bonus.

The real test, though, is the texture and shelf life. The yudane is supposed to improve the texture, making it softer and more pillowy, as well as increase the shelf life before that texture starts to go hard and stale.

I ate the bread as I normally do throughout the week, and largely I came away impressed. The texture was quite good, and it wasn't until Friday that I noticed the bread starting to go a bit stale. I probably could have toasted that last slice, and perhaps for this week's loaf I'll do just that.

In all, I'd say this experiment was a success.

Saturday, April 6, 2024

Gay Goblins

So it snowed on Thursday, so you know what that means!

It means it's time to do some spring planting. This corner of the yard at the end of my motorcycle parking pad used to house a half-rotten maple tree. I got it cut down and the stump ground out I guess a few years ago now, and that made for some fantastically fertile soil here.

But it's just been sitting there under a blanket of mulch ever since then while I waited for the ground up stump bits to decompose.

Well, I decided that today would be the day to actually plant something here, finally.

To start off with, there's this Japanese Boxwood.

I had initially planned to get some cherry laurel as a test run for planting some against the back fence, but they didn't have any in stock. I had a little browse around and almost grabbed some black stem pittosporum but they only had those in the larger size which would have cost about $45 each vs the $15 for these boxwood. Since I wasn't in a rush to get a lot of growth here, the smaller size made a lot more sense.

These boxwood are up against the north side of a fence, so I'm expecting that the foliage along the bottom will eventually thin out and die back, so to help fill in below it, I got this plant.

It's a Gay Goblin Pieris. Which is a varietal name that I don't think someone would come up with these days. But I dunno, I'm not a botanist.

Anyway, this corner should fill in nicely, and in a few years the boxwood should give my motorcycles a bit more shade.

Possibly quite a few years, the boxwood is apparently pretty slow growing.

While I was out plant shopping, I also got a few more lantana to replace the ones that died from the frost, again.

There's two in the back along the sidewalk, and two in the front along the driveway, plus one right between them, the sole survivor that has made it through two winters without succumbing to the frost. These stupid lantana just have to survive one winter to get themselves established enough to keep from completely dying every year, and one of these years they're going to make it.

Until then, it's a good thing they're cheap.

Saturday, March 23, 2024

Horrorology

Back in 2010 I fell off my longboard and broke my shoulder. I also, at the same time curiously enough, broke my watch. So, I decided to treat myself to a fancy-pants Seiko Kinetic watch, which is an analog, electronic watch but with a self-charging mechanism that uses a tiny little dynamo and counterweight inside to keep a capacitor (actually a battery) constantly recharged.

This watch worked well for me for many years, until about 2019 when, even though I was wearing it every workday, I noticed that it would often go into its low-charge limp mode.

I contemplated possibly getting the battery swapped, since they don't last forever, but instead figured it was time to get an even fancier watch. So I did.

Then the world ended.

Since I was now no longer wearing a watch each and every day, I needed a way to keep it charged, as only wearing it once or twice a week wasn't going to cut it. So, off to the House of Bezos I went once again, and got this self-winding-watch-winder, because that's the kind of world we live in these days.

This solved the problem nicely for me. For a while.

But, as these things go, eventually the battery in this one started to go a bit soft. It actually hadn't been holding an amazing charge ever since I got it, and I suspect it had been sitting in the warehouse for quite some time before it reached my wrist. Apparently wrist watches aren't much of a hot commodity these days? Weird.

Anyway, with two dead watches, I decided that it was time to take matters into my own hands.

Starting with the older watch, just in case.

This will require a few tools.

Which are all surprisingly inexpensive. I didn't actually end up using all of these; some of them I bought just in case I'd need them part way through the procedure.

Anyway, step one is getting the watch itself off the band. In this case, this is done by releasing a pair of spring bars that hold the band, releasing them from the watch body itself.

These spring bars have seen some shit, but we'll come back to them later.

Anyway, now that we have the patient on the gurney, we can begin.

We need to remove the case back, and surprisingly the most effective tool for this is made by Bergeon, and is a soft, tacky rubber ball called the BOOB.

Sorry, I mean the 8008. My bad.

Unfortunately the case back on this watch got itself welded on with congealed wrist-cheese, so just the BOOB alone wasn't quite enough to get the case back off. Not because the BOOB couldn't apply enough force, but surprisingly because I couldn't hold the rest of the watch tightly enough in my hand.

Thankfully, there's a tool for that too.

And we're in.

The counterweight partially obstructs the battery, so it needs to come off. It's only held in place by the one screw in the middle, so out it comes.

And it is somehow not the tiniest screw we're going to be dealing with today.

With the counterweight off, we can get access to the battery bridge.

And remove the two tinier screws to get it out of the way.

They are smol.

The insulator comes off next. It's just captured by a few plastic posts.

And then out comes the battery.

That white sawtooth-looking thing is actually the back of the date ring. On the other side, the days of the month are printed, and get ratcheted into place at around midnight each day.

So the battery is out.

And it is smol.

And because it has some funny tabs spot-welded to it, you need to buy the exact right replacement, which varies between different movements.

For my future reference, this movement takes a 3023-24X

And in it goes.

Followed by the insulator.

And the bridge.

And the tiny, tiny screws.

And the counterweight, making sure the gear lines up with the pinion it drives, and that it sits down in the correct orientation over the stud, which has some flats on the sides.

And then the back gets BOOBed, after giving the o-ring a little silicone loving to make sure it doesn't bind up.

And then we replace those ratty old spring bars with brand new ones.

Or maybe I'm replacing the "spring bap", hard to say.

But what's slightly annoying is that I ordered 1.5mm spring bars, and what I actually needed was 1.8mm, so I guess the old ones are going back in for now. (I've got the right size on order, and they should be here tomorrow).

Ah well, it is what it is.

The important thing is I now know what time it is. And with that practice under my belt, it's time to do the swap on my other watch.

Second verse, same as the first. Except this one takes a 3023-24T. Because of course it does.

There's a saying out there, that goes a little something like this: A man who owns a watch always knows what time it is.

But a man who owns two watches is never quite sure.